Building a Flutter screen from a Figma design is a tedious squint-and-compare cycle. So are tracking down UI bugs or refactoring screens that have drifted from their designs. Read the design, write or adjust the widget, run it, eyeball the result, tweak, and repeat. Now, AI agents can now run that whole loop themselves. They read Figma’s structured design data, change the code, hot-reload, and visually verify the rendered result against the design with precision.
The Figma, Maestro, and Dart MCPs are what make it work. If you’re new to how MCP servers fit into the Flutter developer toolkit, see 7 MCP servers every Dart and Flutter developer should know.
How the loop works
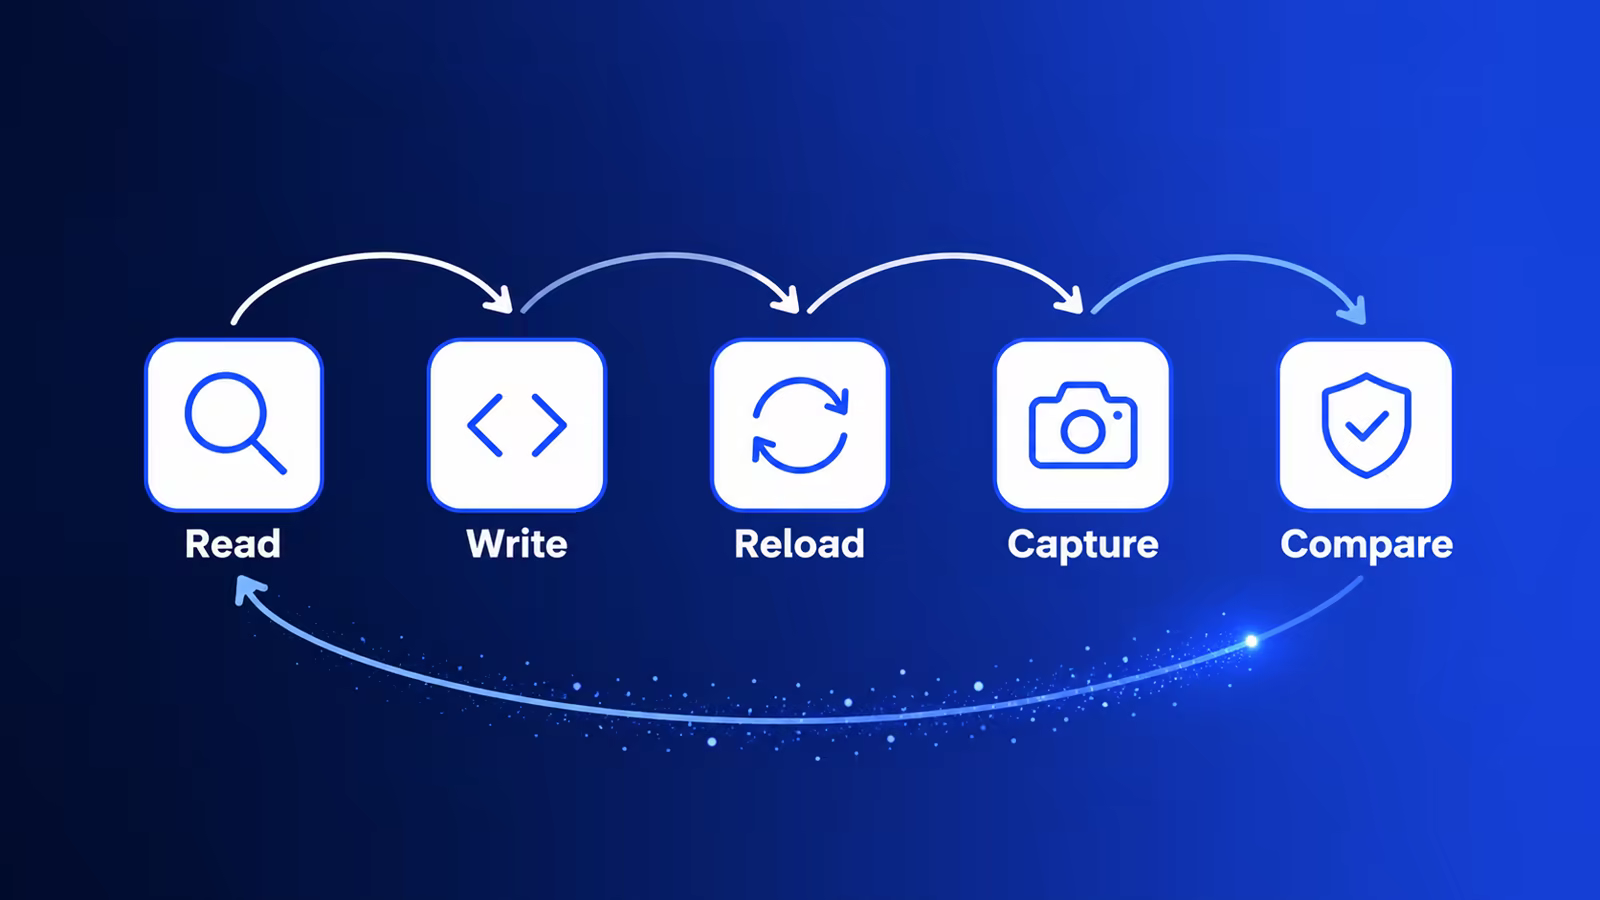
Together, these MCPs enable a five-step loop: read, write, reload, capture, and compare.
Figma
The Figma MCP enables an agent to read directly from Figma files - extracting components, variables, layout data, and other design details. See the official Figma MCP guide.
Maestro
With the Maestro MCP, agents can interact with a running device - scrolling, tapping, entering text, and even taking screenshots. See the official docs.
Heads up: The Maestro MCP currently has some rough edges on Flutter web — several core interactions don't behave reliably with a browser window. For now, run your app on an iOS or Android emulator, a physical device, or a desktop target. Track progress in the Maestro issue tracker.
Dart
Finally, the Dart MCP allows agents to interact with the Dart VM and the running Dart process. This allows agents to hot-reload after making changes, enabling a lightning-fast validation path.
Setting up the MCPs
Using the Very Good AI Flutter Plugin?
You already have all three! Skip ahead to the next section.
Figma
Install
Install the Figma Plugin for Claude Code:
claude plugin install figma@claude-plugins-officialConfigure
Authenticate with your Claude.ai account:
- Launch a
claudesession and open the/mcpmenu - Find the
figmaMCP server - If necessary, authenticate and connect to enable the server
See the official remote server installation guide.
Maestro
Install
Install the Maestro CLI:
curl -Ls "https://get.maestro.mobile.dev" | bashThe MCP server is bundled with the CLI - no separate install is needed.
Configure
Add the Maestro MCP to Claude Code:
claude mcp add maestro -- maestro mcpFor full details, see the official Maestro installation guide.
Dart
Install
The Dart MCP server ships with the Dart SDK (Dart 3.9+) - no separate installation needed.
Configure
Add the Dart MCP to Claude Code:
claude mcp add dart -- dart mcp-serverConnecting
The Dart MCP connects via the Dart Tooling Daemon (DTD).
Run your Flutter app with the --print-dtd flag so the DTD URI is printed to the console:
flutter run --print-dtdLook for a URI like: ws://127.0.0.1:<port>/<token>
Tip: You can use the bang (!) prefix to run the command directly in a Claude conversation; the output, including the DTD URI, will land in the conversation automatically:
! flutter run --print-dtd
Running the loop
For new UI, prompt your agent. Something like:
Implement the component(s) from this Figma design: [link]. Use the Figma MCP to read the design. Once you’ve written the widget(s), hot-reload the app with the Dart MCP and take a screenshot with Maestro, then verify it matches the design. Iterate until they are pixel-perfect.
For an existing screen that has drifted from its design:
The [screen/component name] no longer matches this Figma design: [link]. Use the Figma MCP to read the design and the Maestro MCP to screenshot the current state. Identify the discrepancies, fix the widget(s), hot-reload, and verify. Iterate until pixel-perfect.
From here, Claude Code runs the loop autonomously:
- Read - The Figma MCP pulls the component tree, spacing, color values, and typography directly from the Figma file. No copying and pasting design specs.
- Write - Claude generates and/or modifies your Flutter code.
- Reload - The Dart MCP triggers a hot reload, applying the changes to the running app immediately and without losing app state.
- Capture - The Maestro MCP interacts with the app to locate the elements, then captures a screenshot.
- Compare - Claude compares the screenshot against the Figma design, identifies discrepancies, and goes back to step 2.
In practice, the loop converges in two or three iterations for straightforward screens. The agent catches obvious mismatches - wrong padding, an off-brand color, a font weight that didn’t apply - whether it’s building a screen from scratch or fixing one that has slipped out of sync.
Wrapping up
The Figma, Maestro, and Dart MCPs turn what was a tedious manual process into a tight agentic loop. Figma eliminates the guesswork on the designs. Dart keeps iteration fast. And Maestro closes the loop with visual verification, letting your agent confirm its own output.
The result is less time shuttling between tools and more time on the work that actually requires your judgment.
Further reading
Check out our article on Maestro MCP test automation.