On this page
- Prerequisites: packages you’ll need
- Architecture overview
- Understanding the dart_mcp building blocks
- Step 1: Create the server — the minimum surface area
- Step 2: Register MCP tools with typed schemas
- Step 3: Implement handlers that delegate, not duplicate
- Step 4: Create the MCP command with stdio transport
- Step 5: Wire it into your command runner
- How MCP clients connect
- Making it testable
- Configuring the MCP server for AI clients
- The pattern in four lines
When we added MCP support to Very Good CLI, the first instinct was to build a parallel layer — new commands, new logic, new surface area. The better approach turned out to be the opposite: make the MCP server a thin translation layer that speaks to the CLI you already have. This post shows how we did it, and how you can apply the same pattern to any Dart CLI.
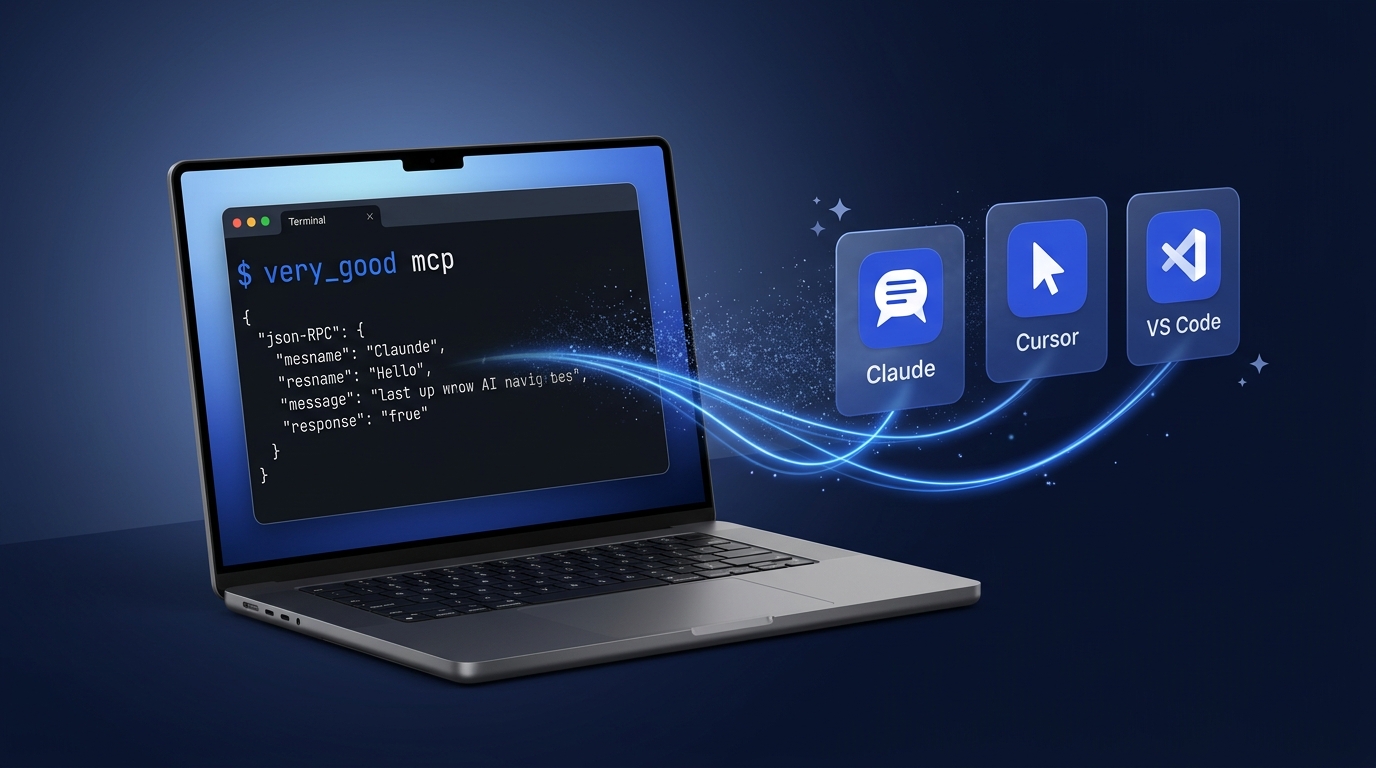
The Model Context Protocol (MCP) is an open standard that lets AI assistants interact with your external tools and data sources through a unified interface. Instead of building custom integrations for every AI tool, you define your capabilities once as an MCP server, and any MCP-compatible client — Claude Code, Cursor, Windsurf, and others — can use them. If you are exploring how MCP fits into larger agentic workflows, our Agentic AI Solutions page covers the patterns we use in production.
The practical payoff: once your CLI is MCP-compatible, AI assistants can scaffold projects, run tests, and manage packages on behalf of developers — without any additional integration work on your end. We shipped this pattern in the Very Good CLI 1.0.0 release, and you can read more about the broader ecosystem in our companion post on 7 MCP servers every Dart and Flutter developer should know.
Prerequisites: packages you’ll need
Two packages power the MCP integration:
dart_mcp— A Dart implementation of the MCP protocol that provides server and client primitives. This is the official package backed by the Dart team, which we chose over community alternatives likemcp_dartfor long-term stability and protocol version support.stream_channel— Abstraction for two-way communication, used for the stdio transport layer.
Add them to your pubspec.yaml:
dependencies:
  dart_mcp: ^0.5.0
  stream_channel: ^2.1.4
Architecture overview
The integration has three layers, each with a single responsibility:
CommandRunner ──registers──▶ MCPCommand ──creates──▶ MCPServer
                (CLI entry)    (transport)           (tools & handlers)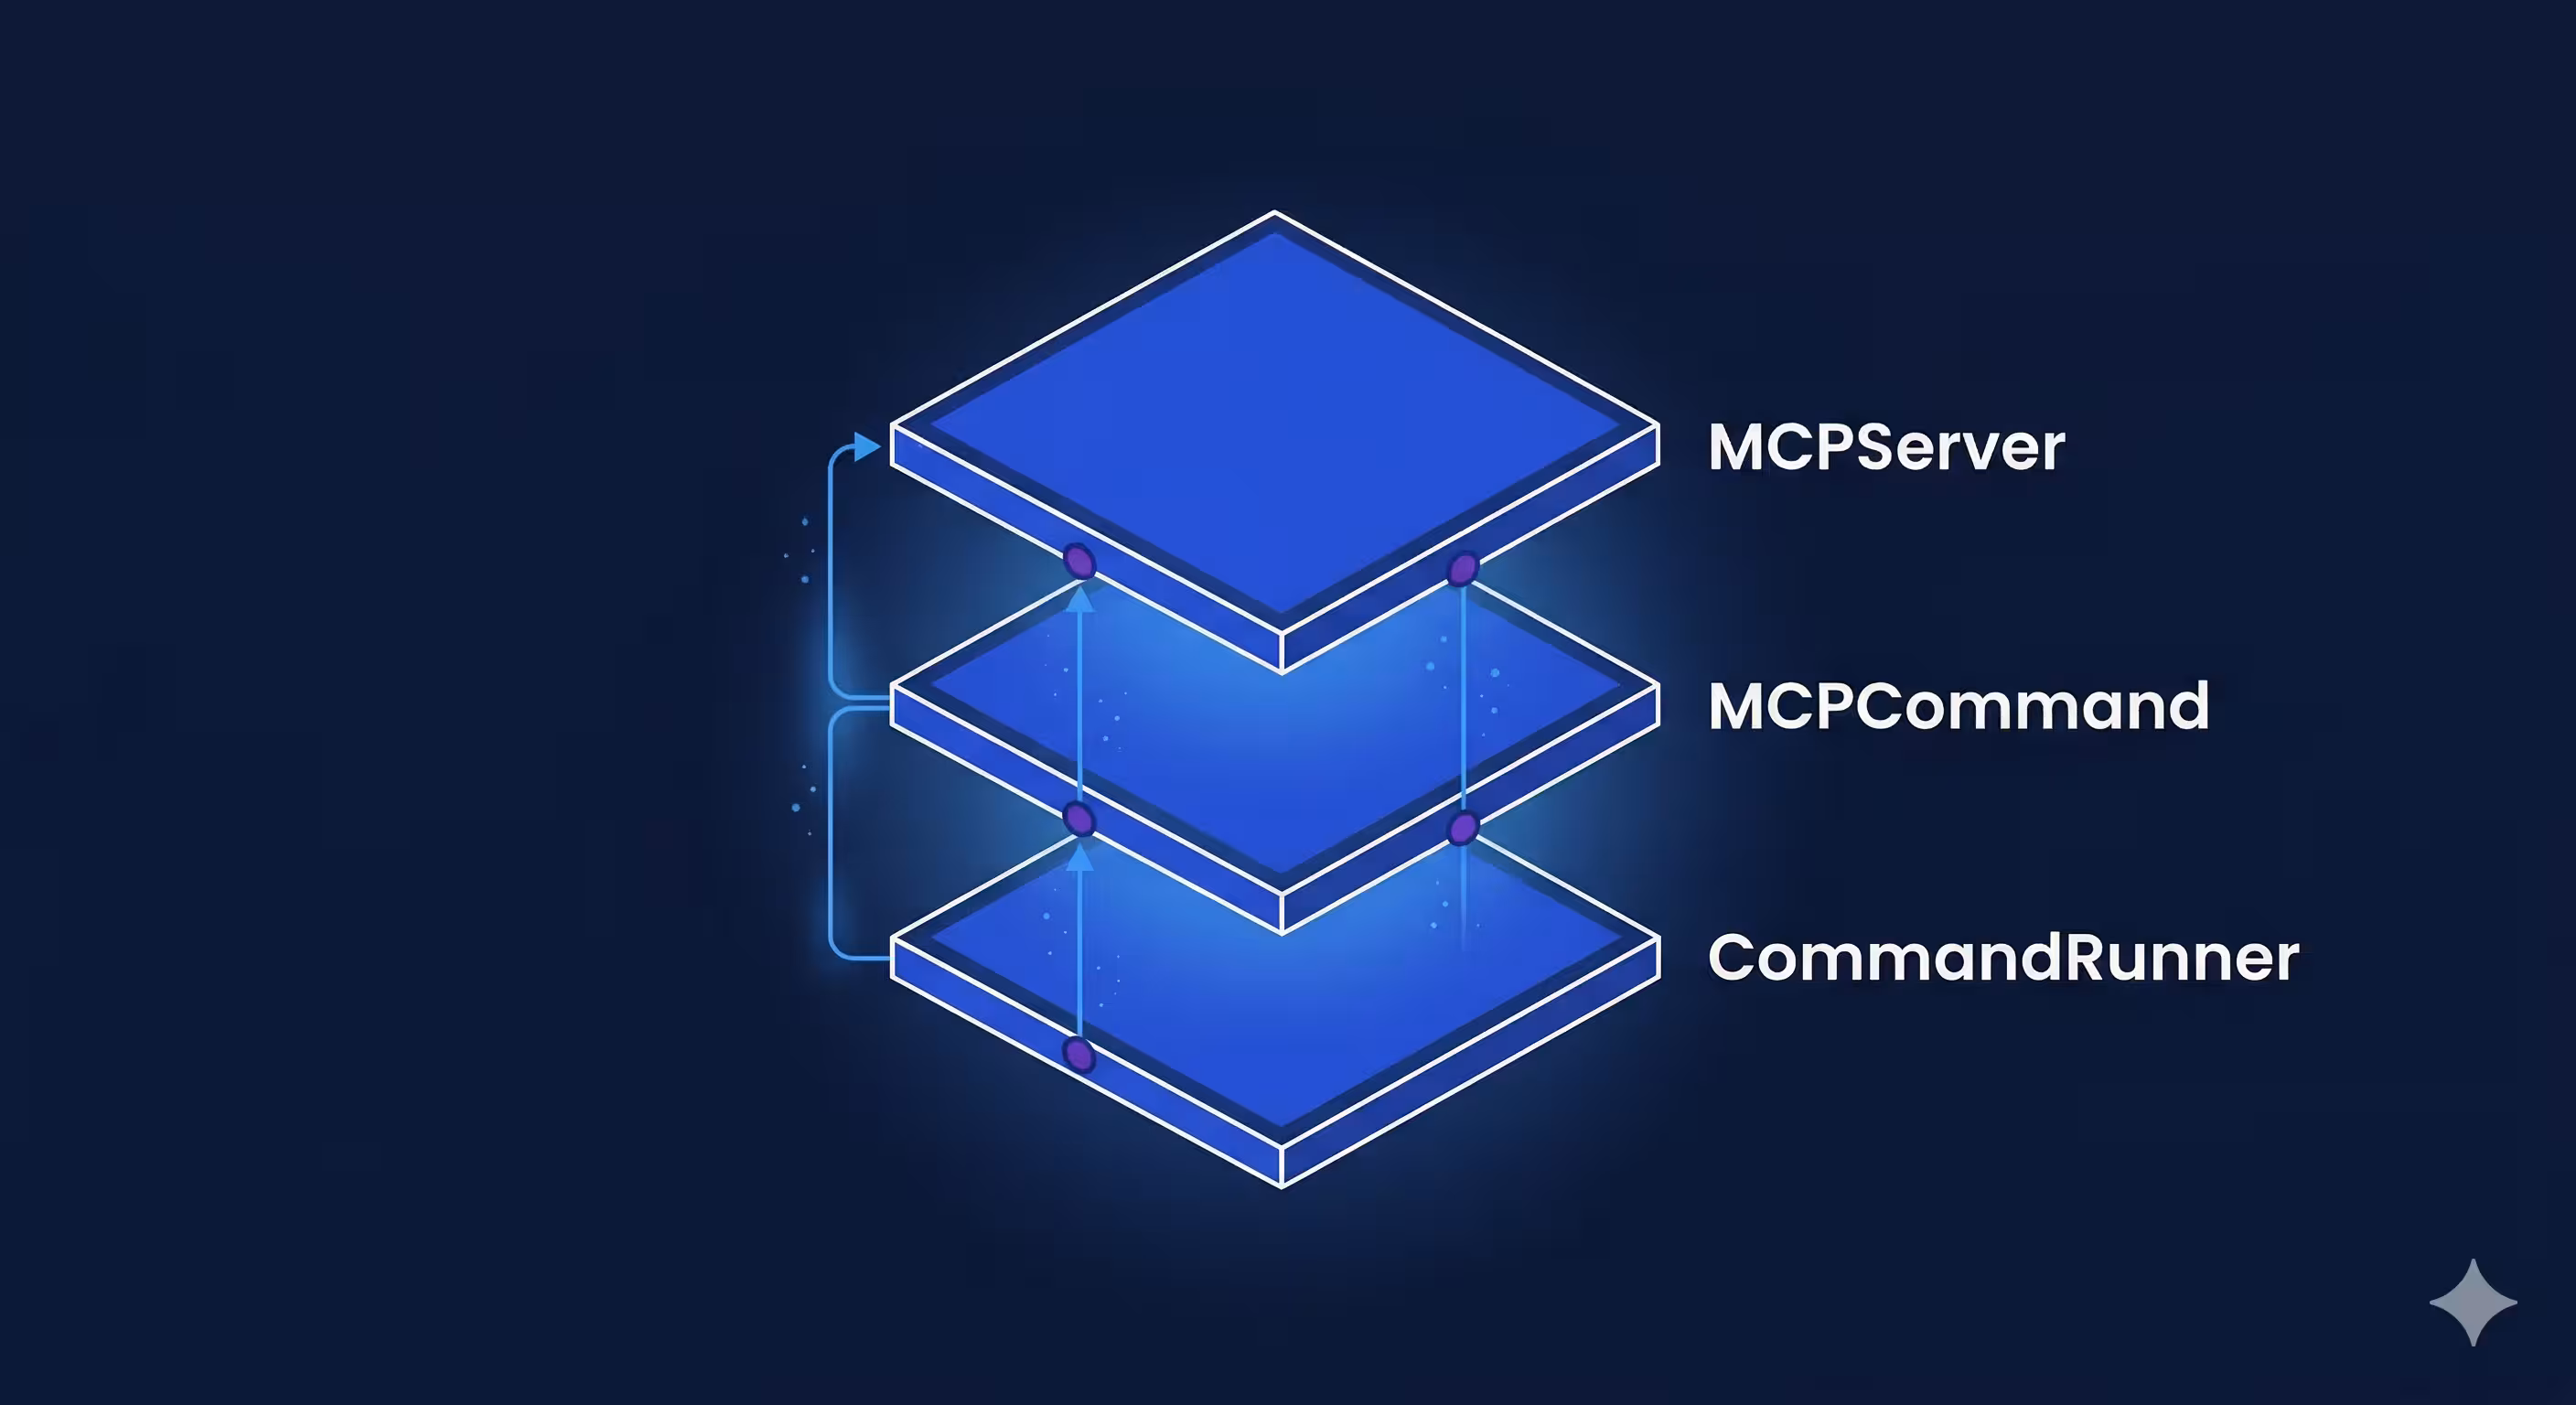
- CommandRunner — Registers the
mcpsubcommand alongside your other CLI commands. - MCPCommand — Sets up the stdio transport channel and starts the server.
- MCPServer — Defines MCP tools and maps them to your existing CLI logic.
Before we implement, let’s understand the key types that make this work.
Understanding the dart_mcp building blocks
This section covers the key types from dart_mcp that power the MCP integration. We assume you’re already familiar with CommandRunner and Command from package:args — the standard building blocks for Dart CLIs. The MCP server delegates to your existing command runner, so your CLI structure stays exactly as it is.
MCPServer
MCPServer is the base class for building MCP-compatible servers. It handles the protocol lifecycle: the initialization handshake, capability negotiation, JSON-RPC message framing over a StreamChannel, and graceful shutdown.
The key things it provides:
fromStreamChannelconstructor — Connects the server to a bidirectional communication channel (typically stdin/stdout). You pass anImplementation(your server’s name and version) and optionalinstructions(a human-readable description of what the server does).initialize(InitializeRequest)— Called when an MCP client connects. The client sends its capabilities and info; you respond with yours. This is where you set up tools, resources, or prompts.done— AFuture<void>that completes when the connection closes. Your CLI command awaits this to keep the process alive.
On its own, MCPServer doesn’t do much — mixins like ToolsSupport add the actual capabilities.
ToolsSupport mixin
ToolsSupport is a mixin from dart_mcp that adds tool capability to your server. When mixed in, it:
- Advertises to clients that your server supports tools during the initialization handshake.
- Provides the
registerToolmethod for defining tools. - Handles incoming
tools/callrequests by routing them to the correct handler. - Validates incoming arguments against your tool’s input schema automatically.
// ToolsSupport gives you this method:
void registerTool(
  Tool tool,
  FutureOr<CallToolResult> Function(CallToolRequest) handler, {
  bool validateArguments = true,  // schema validation is on by default
});
If a client sends arguments that don’t match your schema, ToolsSupport rejects the call before your handler is even invoked.
CallToolRequest and CallToolResult
These are the input and output of every tool handler.
CallToolRequest is what the MCP client sends when it wants to invoke a tool. It has two key fields:
name— Which tool to call (matched against your registered tool names).arguments— AMap<String, Object?>of the arguments the AI provided, shaped according to your tool’s input schema.
CallToolResult is what your handler returns. It tells the client what happened:
content— A list of content blocks. TypicallyTextContentwith a message, but can also includeImageContent,AudioContent, or embedded resources.isError— A boolean indicating whether the tool call failed. Whentrue, the AI assistant can read the error message and try to self-correct (e.g., fix an argument and retry). This is different from a protocol-level error, which would abort the conversation.
// Success
CallToolResult(
  content: [TextContent(text: 'Project created successfully')],
);

// Failure — the AI can read this and adjust
CallToolResult(
  content: [TextContent(text: 'Invalid template name "foo"')],
  isError: true,
);
The design is intentional: tool errors go through CallToolResult so the AI can handle them gracefully, rather than throwing exceptions that break the protocol.
How these types connect
Here’s how the pieces fit together at runtime:
CommandRunner.run(args)             MCPServer
        │                               │
        │   ┌───────────────────────────┤
        │   │  initialize()             │
        │   │  └─ registerTool(         │
        │   │       Tool('create',...)  │
        │   │       _handleCreate       │
        │   │     )                     │
        │   │                           │
        │   │  CallToolRequest ────────▶│ _handleCreate()
        │   │    .name = 'create'       │   │
        │   │    .arguments = {         │   │ translate args
        │   │      'template': '...',   │   │
        │   │      'name': '...'        │   ▼
        │◀──┼─── _runCommand(cliArgs) ──┤ _parseCreate()
        │   │                           │   → ['create', 'flutter_app', 'my_app']
        │   │                           │
  runs existing ◀───────────────────────┤
  Command.run()                         │
        │                               │
        ├── exitCode ──────────────────▶│
        │                               │
        │                   CallToolResult ──▶ AI Client
        │                     .content = [TextContent('Success')]
        │                     .isError = false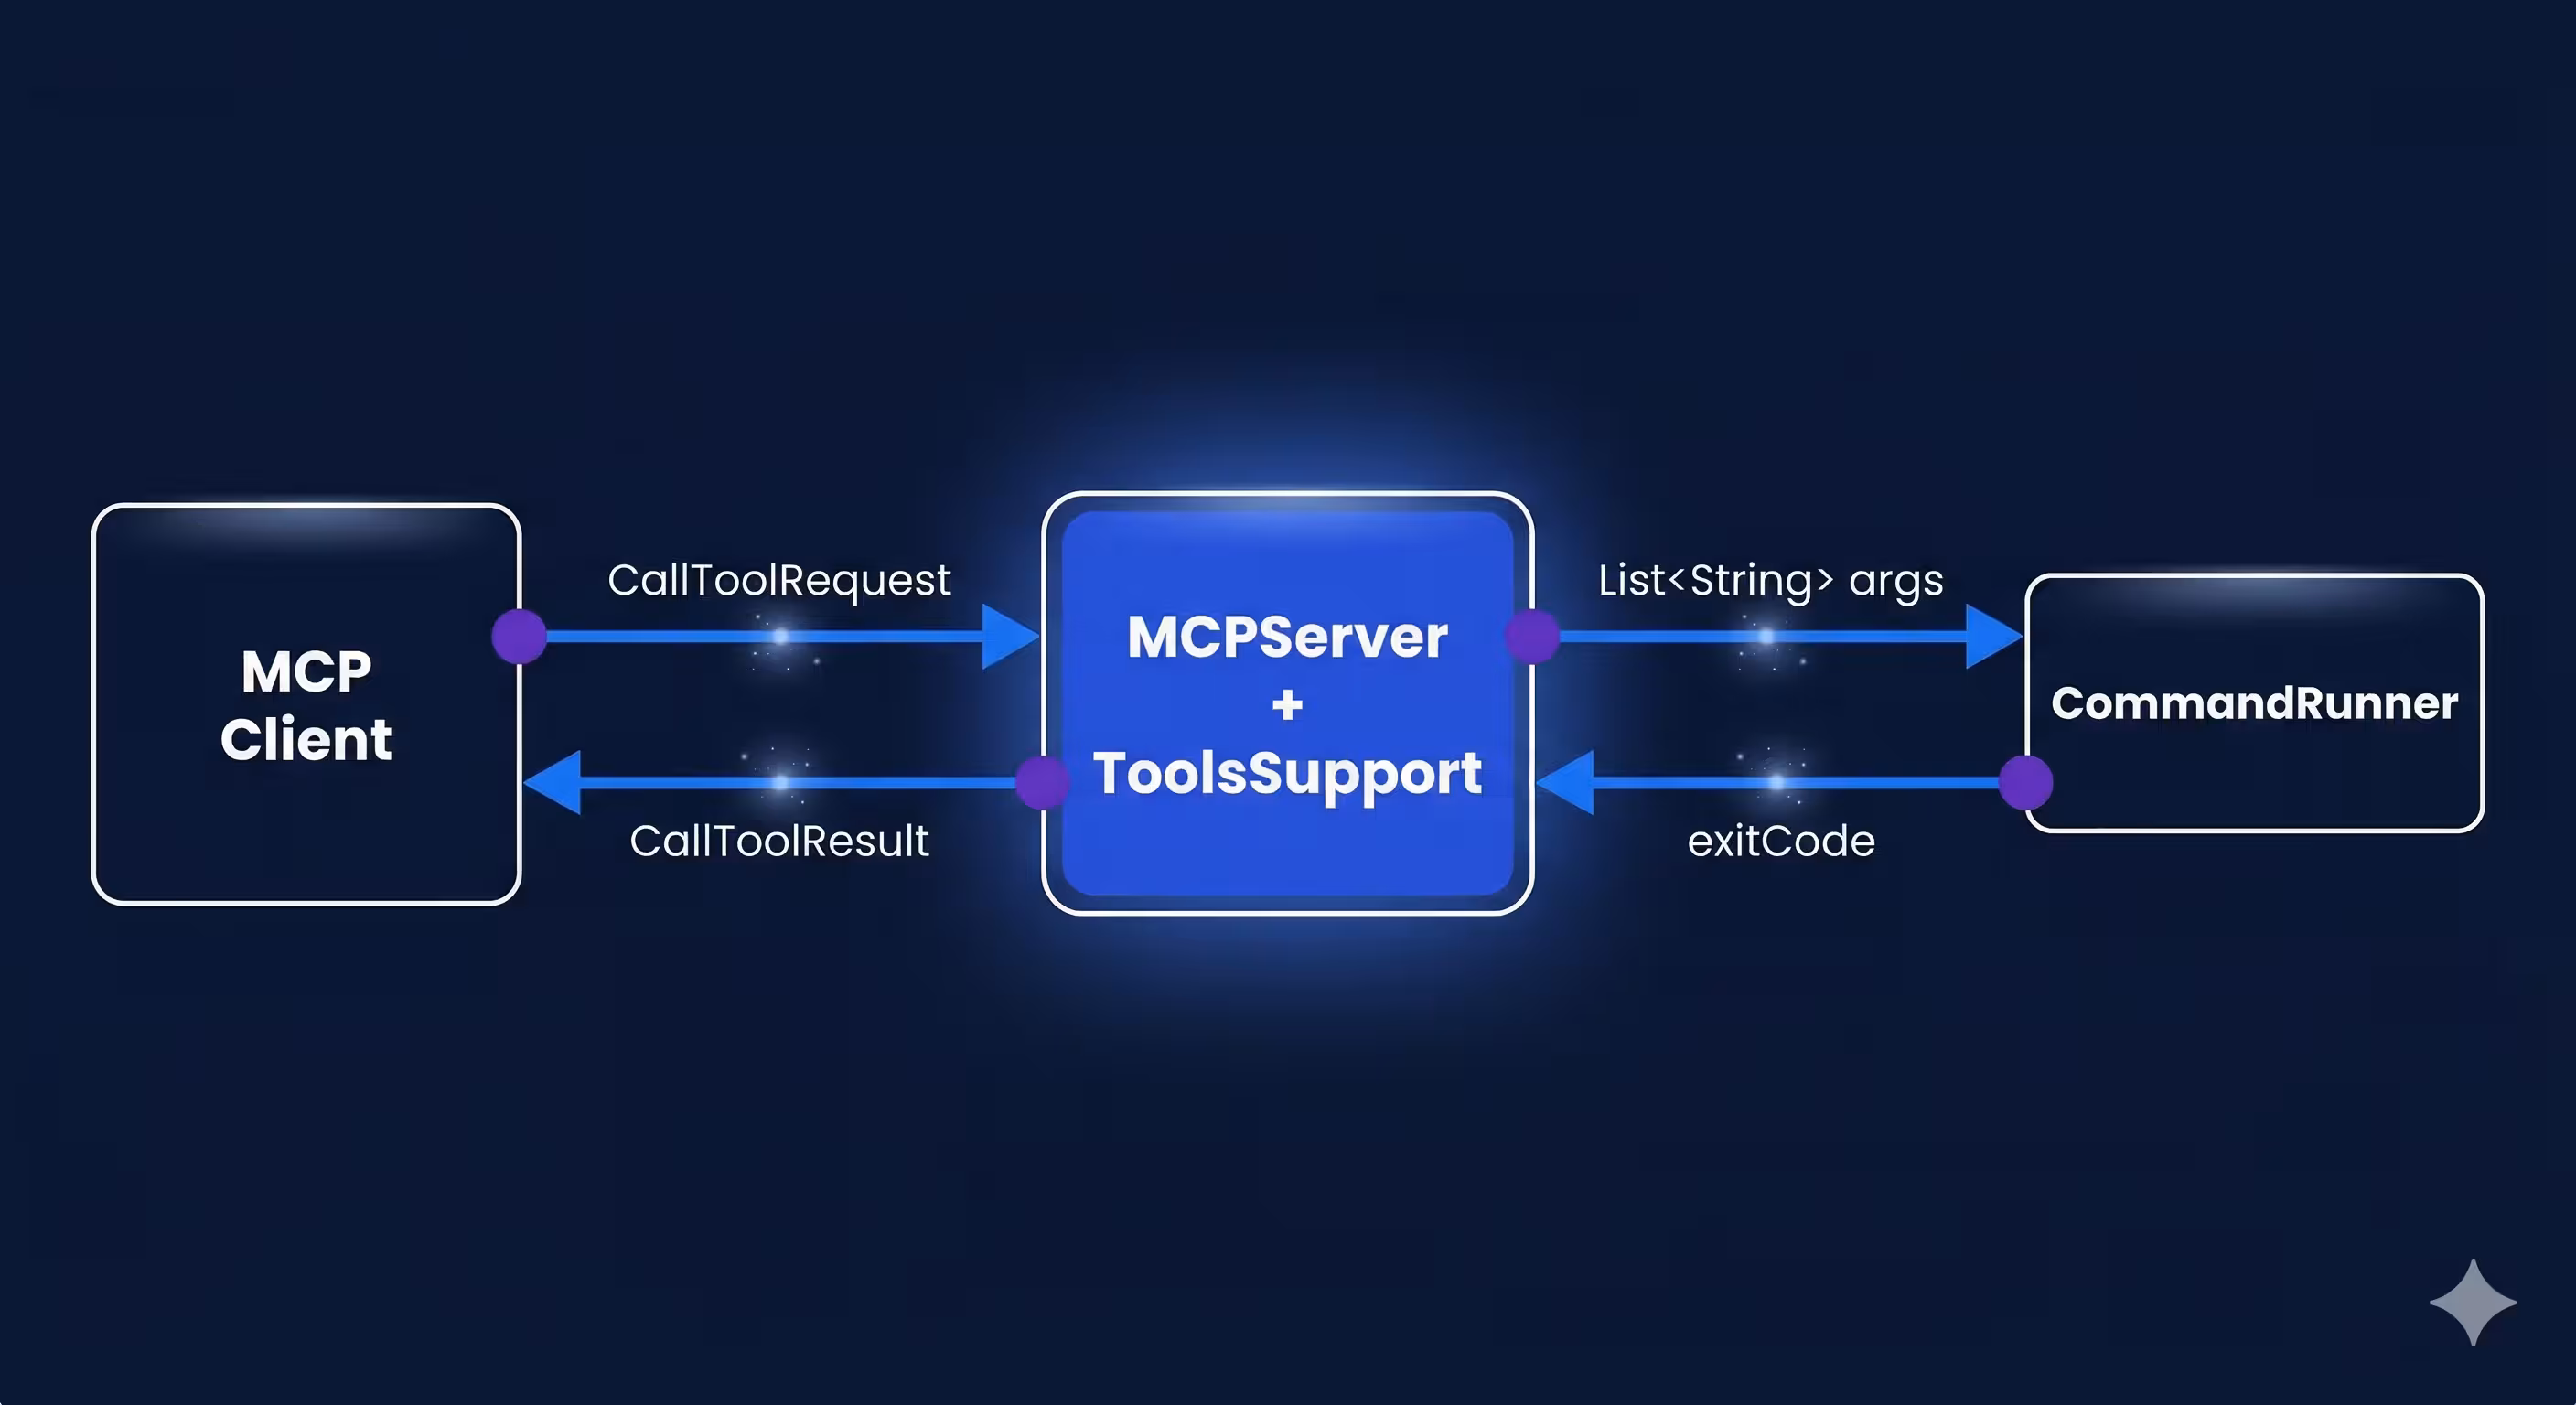
The MCP server doesn’t reimplement your CLI logic. It translates structured MCP arguments into the same List<String> your CommandRunner already knows how to parse, calls commandRunner.run(args), and wraps the exit code in a CallToolResult.
Now let’s build each layer.
Step 1: Create the server — the minimum surface area
The server is where you define what tools AI assistants can use. Extend MCPServer and mix in ToolsSupport from dart_mcp:
import 'dart:async';

import 'package:args/command_runner.dart';
import 'package:dart_mcp/server.dart';
import 'package:stream_channel/stream_channel.dart';

final class MyMCPServer extends MCPServer with ToolsSupport {
  MyMCPServer({
    required StreamChannel<String> channel,
    required MyCommandRunner commandRunner,
  }) : _commandRunner = commandRunner,
       super.fromStreamChannel(
         channel,
         implementation: Implementation(
           name: 'my_cli',
           version: '1.0.0',
         ),
         instructions:
             'An MCP server that provides tools for my CLI.',
       );

  final MyCommandRunner _commandRunner;

  @override
  FutureOr<InitializeResult> initialize(InitializeRequest request) async {
    final result = await super.initialize(request);
    _registerTools();
    return result;
  }
}
Key points
- We extend
MCPServerand mix inToolsSupport— this is the minimum needed for a tool-serving MCP server. - The
Implementationpassed tosuper.fromStreamChannelidentifies your server to clients. Theinstructionsstring gives AI assistants context about what your server can do. - Tools are registered inside
initialize, not in the constructor. Theinitializemethod is called during the MCP handshake — registering tools here ensures the client receives them as part of the capability negotiation. - The
_commandRunnerfield is the bridge to your existing CLI. Every tool handler will ultimately call_commandRunner.run(args)to execute the real logic.
Step 2: Register MCP tools with typed schemas
Each tool needs a name, description, an input schema, and a handler function. The schema tells AI assistants what arguments the tool accepts, which is key for generating correct tool calls.
void _registerTools() {
  registerTool(
    Tool(
      name: 'create',
      description: 'Create a new project from a template.',
      inputSchema: ObjectSchema(
        properties: {
          'template': UntitledSingleSelectEnumSchema(
            description: 'The project template to use.',
            values: ['flutter_app', 'dart_package', 'dart_cli'],
          ),
          'name': StringSchema(description: 'Project name'),
          'output_directory': StringSchema(
            description: 'Where to create the project.',
          ),
        },
        required: ['template', 'name'],
      ),
    ),
    _handleCreate,
  );
}
dart_mcp provides typed schema classes that map to JSON Schema:
| Schema class | Maps to |
|---|---|
StringSchema | { "type": "string" } |
BooleanSchema | { "type": "boolean" } |
ObjectSchema | { "type": "object", "properties": {...} } |
UntitledSingleSelectEnumSchema | { "enum": [...] } |
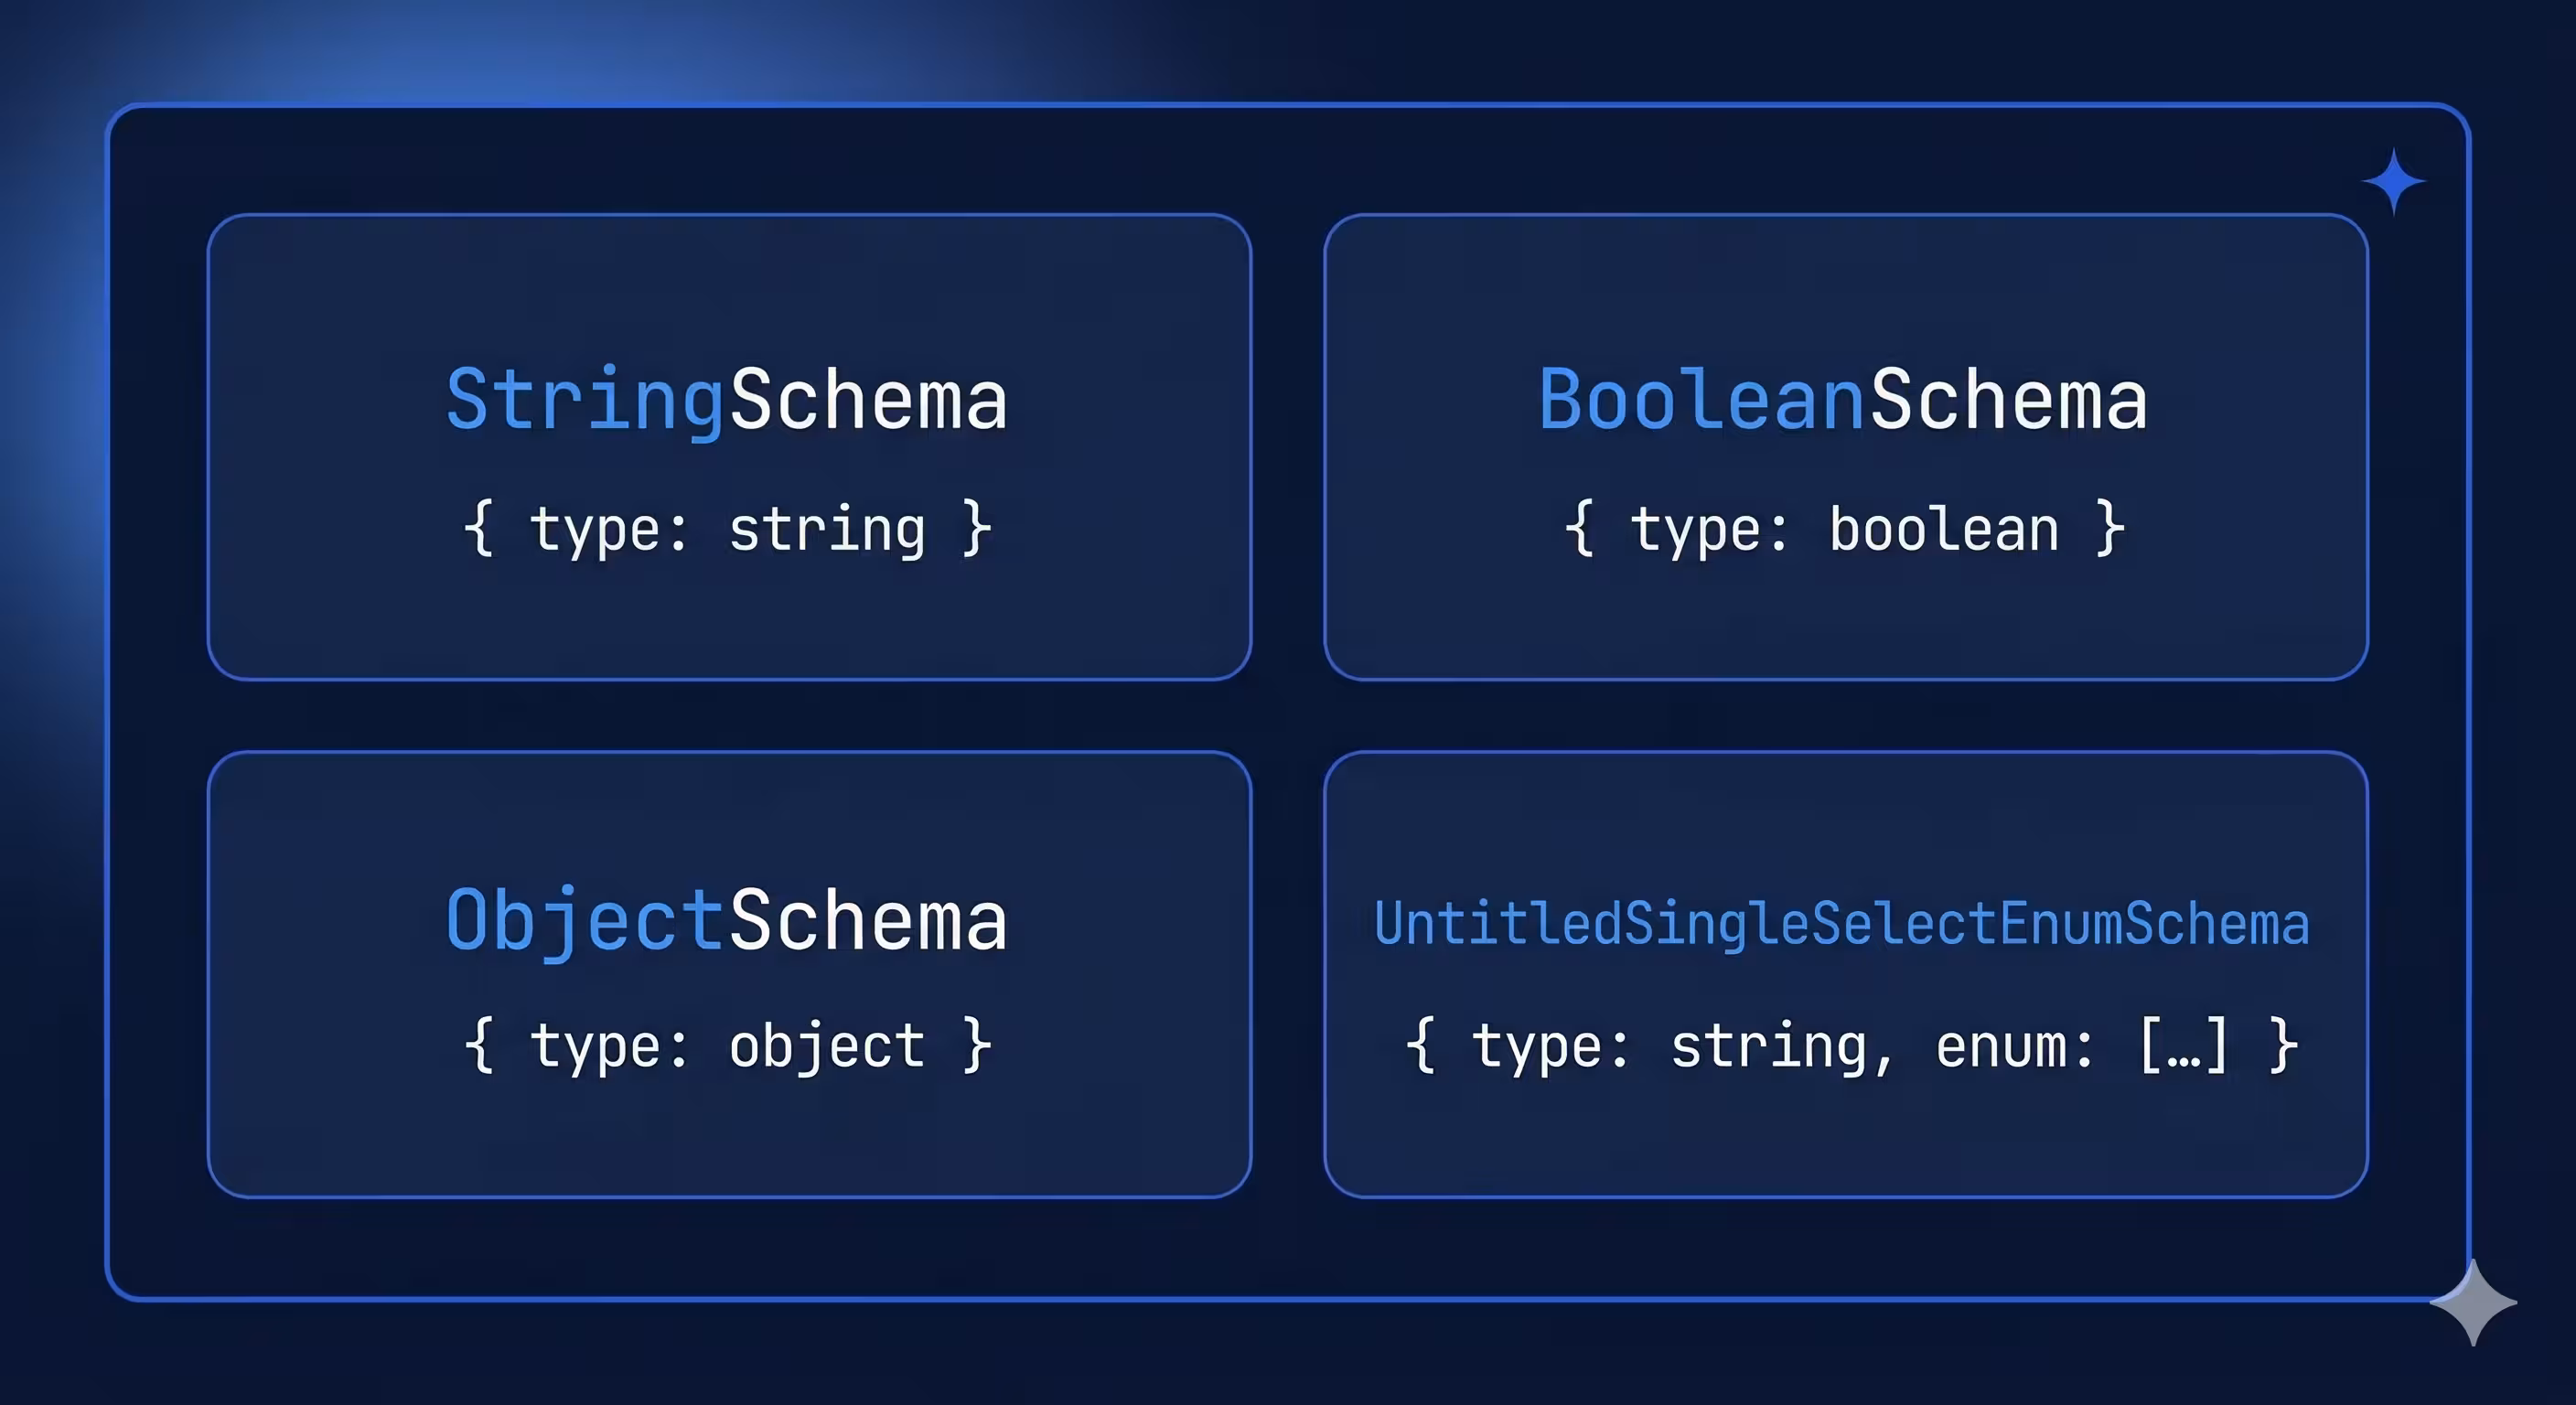
The required list in ObjectSchema tells the AI which arguments are mandatory.
Step 3: Implement handlers that delegate, not duplicate
Each handler receives a CallToolRequest and returns a CallToolResult. The pattern we use is to translate MCP arguments into CLI arguments and delegate to the existing command runner:
Future<CallToolResult> _handleCreate(CallToolRequest request) async {
  final args = request.arguments ?? {};
  final cliArgs = _parseCreate(args);
  final exitCode = await _runCommand(cliArgs);

  return CallToolResult(
    content: [
      TextContent(
        text: exitCode == ExitCode.success.code
            ? 'Project created successfully'
            : 'Failed to create project',
      ),
    ],
    isError: exitCode != ExitCode.success.code,
  );
}

List<String> _parseCreate(Map<String, Object?> args) {
  final template = args['template']! as String;
  final name = args['name']! as String;
  final cliArgs = <String>['create', template, name];

  if (args['output_directory'] != null) {
    cliArgs.addAll(['-o', args['output_directory']! as String]);
  }

  return cliArgs;
}

Future<int> _runCommand(List<String> args) async {
  try {
    return await _commandRunner.run(args);
  } on UsageException catch (_) {
    return ExitCode.usage.code;
  } on Exception catch (_) {
    return ExitCode.software.code;
  }
}
Notice the separation of concerns:
_parseCreatetranslates theMap<String, Object?>fromCallToolRequest.argumentsinto theList<String>thatCommandRunner.runexpects._runCommanddelegates to the command runner and catches exceptions._handleCreatewraps the result in aCallToolResultwith a descriptive message.
This means your MCP tools get all the validation, default values, and business logic from your existing commands for free. You’re not rewriting anything — just translating the input format. And because errors are returned via isError: true (not thrown), the AI assistant can read the error message and self-correct.
Step 4: Create the MCP command with stdio transport
The command is responsible for setting up the stdio transport and starting the server. Users will run it with my_cli mcp.
import 'dart:io';

import 'package:args/command_runner.dart';
import 'package:dart_mcp/stdio.dart';
import 'package:stream_channel/stream_channel.dart';

class MCPCommand extends Command<int> {
  MCPCommand({
    required this.serverFactory,
  });

  @override
  String get name => 'mcp';

  @override
  String get description => 'Start the MCP server.';

  final MCPServer Function({
    required StreamChannel<String> channel,
  }) serverFactory;

  @override
  Future<int> run() async {
    // Create a channel from stdin/stdout
    final channel = stdioChannel(input: stdin, output: stdout);

    // Create and start the MCP server
    final server = serverFactory(channel: channel);

    // Block until the connection is closed
    await server.done;

    return ExitCode.success.code;
  }
}
Key points
stdioChannelfromdart_mcp/stdio.dartcreates aStreamChannel<String>that reads fromstdinand writes tostdout. This is the standard transport layer for MCP CLI servers.server.doneis a future that completes when the client disconnects. The command blocks on it so the process stays alive.- Constructor injection of the server factory makes this testable — you can pass a mock server in tests.
Step 5: Wire it into your command runner
The final step is registering the mcp command in your command runner so it’s available as a subcommand:
class MyCommandRunner extends CommandRunner<int> {
  MyCommandRunner() : super('my_cli', 'My CLI tool') {
    addCommand(CreateCommand());
    addCommand(TestCommand());
    // Add the MCP command
    addCommand(MCPCommand(serverFactory: MyMCPServer.new));
  }
}
That’s it. Users and AI clients can now start your MCP server with:
my_cli mcpHow MCP clients connect
When an AI assistant wants to use your tools, the flow looks like this:

The client discovers your tools through the initialization handshake and can then call them by name with structured arguments. From the AI assistant’s perspective, your CLI commands become first-class tools — no plugins, no wrappers, no special knowledge required beyond the schema you defined.
Making it testable
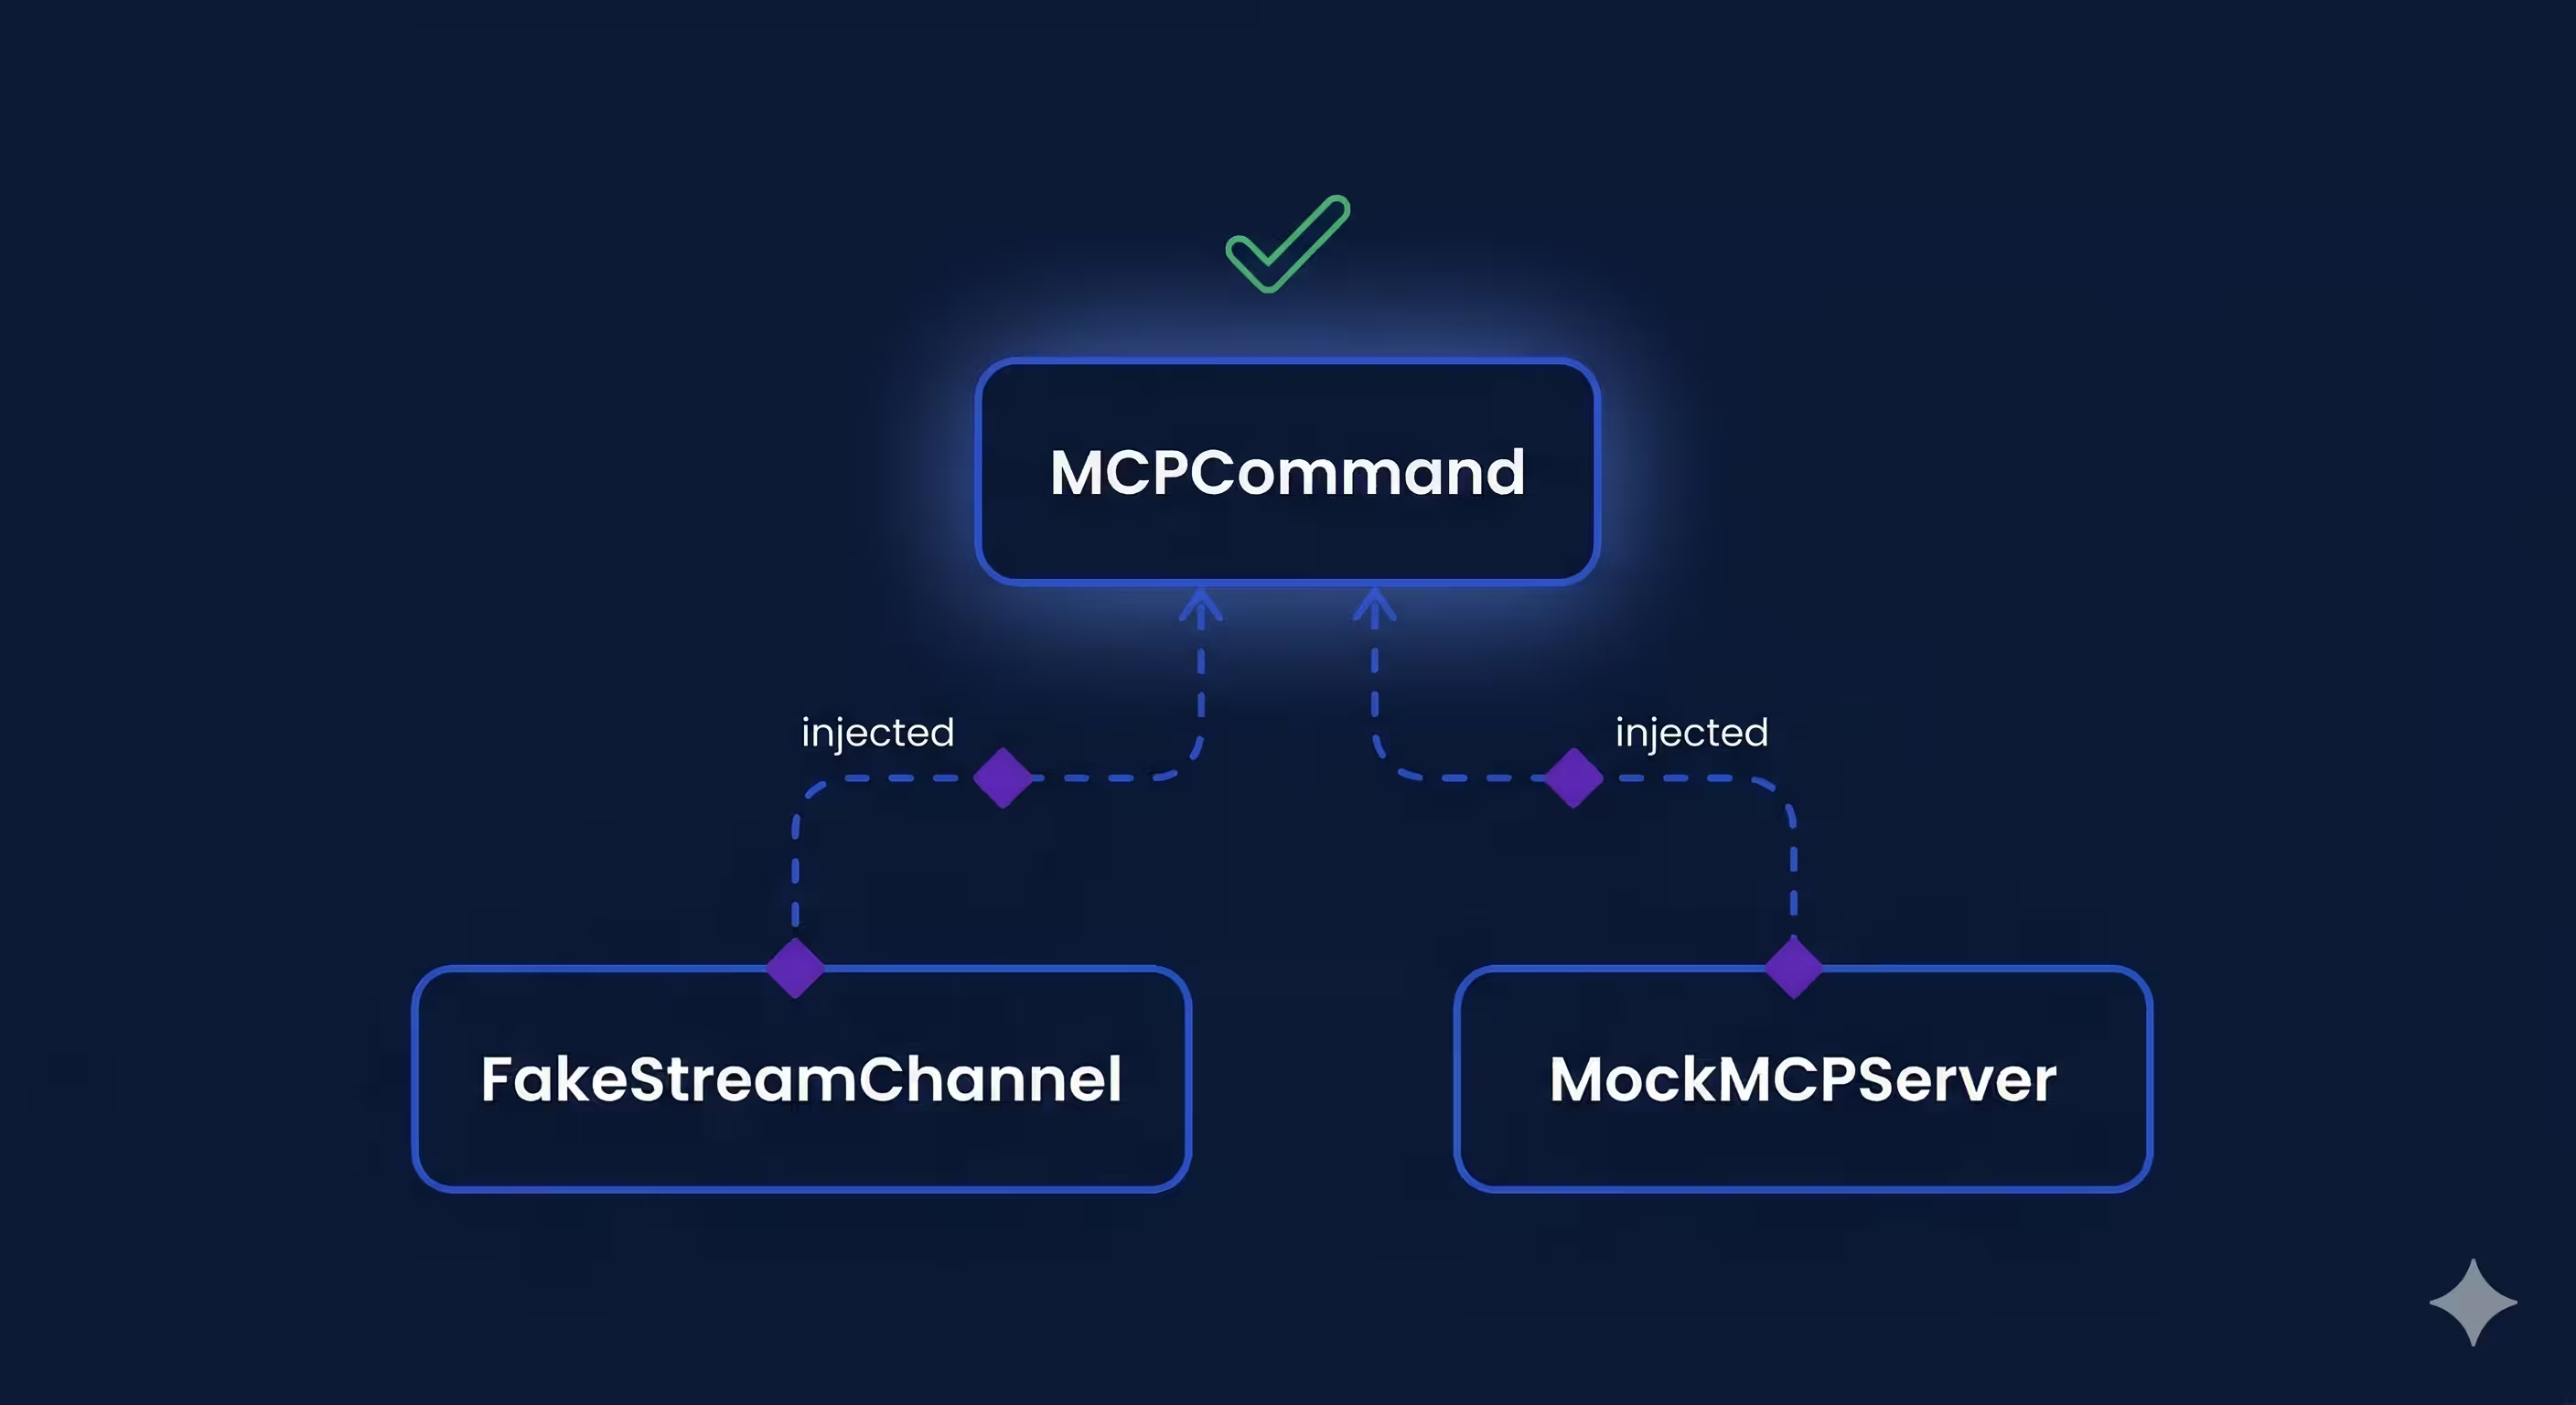
This architecture is testable because every layer accepts its dependencies as constructor parameters:
- MCPServer accepts a
StreamChannelandCommandRunner— in tests, pass an in-memory channel and a mock runner. - MCPCommand accepts a factory function for the server — in tests, inject a fake.
// Example: testing the MCP command
test('runs the MCP server', () async {
  final mockServer = MockMCPServer();
  when(() => mockServer.done).thenAnswer((_) async {});

  final command = MCPCommand(
    serverFactory: ({required channel}) => mockServer,
  );

  final exitCode = await command.run();
  expect(exitCode, ExitCode.success.code);
});
This means your MCP integration can have the same test coverage discipline as the rest of your CLI without requiring a live AI client.
Configuring the MCP server for AI clients
To make your MCP server discoverable by Claude Code, add a configuration entry that tells it how to launch your CLI. Create a .mcp.json file in your project root:
{
  "mcpServers": {
    "my_cli": {
      "command": "my_cli",
      "args": ["mcp"]
    }
  }
}
Once configured, Claude Code will automatically spawn your CLI process, complete the MCP handshake, and start calling tools as needed.
Other MCP-compatible clients like Cursor and Gemini CLI follow a very similar setup. Because the MCP standard defines the configuration format, building once gives you compatibility with the full ecosystem — not just one client.
The pattern in four lines
Adding MCP to an existing Dart CLI requires four things:
- Create an
MCPServersubclass that mixes inToolsSupportand registers tools duringinitialize. - Define tools with descriptive names, clear descriptions, and typed input schemas so AI assistants know how to call them.
- Delegate to your existing command runner from tool handlers — don’t rewrite business logic.
- Add an
mcpcommand that sets up the stdio transport and blocks until the connection closes.
The pattern keeps the MCP layer thin. Your CLI commands remain the source of truth, and the MCP server is just a new interface to them.
The goal isn’t to build an AI interface — it’s to build a good CLI. The MCP server is just evidence that you did.