On this page
- The Core Idea: The LLM Is a UI Generator, Not a Chatbox
- Step 1: Gate the AI Behind a Human Onboarding Flow
- Step 2: Design a Closed Widget Catalog for Generative UI
- Step 3: Build the Prompt as a Rulebook, Not Instructions
- Step 4: Architect the State Machine with flutter_bloc
- Step 5: Handle LLM Latency with Deferred Navigation
- Step 6: Animate Between Pages Like a Wizard, Not a Router
- Step 7: Make Widgets Reactive to User Input
- Step 8: Handle the Final Step with Drama
- Step 9: Build an Error Recovery Path
- What This Architecture Gets You
- The Tech Stack
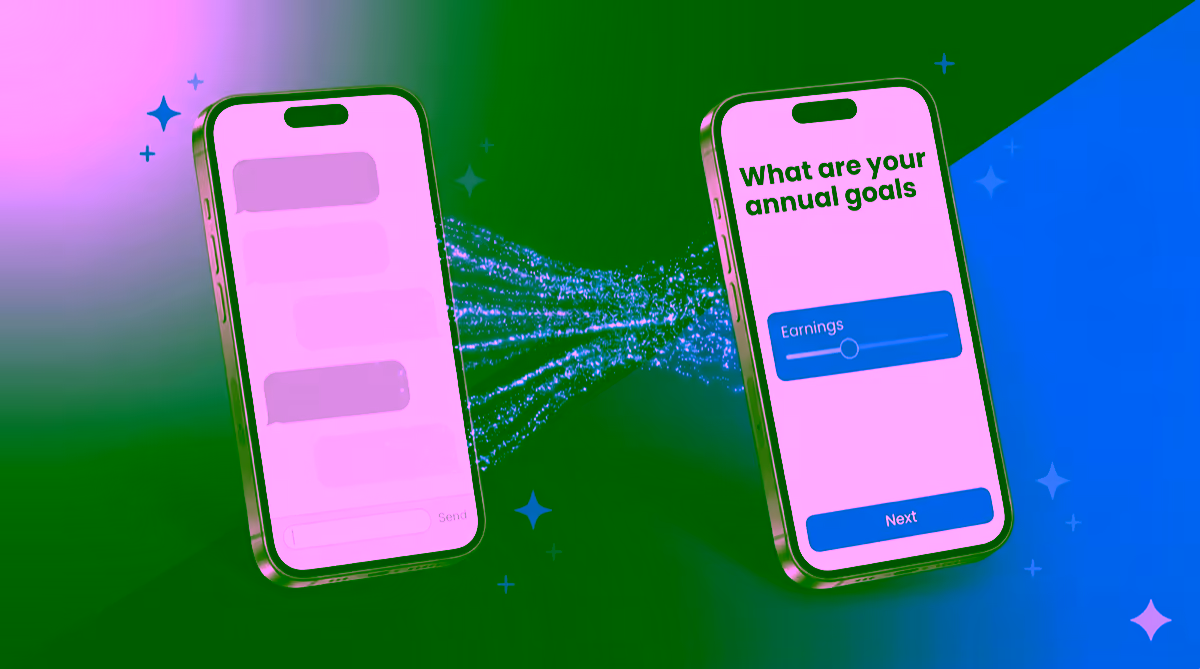
Most AI-powered apps follow the same pattern: a text input at the bottom, a scrolling list of messages above, and a send button. It works. But it doesn’t guide. For a fintech financial planning demo like GCN, where a confused user staring at a blinking cursor is the worst possible outcome, we needed something different. We needed a wizard. Here’s the architectural breakdown of how we built GCN’s AI-driven financial planning simulator with GenUI SDK for Flutter, where the LLM doesn’t respond to the user — it builds the screen for them.

The Core Idea: The LLM Is a UI Generator, Not a Chatbox
The mental model shift that unlocked everything: stop asking the AI what to say, and start asking it what screen to show.
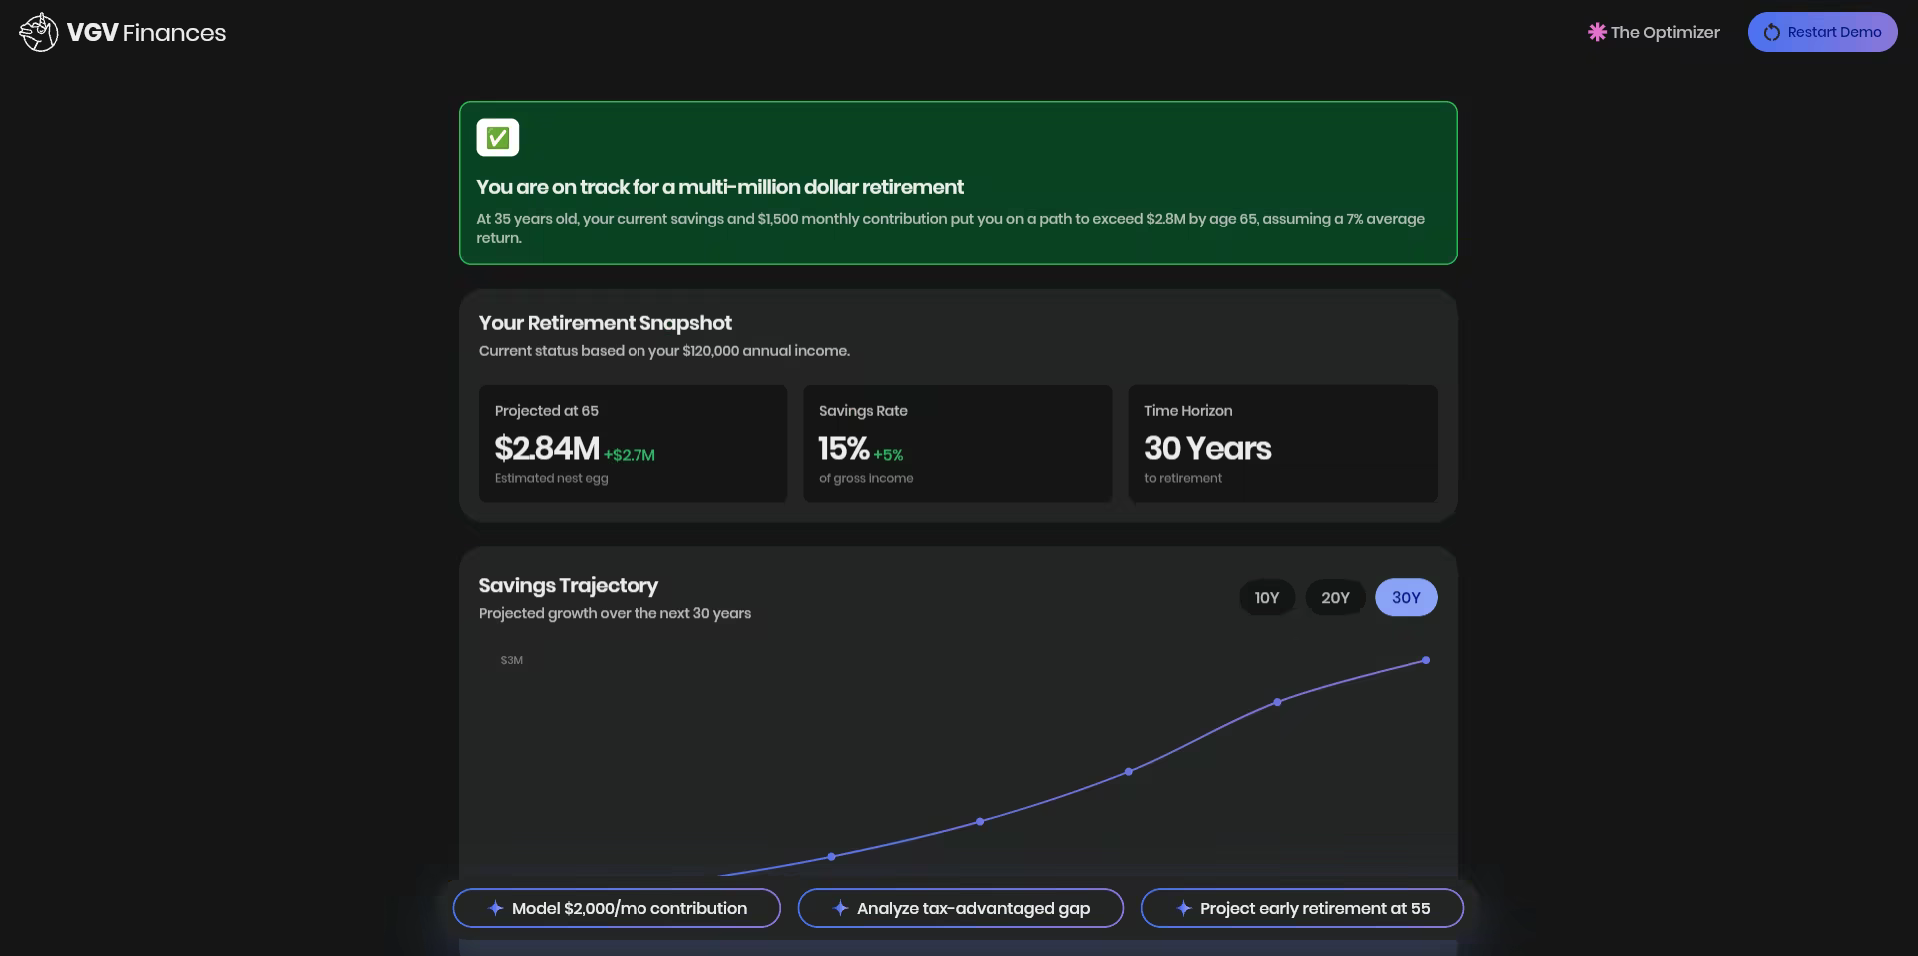
In GCN, every AI response is a complete UI surface — a JSON-defined screen with sliders, selection cards, charts, and buttons. The LLM never returns raw text. It returns structured widget trees that Flutter renders as full-screen experiences. This is generative UI in practice: an AI-generated user interface, rendered natively at runtime.
The user never sees a chat thread. They see a sequence of polished screens. They swipe forward. They answer. The AI generates the next screen. It’s a wizard, powered by a language model.
Step 1: Gate the AI Behind a Human Onboarding Flow
Before the user ever touches AI, we collect two critical data points through a hand-crafted wizard. The flow is: IntroPage → PickProfilePage → WantToFocusPage → SimulatorPage.
PickProfilePage asks one question: Beginner or Optimizer? It uses PickProfileCubit and renders ProfileCard widgets, with the Next button disabled until a selection is made. No skipping.
WantToFocusPage presents focus areas (Retirement, Mortgage, Healthcare, and Spending) as tappable widgets with multi-selection. There’s even a free-text custom option.
This matters architecturally because by the time we call the LLM, we already know who the user is and what they care about. That data shapes the first user prompt, so the user doesn’t have to type an initial message to start the conversation. The AI doesn’t have to ask cold-open questions — it already has context.
Step 2: Design a Closed Widget Catalog for Generative UI
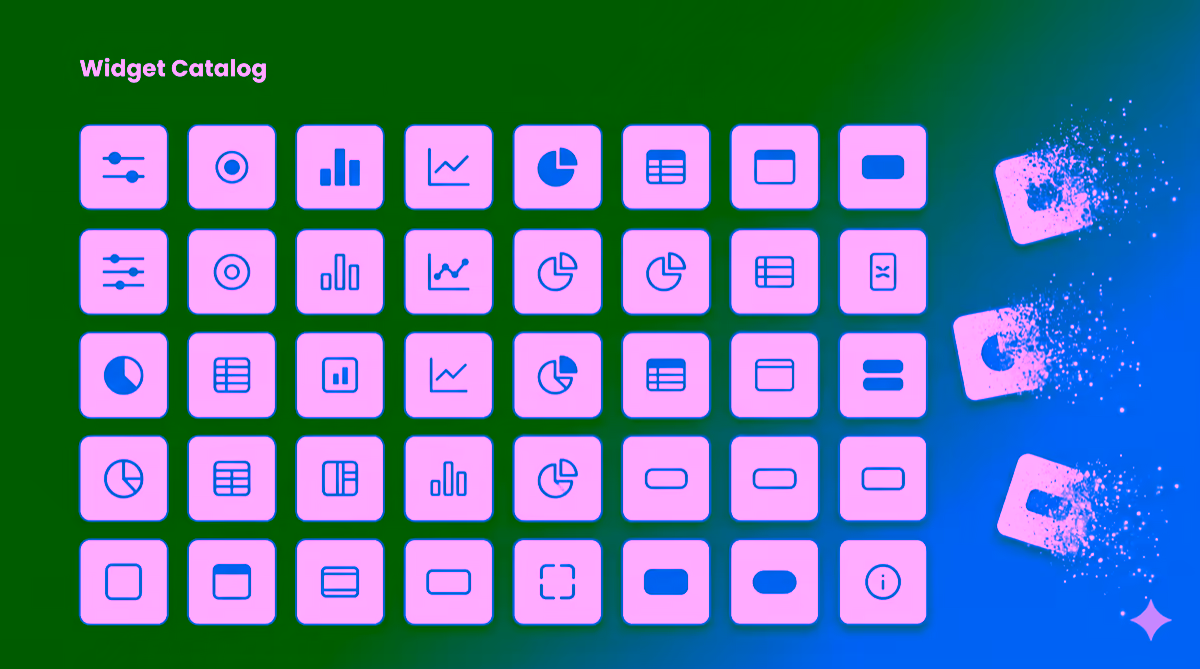
The biggest mistake teams make with generative UI is letting the AI do anything. Unconstrained generation creates inconsistent, unpredictable UIs. The answer is a closed catalog — a server-driven UI (SDUI) constraint applied to LLM output. For a hands-on parallel example, see our Flutter GenUI tutorial: build an AI shopping assistant.
We defined exactly 28 widget types the LLM is allowed to use, grouped by role:
- Container Components (root layout)
- QuestionContainer: for focused questions
- SummaryContainer: for the final summary
- SectionCard: groups related content
- Interactive Inputs (write to a data model, don’t dispatch events)
- GCNSlider
- RadioCard
- EmojiCard
- FilterBar
- Action Widgets (read-only, can bind to data model paths)
- SectionHeader, MetricCard, and InsightCard
- Charts: LineChart, BarChart, PieChart, SparklineCard, and ProgressBar
- Tables: RankedTable, ComparisonTable, and TransactionList
- NextStepsBar (sticky footer on the summary screen)
The catalog is registered with a unique ID, and the LLM must reference it. Unknown widget types are rejected. For readers curious about hardening this generative UI framework further, our post on Genkit for Flutter: flows, middleware, and tools in a GenUI shopping assistant covers layering middleware and structured output on top of a GenUI catalog.
Step 3: Build the Prompt as a Rulebook, Not Instructions
The system prompt in lib/simulator/prompt/prompt.dart isn’t a description of the app — it’s a strict contract the LLM must follow. This rulebook framing reflects the same “Structured Creativity” approach we described in Generative UI for adaptive Flutter experiences.
- Each step MUST create a NEW surface with a unique surfaceId
- Root component MUST be QuestionContainer or SummaryContainer
- ALL text MUST be inside surface JSON — no markdown, no prose outside blocks
- Output format: ONLY JSON blocks, nothing between them
The contract depends on the Catalog, DataModel, and SurfaceController abstractions described in the GenUI SDK components and concepts documentation. If you want to reproduce the setup, the GenUI SDK for Flutter (get started) guide is the fastest path.
The first user message is constructed programmatically from the onboarding selections:
"Hi! I'm new to financial planning.
I want to focus on:
  - everyday spending
  - saving for retirement
Guide me step by step..."
The LLM receives this and generates Surface 1 — a welcome screen with goal confirmation. From there, every “Next” button tap sends the user’s data back to the LLM, which generates Surface N+1.
Step 4: Architect the State Machine with flutter_bloc
The simulator’s state lives in SimulatorBloc, and it’s a proper state machine, not a simple isLoading toggle. We lean on the flutter_bloc package for the same reasons we describe in why we use flutter_bloc for state management: sealed-class states and a clean event/state contract.
Here’s the core state shape:
class SimulatorState {
  List<List<DisplayMessage>> pages; // Each page = one full-screen step
  int currentPageIndex;             // Currently visible
  int? pendingPageIndex;            // Deferred navigation (LLM still generating)
  bool isLoading;
  bool showLoadingOverlay;
  SimulatorStatus status;
  SurfaceHost? host;
}
Each page contains a list of DisplayMessage items, which are a sealed class:
sealed class DisplayMessage
  UserDisplayMessage(text)          // What the user submitted
  AiTextDisplayMessage(text)        // Rare transitional text
  AiSurfaceDisplayMessage(surfaceId) // The actual rendered surface
In practice, nearly every page is a single AiSurfaceDisplayMessage. The list structure supports edge cases (text before a surface generates, multi-surface pages).
The bloc responds to 8 event types: Started, MessageSent, SurfaceReceived, ContentReceived, Loading, LoadingOverlayRequested, ErrorOccurred, and Retried.
Step 5: Handle LLM Latency with Deferred Navigation
This is the subtlest and most important pattern in the whole app.
When the user taps “Next”, we send their data to the LLM. The LLM takes 1–3 seconds to generate the next surface. What should the user see? The naive answer is to show a loading spinner and blank the current screen. That breaks the wizard feel.
Instead, we show the current screen exactly as-is, with a “thinking” animation overlaid. When the surface arrives, we animate to the new page.
// In SimulatorBloc._onSurfaceReceived()
if (state.isLoading) {
  // LLM still streaming — defer navigation
  emit(state.copyWith(pendingPageIndex: newPageIndex));
} else {
  // LLM done — navigate now
  emit(state.copyWith(currentPageIndex: newPageIndex));
}
The view watches for pendingPageIndex becoming non-null (loading complete) and triggers the page transition. The user always has something to look at.
Step 6: Animate Between Pages Like a Wizard, Not a Router
Flutter’s standard Navigation.push uses route transitions designed for hierarchical navigation, not lateral wizard steps. We replaced it entirely with a PageView and a custom scroll physics that makes transitions feel like turning pages.
The _FadingPageView widget applies a compound animation during scroll:
// As page scrolls away:
opacity: lerpDouble(1.0, 0.0, progress * 2)  // Fades out at 50% scroll
transform: translateY(lerpDouble(0, 40, curve)) // Arcs downward
The result: pages don’t slide in from the side like a browser navigation. They dissolve upward as the new page rises to meet them. It feels like a native wizard flow, not a web navigation.
Step 7: Make Widgets Reactive to User Input
One useful pattern: display widgets can bind to the data model that input widgets write to. The Flutter team’s post on rich and dynamic user interfaces with Flutter and generative UI introduces the DataModel concept that makes this possible. For a broader conceptual grounding, our explainer what is GenUI and why it matters in 2026 walks through reactive binding in plain language.
A SectionHeader on the summary screen can show the user’s selected value:
{
  "type": "SectionHeader",
  "title": "Your Monthly Budget",
  "subtitle": {
    "path": "/income_slider/formattedValue"
  }
}
When the user moves the GCNSlider, it writes to /income_slider/formattedValue. The SectionHeader reactively updates. The LLM doesn’t need to round-trip for this — it’s all client-side data binding within the surface.
Each widget carries its own DataContext. When the user selects “Continue,” all data in the DataContext is gathered and integrated into the chat history as part of the user’s message (managed by GenUI).
Step 8: Handle the Final Step with Drama
The final screen before the summary deserves special treatment. The AppButton in that surface includes a tag:
{
  "type": "AppButton",
  "label": "See My Plan",
  "showLoadingOverlay": true
}
When tapped, it triggers a full-screen loading overlay with a Rive animation. The LLM generates the summary surface behind the scenes. When it’s ready, the overlay dissolves and the summary dashboard appears.
This is the moment of reveal. The loading isn’t a bug — it’s a beat.
Step 9: Build an Error Recovery Path
LLM calls fail. Network requests fail. We handle both without losing the user’s progress. When an error occurs, SimulatorBloc emits a state that displays _ErrorView with a retry button. The retry event:
- Finds the last page with rendered content
- Resets
currentPageIndexto that page - Sends the full conversation history back to the LLM with a “please continue” prompt
The conversation history is preserved throughout, so the retry picks up exactly where it failed. The user doesn’t restart from zero.
What This Architecture Gets You
In practice, these nine steps combine to create a radically different user experience. Compared to a standard chat UI:
| Standard Chat | GCN Wizard |
|---|---|
| User reads messages | User takes actions |
| Open-ended input | Constrained, guided choices |
| Scrollable history | One focused screen at a time |
| AI responds to prompts | AI generates surfaces |
| You see everything AI said | You see only what matters now |
| Works for everything | Optimized for the specific flow |
The tradeoffs are real: this approach requires more work to build and is more rigid to change. Adding a new widget type means updating the catalog, the prompt, and the system. But for a demo where you know the user journey and need every step to land, the control is worth it.
This is why the pattern earns its cost on known, high-stakes user journeys — fintech onboarding, guided planning, structured intake flows — and why it is the wrong choice for open-ended exploration. The wizard pattern fits when the user’s path is predictable enough to design for. The chat-first integrations that ship with most GenUI examples still fit better when the user’s goal is discovery.
The Tech Stack
- Flutter with
fvm flutter(FVM) for version management - Firebase AI/Gemini Flash 3 for the LLM — see Firebase AI Logic: get started with the Gemini API for the integration path
- GenUI for surface rendering — genui Flutter package on pub.dev and VGV’s GenUI: AI-driven generative user interfaces for real-time adaptive experiences resource page. The SDK is in active development; check the pub.dev changelog for current stability before adopting in production.
- BloC pattern throughout (
flutter_bloc) - Rive for the thinking animation — Rive Flutter runtime
This stack is a clean example of Flutter AI integration end-to-end: structured output from an LLM, rendered by a Flutter-native generative UI framework, managed by flutter_bloc, with animation handled by Rive.
The full repository structure:
lib/
├── onboarding/         # Hand-crafted wizard (intro, profile, focus)
│   ├── intro/
│   ├── pick_profile/
│   └── want_to_focus/
├── simulator/          # AI-driven simulator
│   ├── bloc/           # SimulatorBloc, state, events
│   ├── catalog/        # 28 widget type definitions
│   ├── prompt/         # System prompt + initial message builder
│   ├── repository/     # GenUI conversation management
│   └── view/           # SimulatorView, message bubbles, animations
└── design_system/      # Colors, themes, 28 base widgets
The lesson we kept coming back to: the best AI interfaces are the ones that don’t look like AI interfaces. They look like well-designed apps that happen to be infinitely configurable at runtime by a language model. Chat boxes are one pattern. Wizards are another. The architecture that earns user trust is whichever one disappears into the experience.