Using Maestro MCP with Claude for Mobile UI Test Automation
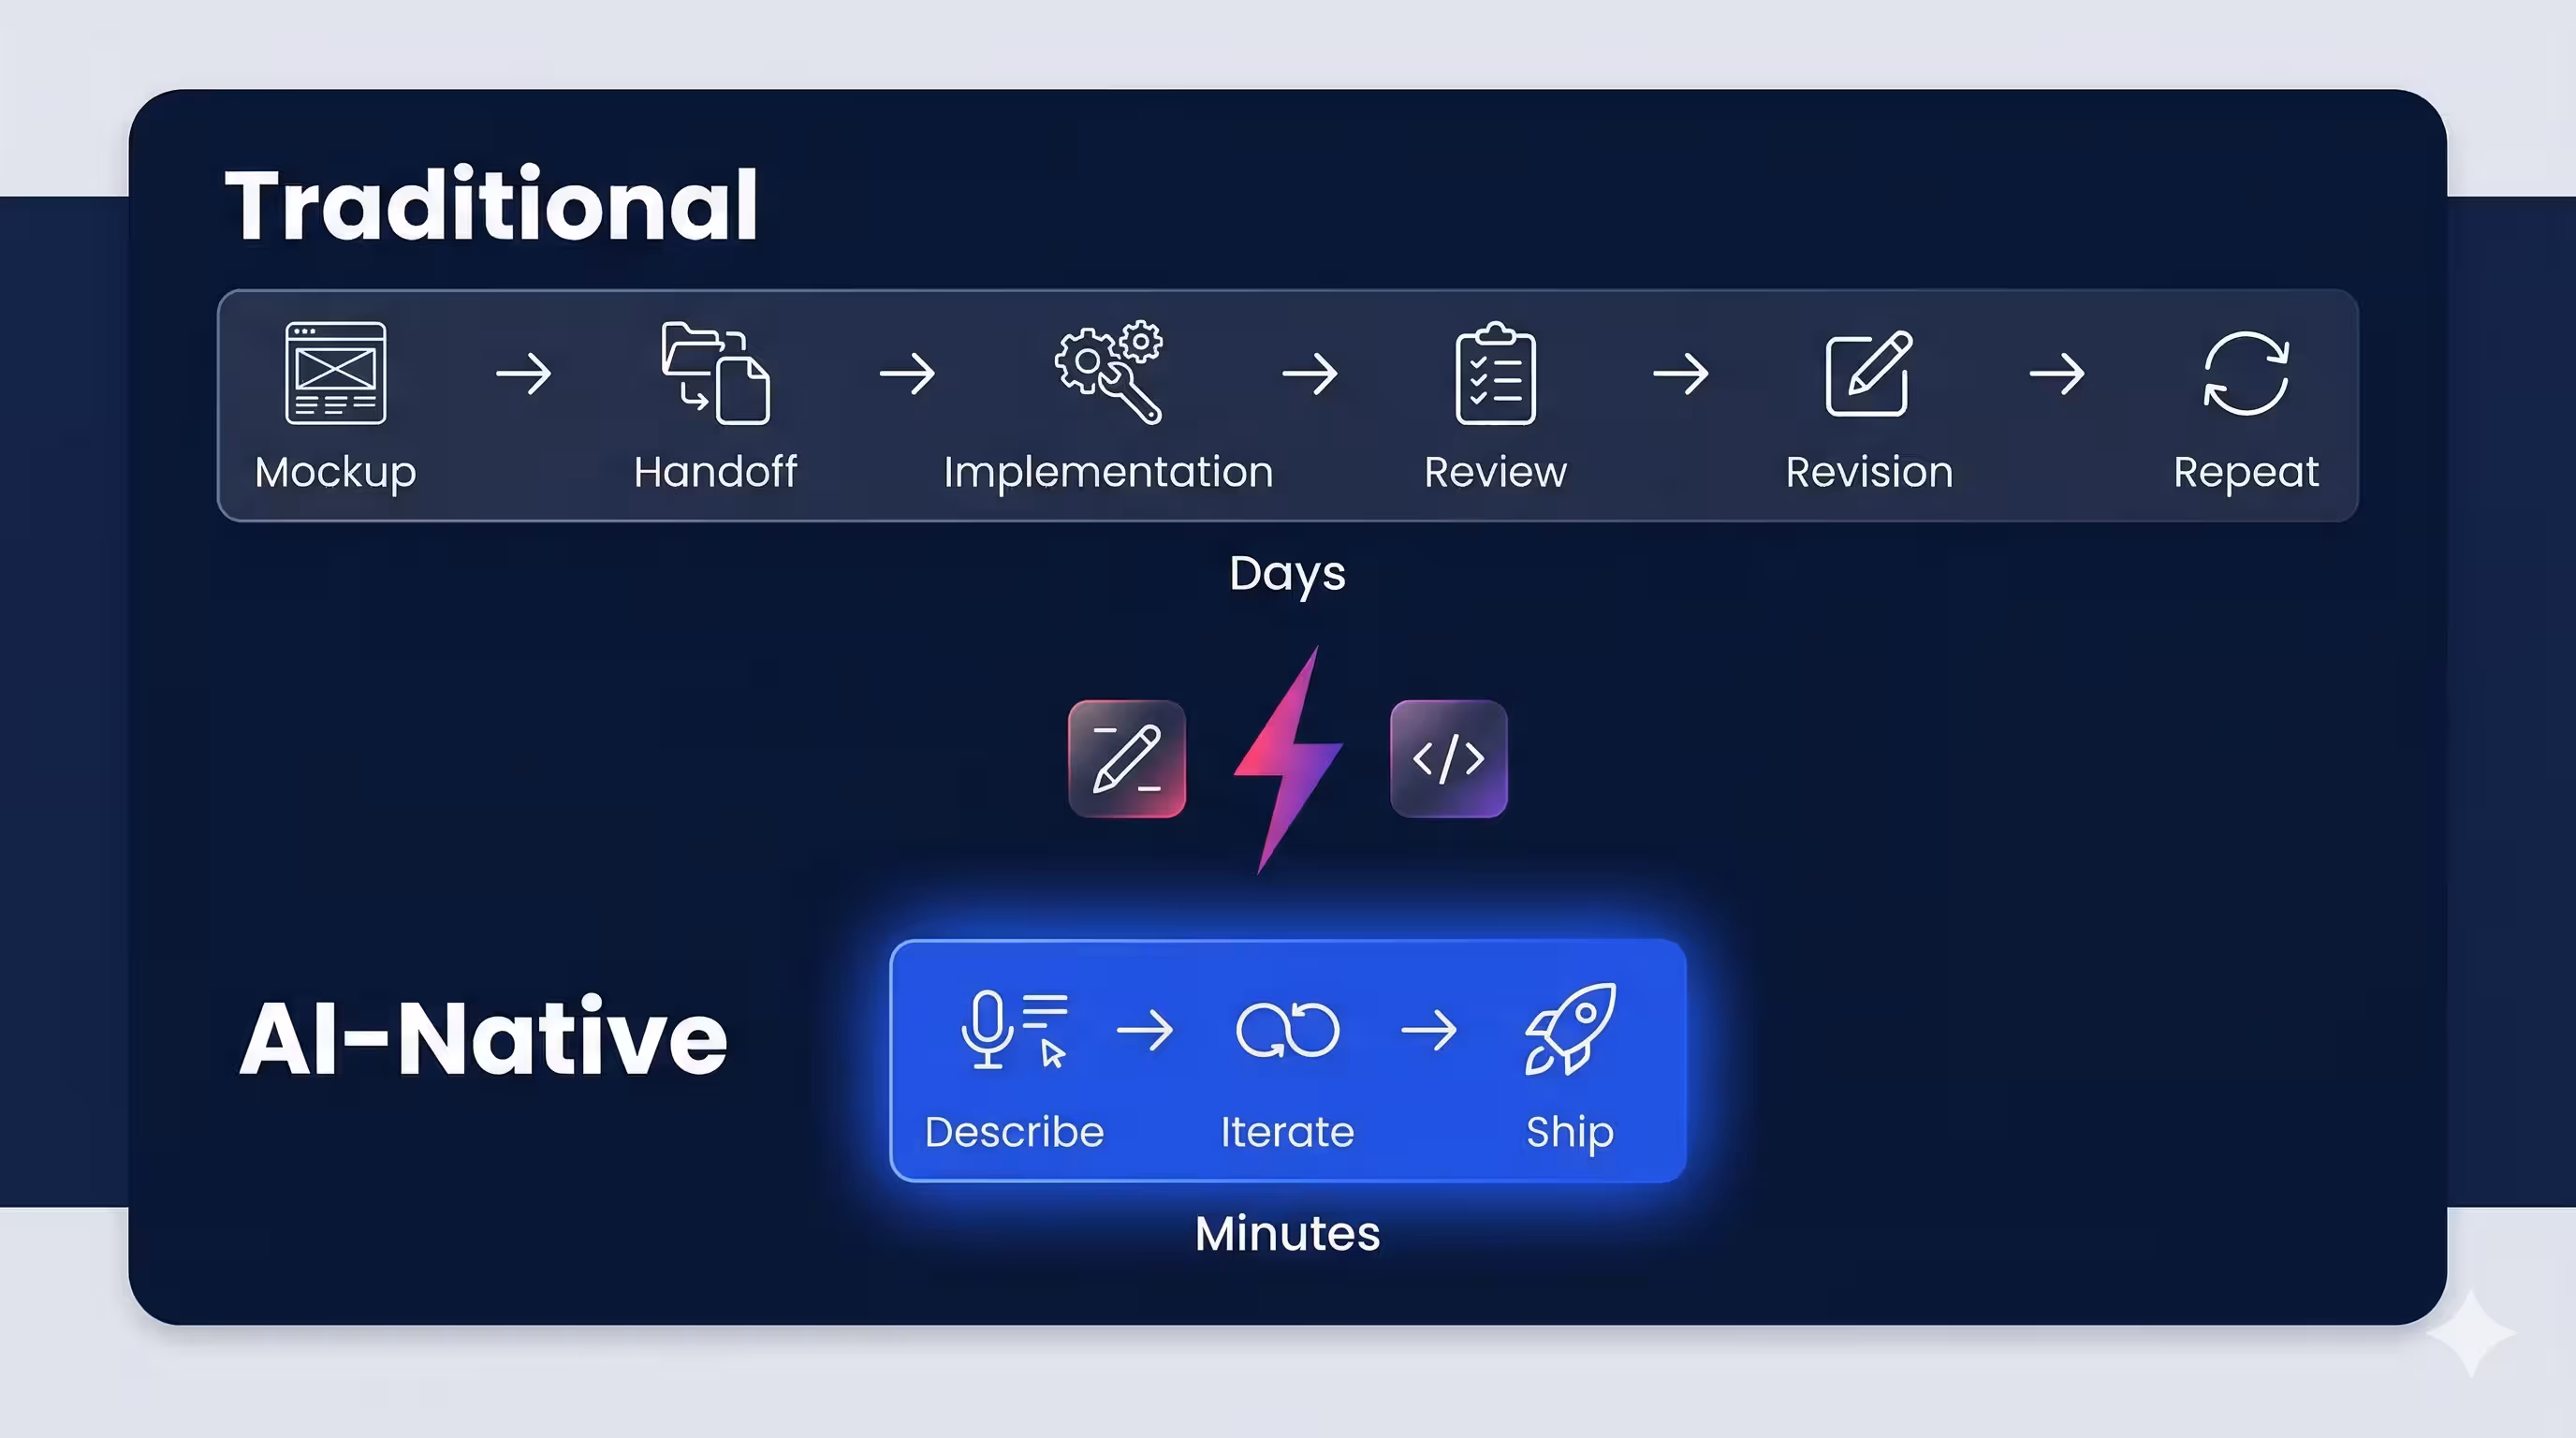
Mobile QA has always been a discipline that demands precision: juggling simulators and real devices, iOS and Android quirks, flaky selectors and ever-changing UI hierarchies — all while keeping pace with a dev team that ships fast. The traditional answer has been to write more automation, maintain bigger YAML files, and hope the test suite doesn’t collapse the moment someone renames a button.
We recently set up Maestro MCP on a project and spent time with the workflow. By connecting Maestro — one of the most widely adopted mobile UI testing frameworks — to an AI coding assistant like Claude through the Model Context Protocol, QA engineers and Test Engineerins gain an AI-assisted mobile testing workflow directly embedded in their existing tools. This post covers what the integration looks like in practice, what worked well, and where the limits are.
What Is the Model Context Protocol (MCP)?
The Model Context Protocol (MCP) is an open standard, introduced by Anthropic in November 2024, that creates a uniform interface for connecting large language models to external tools, data sources, and services. Instead of every tool requiring a bespoke integration with every AI model, MCP defines a single protocol that any compliant client (like Claude) can use to talk to any compliant server (like Maestro).
The architecture is straightforward:
- MCP Servers expose tools and resources through a standardized interface
- MCP Clients (AI assistants) consume those tools via the protocol
- Transport Layer handles communication over stdio, HTTP with SSE, or WebSocket
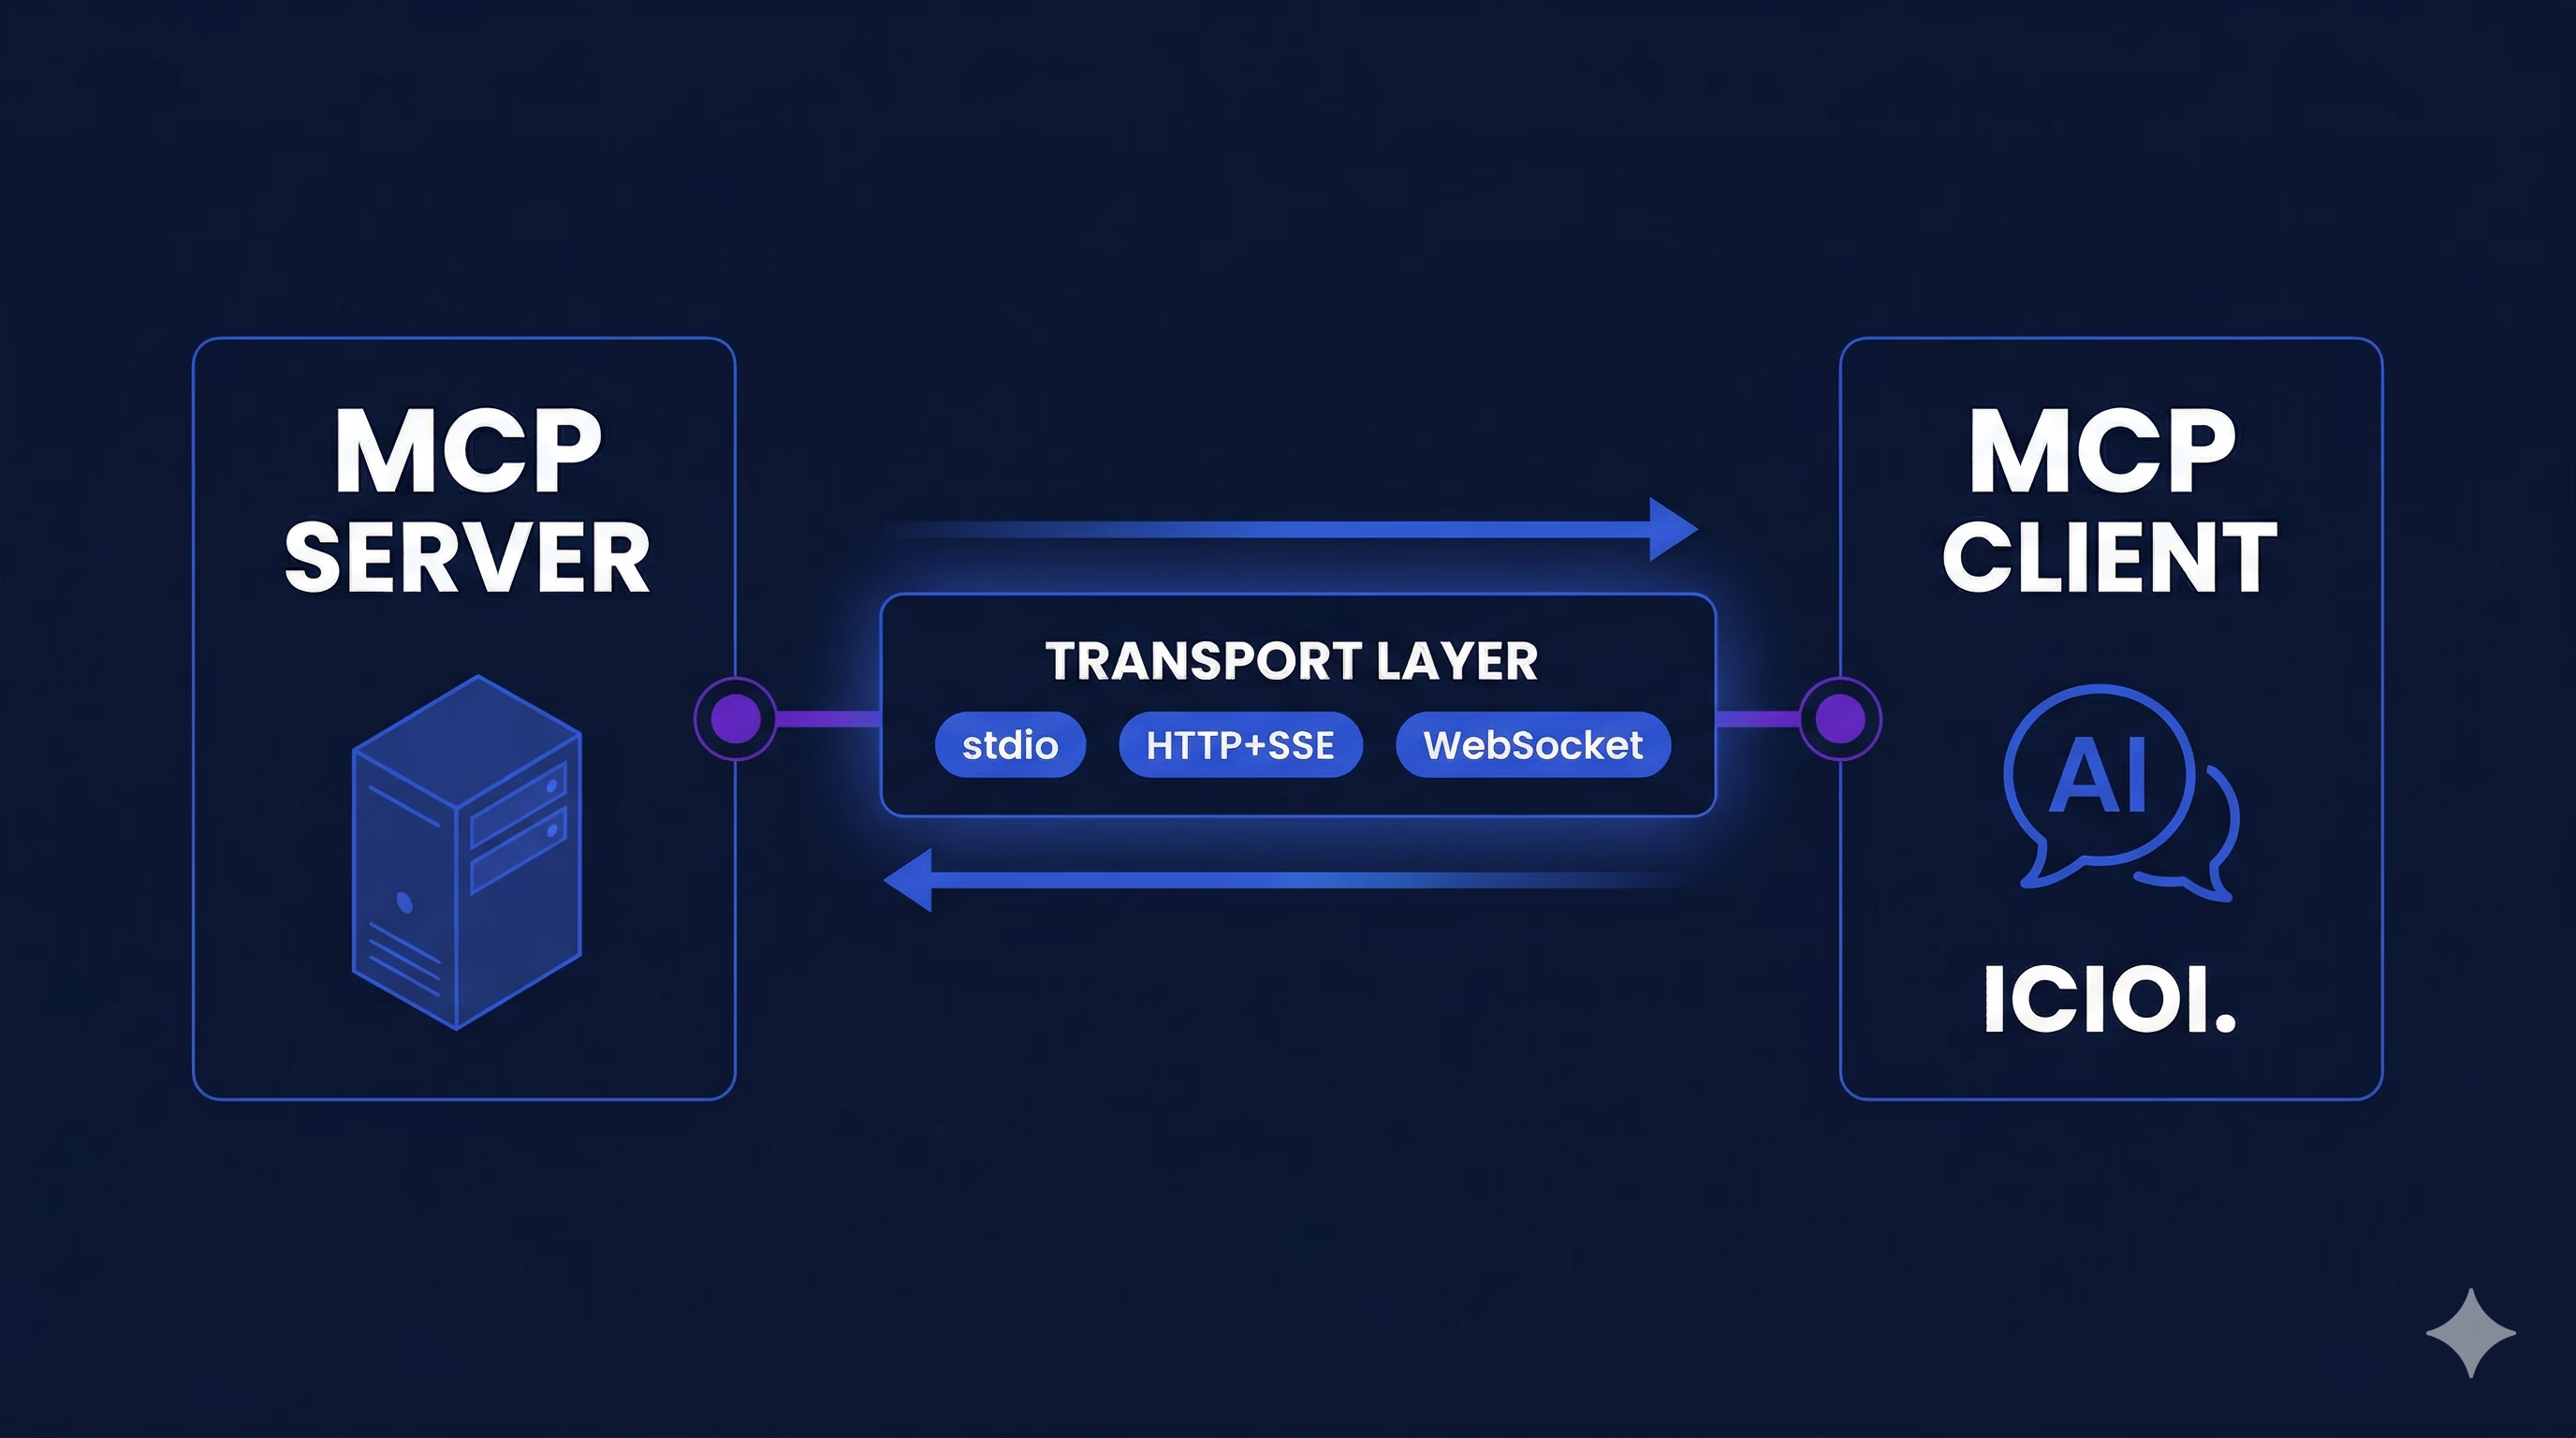
The practical implication: Maestro doesn’t need to build a custom Claude plugin, and Claude doesn’t need a bespoke Maestro SDK. They speak the same language out of the box.
What Maestro MCP Actually Does for QA Teams
Once you configure Maestro as an MCP server and connect it to Claude, your AI assistant gains direct access to the full Maestro CLI — the same commands you’d run in your terminal, now driven by natural language. Here’s what that unlocks:
1. Write Test Flows in Plain Language
Instead of hand-authoring YAML, you can describe what you want in natural language and Claude generates a valid Maestro flow.
“Create a flow that opens the app, taps the login button, enters credentials, submits the form, and verifies the home screen appears.”
Claude produces a properly structured YAML flow tied to Maestro’s YAML flow syntax and command reference. Here’s what that output looks like in practice:
appId: com.example.myapp
env:
  BASE_URL: "https://your-app-url.com"
  LOGIN_EMAIL: "user@example.com"
  LOGIN_PASSWORD: "your-password"
---
# Navigate to Login
- openLink: "${BASE_URL}/login"
- waitForAnimationToEnd
- assertVisible:
    id: "login-page"

# Log in
- tapOn:
    id: "login-email-input"
- inputText: "${LOGIN_EMAIL}"
- tapOn:
    id: "login-password-input"
- inputText: "${LOGIN_PASSWORD}"
- hideKeyboard
- tapOn:
    id: "login-submit-btn"
- waitForAnimationToEnd
- assertVisible:
    id: "feed-page"
This test flow generation capability is particularly valuable when onboarding new team members unfamiliar with Maestro’s DSL, or when rapidly scaffolding test coverage for a new feature.
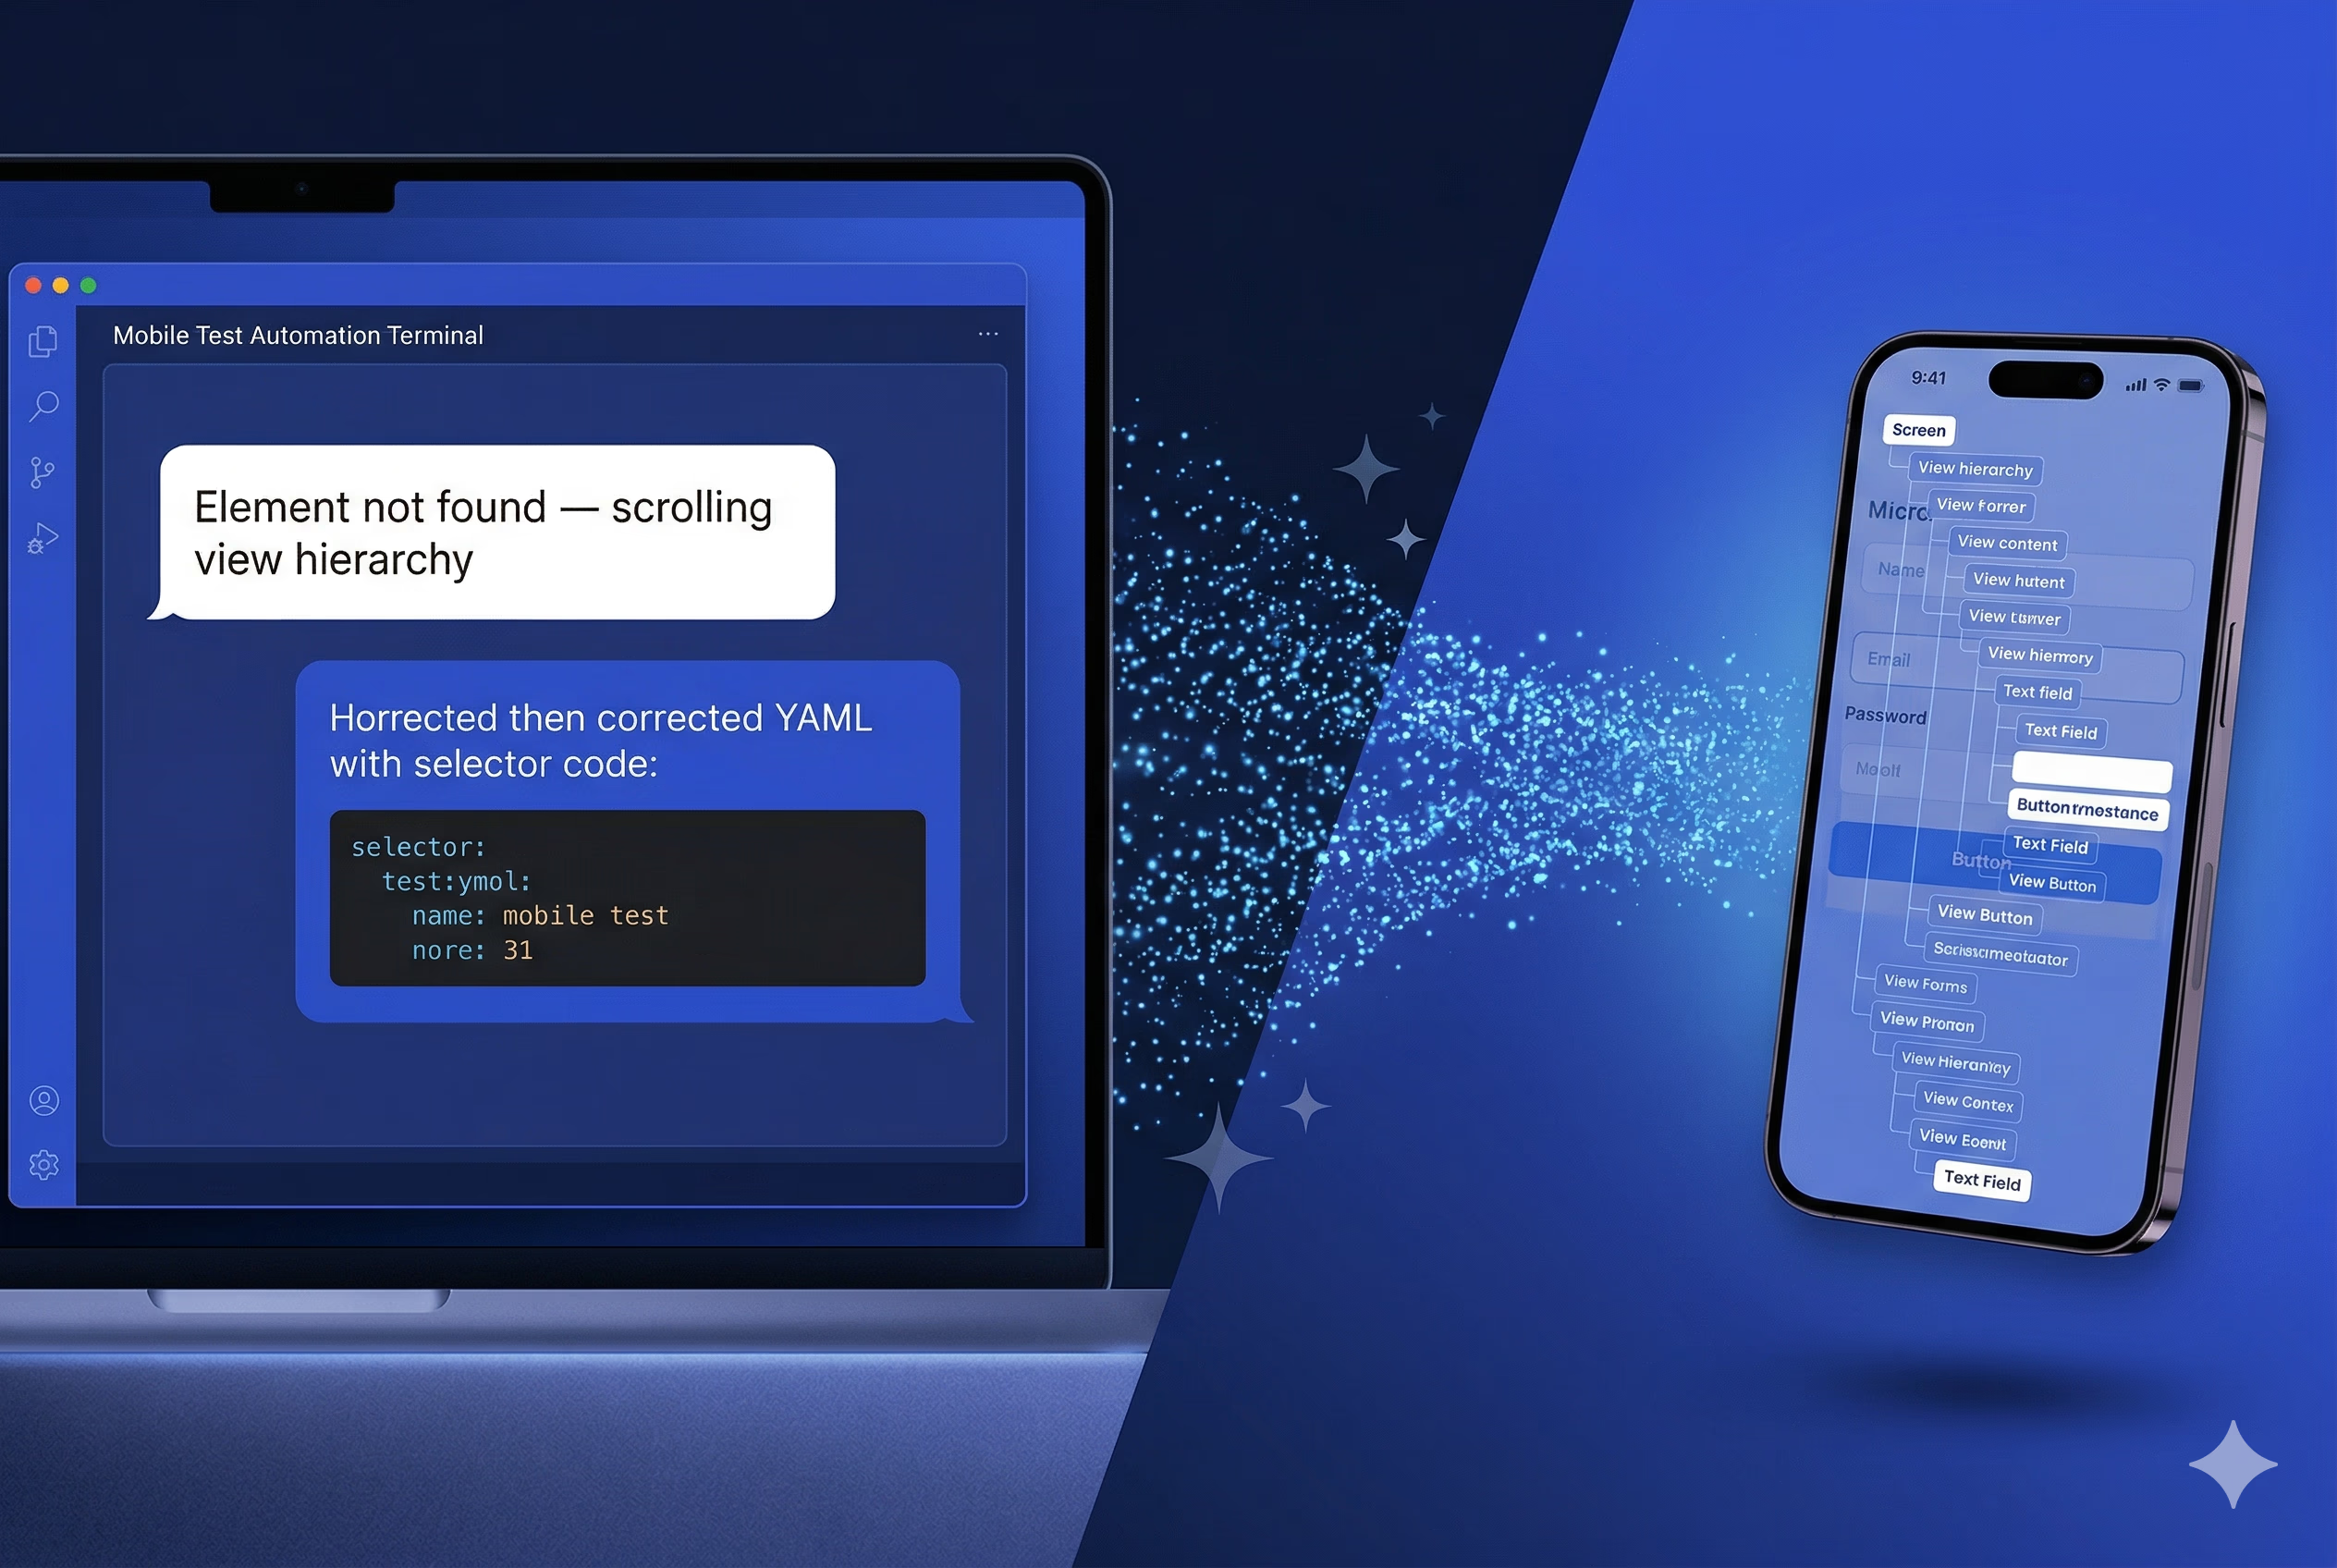
2. Automatically Debug Failing Tests
This is where the practical value surfaces. When a test fails with a vague “Element not found” error, instead of manually digging through the view hierarchy, you can describe the failure to Claude and have it analyze the issue and suggest a fix — immediately.
Claude can inspect the nested view hierarchy of the current screen in CSV format, cross-reference it with the failing flow, and propose the corrected selector or interaction. Debugging that previously required manually tracing through a hierarchy and iterating on selectors collapses into a short back-and-forth conversation. That reduction in per-failure overhead compounds quickly across a growing test suite.
3. Control Emulators and Real Devices Interactively
Maestro MCP gives Claude the ability to directly interact with your running emulators and simulators — tapping elements, inputting text, pressing back, validating UI state — all through natural language. In exploratory testing, you can describe a scenario conversationally and Claude executes it live.
4. Validate Flow Syntax Before Running
Before committing a new test flow, Claude can validate the YAML syntax against Maestro’s spec. This catches malformed flows before they hit CI, reducing pipeline failures caused by test authoring errors rather than actual bugs.
5. Access Built-in Testing Knowledge
Maestro MCP bundles the YAML flow syntax guide, command reference, and mobile testing best practices for debugging and CI/CD setup. Claude draws on this context when generating and reviewing flows, keeping output idiomatic and production-ready.
See It in Action
The demo below shows a Maestro test flow running against a live device — tapping through the app, validating UI state, and completing the full sequence end to end.
How to Set Up Maestro MCP with Claude
Step 1: Install the Maestro CLI if you haven’t already. This is a hard requirement — the MCP server is exposed through the CLI, so nothing works without it. You can follow the official installation guide at docs.maestro.dev.
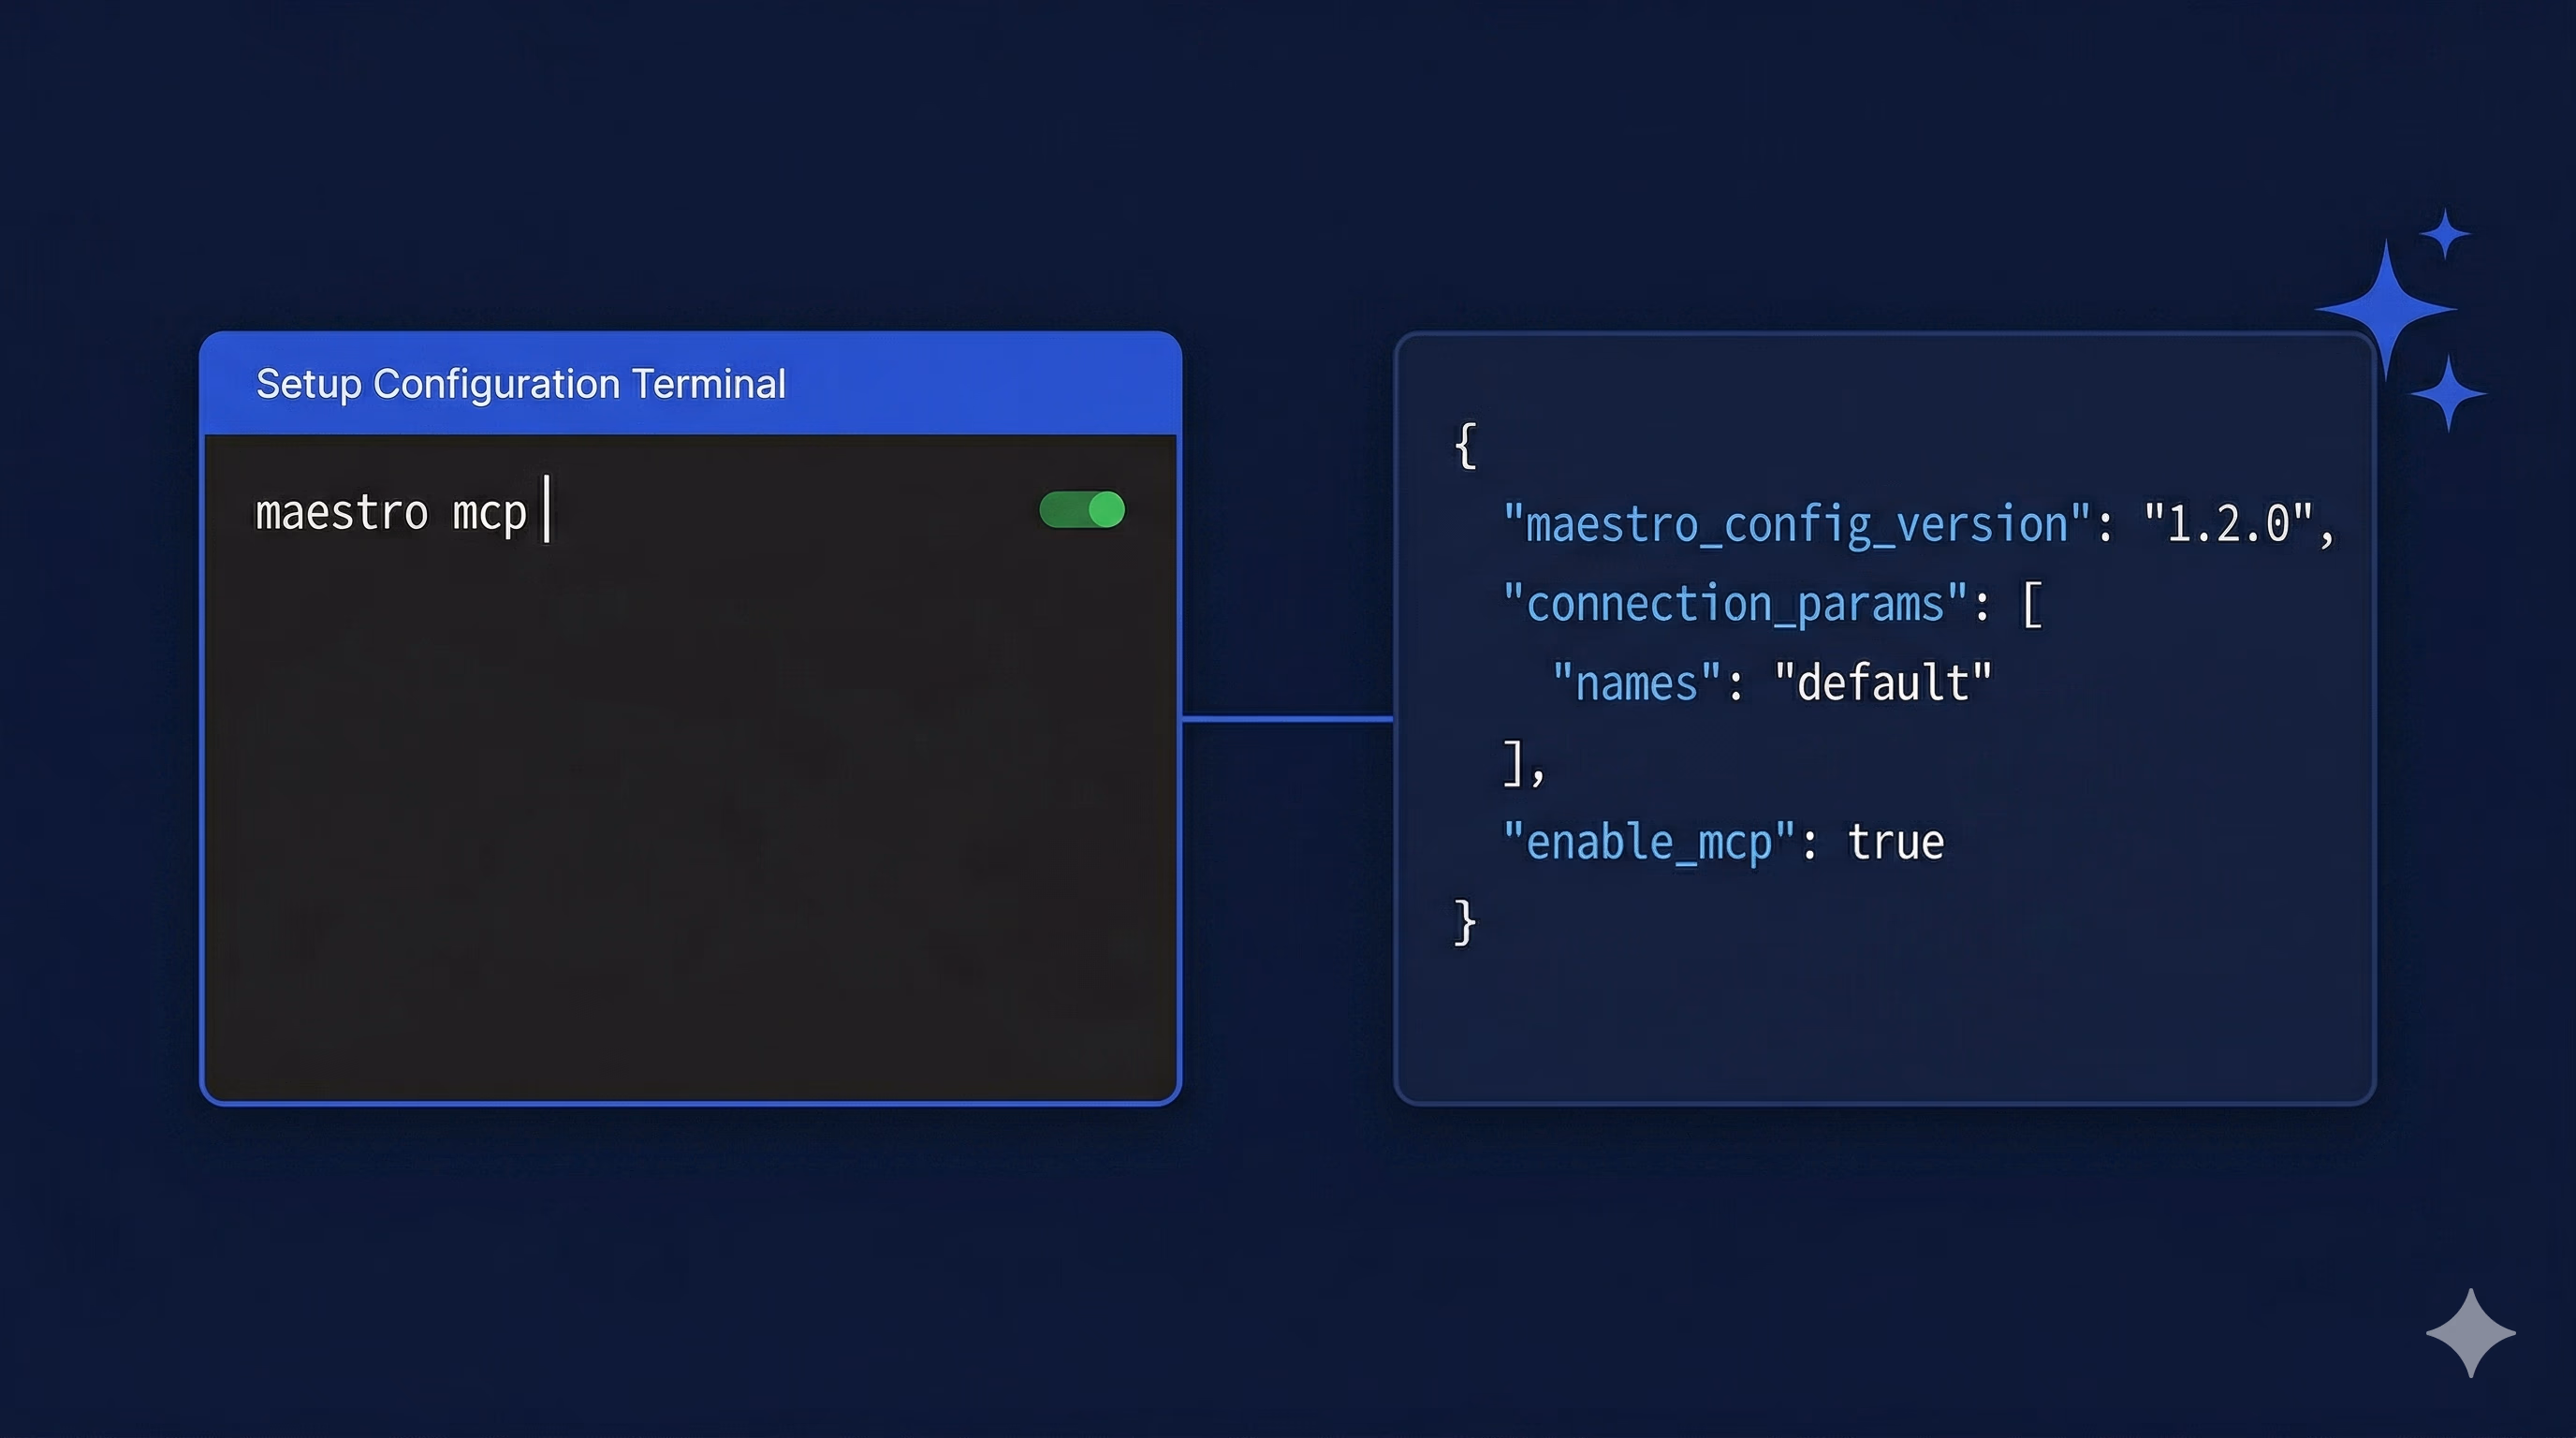
Step 2: Once the CLI is installed, run maestro mcp from your terminal to start the MCP server. No separate installation is needed for the server itself — it comes bundled with the CLI.
Step 3: Add the MCP configuration to your IDE or AI client. For Claude Desktop, edit:
- macOS:
~/Library/Application Support/Claude/claude_desktop_config.json - Windows:
%APPDATA%\Claude\claude_desktop_config.json
Step 4: Point the config at your Maestro CLI executable. If Maestro is on your PATH, the setup is a few lines of JSON. If not, use the full path to the executable.
Once configured, Claude has full access to Maestro’s toolset.
What This Isn’t
It’s worth being clear about the limits. Maestro MCP isn’t a replacement for thoughtful test strategy. Claude won’t know which user flows matter most to your business, or where your app’s riskiest edge cases live — that expertise still belongs to your QA team. What it does is remove friction from the execution layer, so the time you do spend on test automation goes toward decisions that actually require human judgment.
There are also cases where natural language test generation produces flows that are syntactically valid but miss business logic — a login flow that checks for the home screen but doesn’t verify the right user session, for example. The AI handles mechanics well; domain reasoning still needs a human in the loop.
Where This Fits
For QA engineers and SDETs, the value of Maestro MCP shows up in a few specific places.
Generating a test flow from a user story description is faster than authoring it manually. Teams can keep pace with feature development without sacrificing test depth. AI-assisted triage of “element not found” and selector drift issues cuts the feedback loop on failing tests. And natural language authoring means more people on the team can contribute to test coverage without needing deep Maestro expertise — lowering the floor without lowering the standard.
Worth noting: Maestro MCP operates cross-platform against compiled APK and IPA files with no app instrumentation required. If you’ve seen other MCP-based mobile testing tools that attach to a specific framework’s debug session, the distinction matters. Maestro works regardless of whether your app is built in Flutter, React Native, or native iOS/Android.
The Honest Take
Maestro MCP changes how QA engineers interact with their test tooling. By bridging Claude’s language understanding with Maestro’s mobile automation capabilities, it replaces the manual workflow for test authoring, debugging, and device interaction with a conversational one.
If your team runs mobile UI test automation on iOS or Android and uses — or is evaluating — Maestro, set up the MCP integration. Configuration takes under an hour. Whether the workflow change sticks depends on how your team actually debugs failing tests — that’s the part worth evaluating.
The Maestro MCP documentation at docs.maestro.dev covers the full setup guide and tool reference.