There are few resources more crucial to software development than command-line interfaces (CLIs). As one of the simplest forms of Human-Computer Interface (HCI), a CLI allows you to simplify complex tasks and can be used to compose rich applications. Most developers use CLIs every day. Even Flutter comes with one: flutter_tools.
Knowing how to build a command-line application can unlock a world of possibilities for a Dart developer. There are several excellent examples of CLI packages out there, for instance: mason_cli, fvm, dart_frog_cli, and umbra.
Creating one from scratch is not an easy task though. If you’re making a CLI package for the first time, you may face some challenges, such as handling exceptions and keeping the code organized. Due to Dart’s flexible nature, it can take some time to figure out how to organize the code, make it testable, and configure the details of what makes a CLI application that is not only good, but very good.
Our team has gathered some experience building CLI tools and turned them into a package template, so that you don’t have to go through the same challenge. You can simply start creating great stuff.
This is a guide on designing a kick-ass CLI application written in Dart using the Very Good Dart CLI template. Let’s go!
Getting started
Very Good CLI is a tool made by Very Good Ventures that, among other things, helps to ease the process of setting up any type of Dart project, including Flutter applications, federated plugins, Flutter and Dart packages, and of course, Dart CLI applications.
If you didn’t yet, activate it via:
$ dart pub global activate very_good_cliTo take the first step into the Dart-CLI-making world, use the create command with the appropriate template:
$ very_good create dart_cli my_simple_cliAnd voila! You now have generated a CLI package with everything ready to get started: a sample command with colorful outputs, a plug-and-play update mechanism, a file structure that scales, and last but not least, everything stamped with that beautiful unicorn wearing shades: testable!
Now, let’s look at the generated file structure.
The anatomy of a Dart CLI package
Like everything created using Dart, a CLI application is essentially just a pub package, which defines the basic structure: A pubspec.yaml in the project root, accompanied by the directories lib and bin.
These are three crucial things to be mindful of about the generated project’s structure:
- The lib directory: This may be familiar if you’ve worked with Dart before. This is where packages should put the classes and objects that are to be used by your scripts (library code).
- The bin directory: This, combined with the lib directory constitute the package’s public API: This should include the actual script files, which will call the entry-point function (main) when executed. Most CLIs have only one script file.
- And last but not least, the good old pubspec.yaml: This describes the metadata of the package. Note that for CLI applications, there is one additional field: executables. This entry should match the executable name (the first word in a command that your application will interpret) as keys, to files in the bin directory (values). The value can be left blank if the executable’s name is the same as its corresponding script file.
The executable name doesn’t need to be the same as the package name. To customize that upon generation, use the —executable-name option:
$ very_good create my_simple_cli -t dart_cli --executable-name my_simple
✓ Generated 19 file(s) (3.3s)
✓ Running "flutter pub get" in my_simple_cli (3.4s)
✓ Running "dart fix --apply" in my_simple_cli (3.2s)
Created a Very Good Dart CLI application! 🦄
Resulting pubspec.yaml file:
name: my_simple_cli
# ...
executables:
  my_simple:
Then, after activation through the dart pub global activate command, the CLI application will be invoked by commands that start with my_simple.
What makes a CLI delightful
Before going deep into the code, let’s look at a few essential components of CLI design and the common patterns that most CLI applications follow.
Although CLI apps have a very simple visual interface, we can’t ignore UX completely. Some classical design principles such as familiarity, hierarchy, and consistency, can make your CLI app easier to use.
Familiarity
People may be used to some expected outputs and input formats that are common in most CLIs. For example, it is almost intuitive to type the flag -h at the end of a command to understand what it does and the options available.
Example of a great help message: dart pub add:
$ dart pub add -h
Add dependencies to pubspec.yaml.
Usage: dart pub add [:<constraint>] [[:<constraint>]...] [options]
-h, --help               Print this usage information.
-d, --dev                Adds to the development dependencies instead.
    --git-url            Git URL of the package
    --git-ref            Git branch or commit to be retrieved
    --git-path           Path of git package in repository
    --hosted-url         URL of package host server
...
Hierarchy
CLI applications that have multiple scopes of actions may split into numerous sub-commands. Example: commit and remote are two sub-commands of the git CLI. Once you type them, you enter their context. The following options, arguments, and sub-commands will be specific to the context of the given command.
Consistency
Sometimes, different commands may share similar options and argument formats, but people expect consistency across them. For example, flutter build has several platforms as subcommands, like ios and android. The user can execute each of these in either debug or release. For that, both accept —debug or —release as flags.
As with any HCI, A CLI is just a series of input and output standards. To know how to build each of these parts is the key to success.
What makes excellent input syntax
Options? Arguments? Flags? Commands? Oh my! Do not fear these names. They are pretty helpful in understanding the input formats of a CLI.
Let’s analyze a command with plenty of these things to understand what is what. For example, imagine one of the most used commands in history: creating a state management package for Flutter.
$ flutter create barc -t package --description="Just like bloc, but for dogs" -v --no-pub- flutter: This is called the root command or executable. It should be unique in the current path context, so avoid publishing a CLI with existing executable names, like git or ls. Commands are the ones mapped in the pubspec.yaml file under the executables property.
- create: After that, you have the sub-command (or just command). Commands are predefined unique words that execute a task in a specific context. Some applications have zero sub-commands (ex: cp and ls), while others have multiple levels of sub-commands (ex: git remote add).
- barc: In this example, it is the name of the package. This is called an argument. Unlike commands, arguments are not predefined, but the preceding command should know how many (if any) arguments are expected from the user.
- -t package: This is an option. Options are composed of a key (predefined) and a value. The latter can be either predefined by a set of acceptable strings or not. Specifically, in this case, -t accepts only package, app, and plugin, among other values; anything other than what is predefined will result in an error. This option is in a shorthand format. That is why it starts with a single dash and consists of only one letter. It is the same as using —template.
- —description=”…”: This is also an option, except this one is not in a shorthand format (not all options need to have a shorthand available). It accepts any value from the user, as opposed to the previous option.
- -v: Now there are flags. The first one, -v, indicates that this command will output lots of information that otherwise would be hidden. Flags are just like options: they are formatted with dashes and can also have shorthands. The difference is that they don’t accept explicit values. Flags are ideal for options that have boolean values.
- —no-pub: The second flag, as opposed to the previous one, has a true default value. To override that behavior, the user has to use the negated form. For that, it contains a no prefix to indicate its value being set explicitly to false.
The args package
As you may notice, a command syntax can assume several different forms. To specify which are the commands, options, flags, and arguments in an idiomatic way, we have the args package. It contains classes and functions that help to bring the same organization and hierarchy of your desired CLI syntax into your code. In the template generated by very_good_cli, we have some sample commands and options to illustrate that mapping.
The root command, as said earlier, calls the entry-point function on the related file under bin. The main function receives a list of strings corresponding to everything in the user input after the root command, separated by space. That entry-point function invokes the CommandRunner, the root of our tree of sub-commands.
Each sub-command extends the Command class and an ArgParser object describes its syntax:
/// Example generated by very good CLI
class SampleCommand extends Command {
  SampleCommand({
    Logger? logger,
  }) : _logger = logger ?? Logger() {
    argParser.addFlag(
      'cyan',
      abbr: 'c',
      help: 'Prints the same joke, but in cyan',
      negatable: false,
    );
  }
// ...
Writing valuable “help” documentation
The best way to let the user discover the correct syntax of options and flags for a command is to provide a common “help” flag (—help or -h). The args package generates the help flag automatically for you, given the option mapping (configured via the argParser object) and some overridable fields in the Command class, like name, description, and argumentsDescription. Override them in your Command class to customize the usage output.
# Help available in the sample command
$ my_simple sample -h
A sample sub command that just prints one joke
Usage: my_simple sample [arguments]
-h, --help    Print this usage information.
-c, --cyan    Prints the same joke, but in cyan
Run "my_simple help" to see global options.
Enhancing outputs
Now that we learned how to provide a straightforward way for people to interact with your application, it is time to learn the best ways to respond to those inputs. There are two main ways you can communicate the progress and result of a user’s command: the standard output and exit codes.
One package that is useful is mason_logger. The template generated from the very_good_cli create -t dart_cli has a sample command that shows:
import 'package:args/command_runner.dart';
import 'package:mason_logger/mason_logger.dart';

class SampleCommand extends Command {
  SampleCommand({
    Logger? logger, // <-- Look here: inject a logger in the constructor to make it more testable.
  }) : _logger = logger ?? Logger() {
    argParser.addFlag(
      'cyan',
      abbr: 'c',
      help: 'Prints the same joke, but in cyan',
      negatable: false,
    );
  }

  @override
  String get description => 'A sample sub command that just prints one joke';

  @override
  String get name => 'sample';

  final Logger _logger; // <-- Look here: a logger to abstract stdout

  @override
  Future run() async {
    var output = 'Which unicorn has a cold? The Achoo-nicorn!';
    if (argResults?['cyan'] == true) {
      output = lightCyan.wrap(output)!;
    }
    _logger.info(output);
    return ExitCode.success.code; // <--- Look here: Exit code
  }
}
Notice that it uses mason_logger’s Logger and ExitCode classes. Let’s understand a little bit about each:
The standard output
The standard output, also known as “write stuff on the user’s screen,” is a vital part of any CLI. dart:io has a stdout getter in which the raw API uses this system resource:
import 'dart:io' as io;

final stdout = io.stdout;
stdout.writeln("some output");
One problem with writing directly at this level is that there is no API to style the output. You will have to use ANSI escape codes. Also, using it directly in Command classes makes it hard to test with unit tests.
The Logger class abstracts the styling codes as wrapping API, which can be mocked for tests.
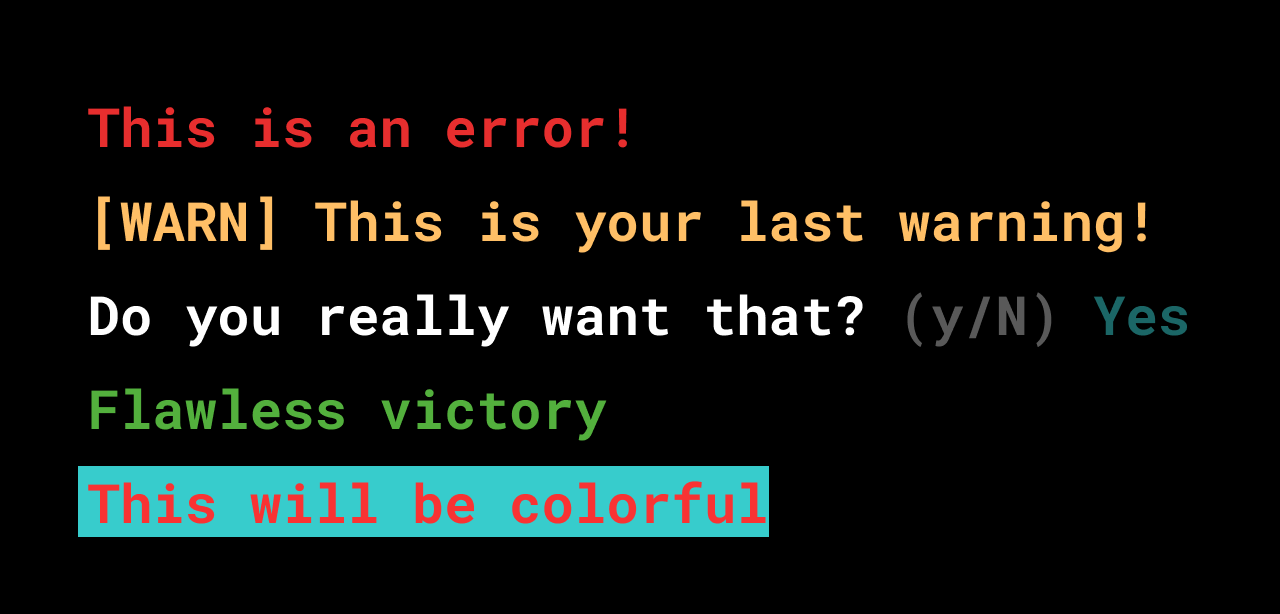
Example of a command that styles output:
@override
Future run() async {
  _logger.err('This is a error!');
  _logger.warn('This is your last warning!');
  _logger.confirm('Do you really want that?');
  _logger.success('Flawless victory');
  _logger.info(backgroundCyan.wrap(red.wrap('This will be colorful')));
  return ExitCode.success.code;
}
Output produced:
Example of mocking the logger using mocktail on a test:
import 'package:mocktail/mocktail.dart';
import 'package:mason_logger/mason_logger.dart';

// ...

class MockLogger extends Mock implements Logger {}

test('prints stuff', () async {
  final logger = MockLogger();
  final command = SampleCommand(
    logger: logger,
  );
  final exitCode = await command.run();
  expect(exitCode, ExitCode.success.code);
  verify(
    () => logger.info('Which unicorn has a cold? The Achoo-nicorn!'),
  ).called(1);
});
Exit codes
When a process or script finishes, it returns a code that indicates the circumstances in which it occurred. On most systems, 0 is the code for success, and anything besides that defines an error.
Mason_logger’s ExitCode abstracts some error codes and success into constants.
@override
Future run() async {
  _logger.err('This command will fail');

  /// A service is unavailable.
  ///
  /// This may occur if a support program or file does not exist. This may also
  /// be used as a catch-all error when something you wanted to do does not
  /// work, but you do not know why.
  return ExitCode.unavailable.code;
}
Returning something like that rather than some random int makes your code more readable.
Dealing with exceptions
As with any software, A CLI application execution can produce exceptions.
It is essential to deal with all exceptions and provide clear reports to the user on what went wrong aligned with the proper exit code. As an example, the generated CLI application has in the CommandRunner a try/catch statement that trades thrown exceptions for exit codes:
Future run(Iterable args) async {
  try {
    final topLevelResults = parse(args);
    return await runCommand(topLevelResults) ?? ExitCode.success.code;
  } on FormatException catch (e, stackTrace) {
    // On format errors, show the commands error message, root usage and
    // exit with an error code
    _logger
      ..err(e.message)
      ..err('$stackTrace')
      ..info('')
      ..info(usage);
    return ExitCode.usage.code;
  } on UsageException catch (e) {
    // On usage errors, show the commands usage message and
    // exit with an error code
    _logger
      ..err(e.message)
      ..info('')
      ..info(e.usage);
    return ExitCode.usage.code;
  }
}
Since the CommandRunner is the root of a command execution, keeping the exception handlers in its run method can be more effective.
Keeping the CLI up to date
One of the hardest things when publishing a CLI package into pub.dev is making sure people are always using the most up-to-date version. Users have to check pub for newer versions, and when there is one, the package has to be activated again:
dart pub global activate my_cliFortunately, the project generated by the very_good_cli already includes infrastructure to make this process easier.
Through pub_updater and with the help of build_version, all commands always check for newer versions of the CLI package on pub.dev. If there are any, the user will receive an alert to update:

This mechanism works based on the lib/src/version.dart file generated by build_version, which makes the current CLI runtime’s version accessible. Always make sure to generate that code before publishing new versions of your CLI package to pub.dev.
The sample also includes an update command that uses pub_updater to let the application update itself.
my_cli update # this will update my_cliConclusion
This is just the tip of the iceberg to what is possible to do with a Dart CLI application. We created the Dart CLI template in Very Good CLI to provide the basics of what our team thinks any Dart CLI application should include from the start. Since it is an open source project, ideas and suggestions are always welcome. If you have any, head over to very_good_dart_cli and open an issue.
Go build something awesome!