On this page
With Dart Frog, Flutter developers have a great opportunity to write full-stack Dart apps. This helps increase development speed by limiting the context switching between backend and frontend code, and also provides a consolidated set of models that can be shared between all your products. What’s more, Flutter’s flexibility makes it a great solution for web apps.
With this in mind, I set out to make a blog app that took advantage of the Dart/Flutter ecosystem on both backend and frontend. The app would have a server that fetches data from a headless CMS and then delivers that data to a clean, mobile-responsive Flutter front end. By handling CMS data in the backend, the app would follow security best practices, since API credentials would never need to cross into the client.
In addition, I thought this would be an excellent opportunity to showcase how smoothly you can integrate Dart software with AWS services. AWS is the most widely used cloud service provider on the planet, and customers who use AWS can also take advantage of all the great benefits Dart and Flutter have to offer.
I built the app with the following structure:
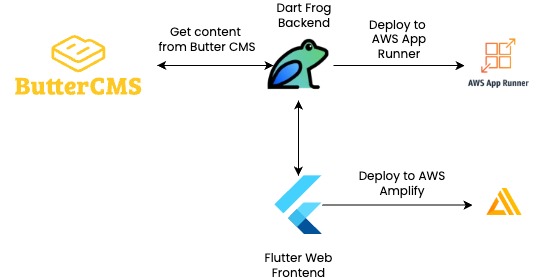
On both backend and frontend, I did my best to adhere to a layered architecture pattern to create maintainable and scalable code. What follows is a three-part series on how to build this blog app. In this article, I will discuss getting the project started and building the API. Part two will go over the frontend app, and part three will lay out the deployment to AWS. For more details, you can also check out the articles on my personal blog about making the API, the app, and the pipeline.
Getting Started
To follow along, you will need to have the following tools set up:
- Flutter (installs both Flutter and the Dart SDK)
- Dart Frog
- Very Good CLI
- A free subscription to Butter CMS
- An AWS Account (your app will have a monthly fee if you keep it running)
- A Github account
The Very Good CLI provides an excellent starting point to any Dart or Flutter project. It’s quick, easy, and lays a lot of groundwork for making a well-architected, well-tested project. To start, navigate to the directory where you want to store your project, and run the following terminal command:
very_good create flutter_app YOUR_APP_NAME_HEREThen, navigate to the root of the app and create a Dart Frog api:
dart_frog create apiA Secure Backend to Fetch Data
It is true that if you wanted, you could write a blog app in Flutter without a backend by simply calling your CMS directly from your frontend code. The problem with this approach is that your CMS will, in all likelihood, require credentials such as an auth token or API key to fetch data. There are ways to obfuscate credentials that are added as environment variables on the front-end, but in reality, the only secure place to store secrets is on the server.
I was able to add a data client to my Dart Frog app that fetched blog content from my CMS without my frontend ever needing to know any credentials. I simply injected my API key as an environment variable when configuring the data client that interfaces with my CMS.
If you build your app using layered architecture, it is easy to wire things up so that your API is interfacing with your CMS. In this article, I use Butter CMS, a headless CMS with free read API access for non-commercial developer use. If you wanted to use a different CMS, however, you could modify the models and data client and most of the architecture would still be the same.
The first step to setting up a full-stack project like this is to create a package for your models. Organizing the models into a single package simplifies access to all necessary object models throughout the project. Any other part of the app that requires model access only needs to import the blog models package. Plus, since we are using json_serializable on the models that need serialization, it is nice to keep this dependency limited to a single place. I based my models on the data returned by the Butter CMS API, with modified classes for presentation:
data_models // core models necessary to construct other models
  author
  blog_meta
  blog_summary
  blog
  blogs_meta
  category
  tag
endpoint_models // representation of how blog data is returned by the API
  blog_response
  blogs_response
presentation_models // models used to present blog data on the frontend
  blog_detail
  blog_preview
Once the model package is complete, we need to create a data client to connect with the CMS. If you follow this article and use Butter, this will be ButterCMSClient. This data client takes the Dart http client from the Dart http package and uses it to interact with the CMS API. Since this app is just reading content, you only need two methods: one to fetch all blog posts, and one to fetch an individual post given a unique identifier:
/// Fetches a list of blog posts from the ButterCMS API.
Future fetchBlogPosts({
  bool excludeBody = false,
}) async {
  final queryParameters = {
    'auth_token': _apiKey,
  };
  if (excludeBody) {
    queryParameters['exclude_body'] = 'true';
  }
  final uri = Uri.https(_baseUrl, '/v2/posts', queryParameters);
  return _httpClient.get(uri);
}

/// Fetches a single blog post from the ButterCMS API,
/// given a unique [slug].
Future fetchBlogPost({required String slug}) async {
  final queryParameters = {
    'auth_token': _apiKey,
  };
  final uri = Uri.https(_baseUrl, '/v2/posts/$slug', queryParameters);
  return _httpClient.get(uri);
}
Using Dart Frog middleware, we can inject our data client into context before API requests are executed. Then, we can construct routes based on the dart files in the routes directory:
routes
  blogs
    [slug].dart // https://{api-url}/blogs/[slug]
    index.dart // https://{api-url}/blogs
The routes allow for the creation of clean, simple endpoints for fetching the necessary data. [index].dart provides the endpoint for fetching all posts:
Future onRequest(RequestContext context) async {
  return switch (context.request.method) {
    HttpMethod.get => await _get(context),
    _ => Response(statusCode: 405, body: 'Method Not Allowed'),
  };
}

Future _get(RequestContext context) async {
  final blogsResponse = await context.read().fetchBlogPosts({
    excludeBody: true, //set this to reduce the size of the API response
  });
  return Response(
    statusCode: blogsResponse.statusCode,
    body: blogsResponse.body,
  );
}
In [slug].dart we have a similar endpoint for fetching an individual post:
Future onRequest(RequestContext context, String slug) async {
  return switch (context.request.method) {
    HttpMethod.get => await _get(context, slug),
    _ => Response(statusCode: 405, body: 'Method Not Allowed'),
  };
}

Future _get(RequestContext context, String slug) async {
  final blogResponse =
      await context.read().fetchBlogPost(slug: slug);
  return Response(
    statusCode: blogResponse.statusCode,
    body: blogResponse.body,
  );
}
Run your app using dart_frog dev and open up your favorite API tool (e.g., Postman) and make a GET request to http://localhost:8080/blogs. If everything is set up right, you should get back a JSON object containing metadata and an array of posts that only contains one post (Butter’s default blog post). Check that default blog for its slug (should be example-post), and then make a request to http://localhost:8080/blogs/{slug}. You should get back a JSON object with metadata and a single blog post object.
If you’ve made it this far, congratulations! You’ve set up a Dart API that connects to Butter CMS and provides blog content. Feel free to check out my sample code for more details, or reach out on LinkedIn with questions/comments.
You can continue reading Deploying Fullstack Dart to AWS Part II: Building the Web App.