On this page
In the last two posts of this series, we discussed building a Dart Frog API to fetch blog content from a headless CMS and building a Flutter web app to display the content in a browser. Now, it’s time to build a pipeline that deploys this content to AWS.
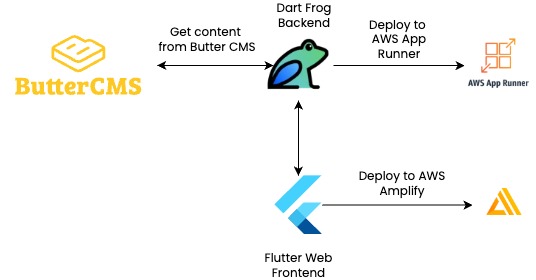
To recap, here is the structure of the app we are building:
For more details, you can also check out the articles on my personal blog about making the API, the app, and the pipeline.
Making Deployments Easy
Dart Frog and Flutter offer great developer experiences, but you still have to get your app deployed so that other people can enjoy it. AWS has several options when it comes to hosting web content on the cloud, such as AWS App Runner, Amplify, Lightsail, EC2 instances, and S3 Storage buckets. For this project, we’ll host the API on AWS App Runner, and the web content on Amplify. Be warned that since App Runner is always running, you will have to pay a small fee (around $10 USD) based on app usage.
If you wanted, you could deploy the entire app on App Runner, since it runs a container on the cloud. The benefit of separating hosting is that you don’t have to re-deploy the API if you make minor changes that only affect the app, and Amplify hosting provides a very quick and easy way to host and update static web content (with a free first year of hosting as well!).
For both API and app deployments, we can use Github Actions to automate deployment. For the API, make a file in .github/workflows titled deploy_api.yaml. Installing the Dart SDK and building the app, this pipeline makes use of AWS actions to push to a repository on Elastic Container Registry (ECR), which is then connected to a new App Runner service.
- name: Configure AWS credentials
  id: aws-credentials
  uses: aws-actions/configure-aws-credentials@v4
  with:
    aws-access-key-id: ${{ secrets.AWS_ACCESS_KEY_ID }}
    aws-secret-access-key: ${{ secrets.AWS_SECRET_ACCESS_KEY }}
    aws-region: ${{ secrets.AWS_REGION }}

- name: Login to Amazon ECR
  id: login-ecr
  uses: aws-actions/amazon-ecr-login@v2
  with:
    mask-password: true

- name: Build, tag, and push image to Amazon ECR
  id: build-image
  env:
    ECR_REGISTRY: ${{ steps.login-ecr.outputs.registry }}
    ECR_REPOSITORY: your-ecr-repository-name
    IMAGE_TAG: ${{ github.sha }}
  run: |
    cd api
    docker build -t $ECR_REGISTRY/$ECR_REPOSITORY:$IMAGE_TAG .
    docker push $ECR_REGISTRY/$ECR_REPOSITORY:$IMAGE_TAG
    echo "::set-output name=image::$ECR_REGISTRY/$ECR_REPOSITORY:$IMAGE_TAG"

- name: Deploy to App Runner
  id: deploy-apprunner
  uses: awslabs/amazon-app-runner-deploy@main
  with:
    service: your-app-runner-service-name
    image: ${{ steps.build-image.outputs.image }}
    access-role-arn: ${{ secrets.ROLE_ARN }}
    runtime: NODEJS_12
    region: ${{ secrets.AWS_REGION }}
    cpu: 1
    memory: 2
    port: 8080
    wait-for-service-stability: true
Be sure to set up the necessary IAM permissions in AWS to allow App Runner to access ECR and to allow Github to access ECR and App Runner.
To securely store API credentials to the CMS, you can use AWS Secrets Manager, because App Runner is able to use Secrets Manager to retrieve environment variables. You will need another IAM role to allow App Runner to access Secrets Manager.
For the app deployment, we will host this web app using AWS Amplify, which allows us to hook our repository directly up to AWS for automatic updates when the source code changes. I recommend creating a dedicated branch titled ci for this purpose. Add build and test pipelines to protect main, and then when the main branch is updated, automate a commit to the ci branch that will push your code change. To do this, create a file titled deploy_app.yaml inside .github/workflows. After checking out the repo and setting up Flutter, this action resets ci to the latest from main, builds the web app, copies the artifact to a dedicated folder, and commits it to the branch.
- name: Set branch to latest from main
  run: |
    git fetch origin main
    git reset --hard origin/main

- name: Build Web Application
  run: flutter build web -t lib/main_production.dart --dart-define BASE_URL=https://your-api-app-runner-url.com

- name: Copy Build Artifact
  run: |
    [[ -d artifact ]] && rm -r artifact
    mkdir artifact
    cp -R build/web artifact

- name: Commit the Artifact
  uses: stefanzweifel/git-auto-commit-action@v5
  with:
    branch: ci
    commit_message: 'ci: automated artifact update at ${{ github.sha }}'
    push_options: '--force'
On the AWS console, if you go to Amplify, you will have the option to host a web app, and you can select Github to connect your repository to AWS. If you have given AWS permissions to access your repository, you should be able to select it in the setup. Specify that you want to connect to the ci branch, and enter the build artifact’s directory (artifact/web) under Connecting a Monorepo?.
You should now have a blog app that is wired up to AWS on both backend and frontend. Frontend is downstream from backend, so changes to the server will prompt a new deployment on both frontend and backend, but changes to the client will only prompt a new deployment on the frontend. All of this will be triggered when new code is merged into main.
If you have read and followed our three blogs around this topic: Well done! You have now a full-stack blog app that fetches from Butter CMS, serves content in Dart Frog, presents content in a Flutter app, and is hooked up to be deployed on AWS.
I’d love to hear your impressions on this tutorial. Feel free to reach out on LinkedIn if you have questions/comments, or if you have done similar work deploying web apps on AWS. I learned tons working on this project, and I would love to hear more about others’ journeys!