On this page
In the previous post of this series, we discussed building a Dart Frog API to fetch blog content from a headless CMS. If you’ve been following along, you should have a working API that is delivering JSON blog posts. Now, it’s time to make a frontend that can display those posts.
To recap, here is the structure of the app we are building:
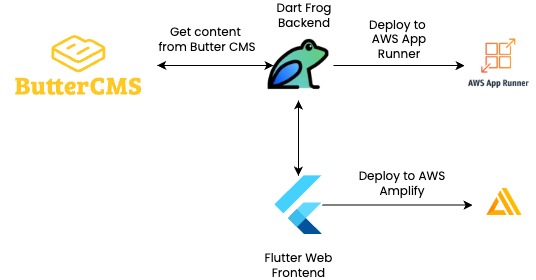
For more details, you can also check out the articles on my personal blog about making the API, the app, and the pipeline.
A Scalable, Responsive Frontend
On the frontend, we should continue to adhere to the principles of layered architecture by creating designated packages for the fetching and manipulating of API data. In addition, we can make a designated package for theming data and widgets.
For fetching data, create a blog_api_client. This package will be responsible for interacting with our Dart Frog api. Right now, we’re only adding two endpoints, but with a few steps we can make our API scalable in case we need to make more. Create a class that extends the BaseClient of the http package, and use that extended client to interact with your endpoints. Then, make a generic _sendRequest method that can be used for any type of future http request.
Future<T> _sendRequest<T>({
  required Uri uri,
  required FromJson<T> fromJson,
  String method = 'GET',
}) async {
  final request = Request(method.toUpperCase(), uri);
  final responseStream = await _client.send(request);
  final response = await Response.fromStream(responseStream);
  final responseBody = response.json;
  if (response.statusCode >= 400) {
    throw BlogApiClientFailure(
      statusCode: response.statusCode,
      error: responseBody,
    );
  }
}

/// {@template blog_api_client}
/// An implementation of an HTTP client to interact with the blog API.
/// {@endtemplate}
class BlogApiClient extends BaseClient {
  /// {@macro blog_api_client}
  BlogApiClient({required Client innerClient}) : _innerClient = innerClient;

  final Client _innerClient;

  @override
  Future<StreamedResponse> send(BaseRequest request) {
    request.headers.putIfAbsent(
      HttpHeaders.contentTypeHeader,
      () => ContentType.json.value,
    );
    request.headers.putIfAbsent(
      HttpHeaders.acceptHeader,
      () => ContentType.json.value,
    );
    return _innerClient.send(request);
  }

  @override
  void close() {
    _innerClient.close();
    super.close();
  }
}
Manipulating the data from our API is relatively simple, thanks to the legwork we did in our blog models package. To manipulate the data, create a blog_repository package with a class to get the data from the api client and turn it into the correct model for the presentation layer.
class BlogRepository {
  BlogRepository({required BlogApi blogApi}) : _blogApi = blogApi;

  final BlogApi _blogApi;

  /// Gets a list of [BlogPreview] objects.
  Future<List<BlogPreview>> getBlogPreviews() async {
    final response = await _blogApi.getBlogs();
    return response.data.map(BlogPreview.fromBlog).toList();
  }

  /// Gets a single [BlogDetail] object given a unique [slug].
  Future<BlogDetail> getBlogDetail({required String slug}) async {
    final response = await _blogApi.getBlog(slug);
    return BlogDetail.fromBlog(response.data);
  }
}
For theming and UI, we need to create a blog_ui package. There are several widgets that you can make here to extract reusable code, but the main two for this project are BlogCard (for displaying a preview on the overview page) and BlogDetailContent (for displaying the full content of a blog post).
The BlogCard is a material Card widget with some extra image and spacing features. The BlogDetailContent is a little more complicated. Since Butter CMS returns blog content in HTML, we need a way to convert HTML into widgets that will fit our app’s styles. The package flutter_html works well for this, but beware: as of writing this post, there is a compilation error in the stable version of flutter html. Using 3.0.0-alpha.5 will work. Alternatively, if you want to use the most recent prerelease version of 3.0.0-beta.2, you will need to fork the package repository and implement a workaround to bypass a rendering issue in older versions of iOS Safari.
Once you have created the api client, repository, and UI packages, you have all the layers necessary to build out two pages: an overview page to present a list of blog previews, and a detail page to present the full content of a blog post. When clicking on a card on the overview page, you navigate to a detail page. Each of these pages has a bloc with a data requested event. The handler for this event sends a request to fetch data on page load. For example, here is the handler for the overview page:
FutureOr<void> _onBlogOverviewPostsRequested(
  BlogOverviewPostsRequested event,
  Emitter<BlogOverviewState> emit,
) async {
  emit(BlogOverviewLoading());
  try {
    final previews = await _blogRepository.getBlogPreviews();
    emit(BlogOverviewLoaded(previews: previews));
  } on Exception catch (e) {
    if (e is BlogApiClientFailure) {
      emit(BlogOverviewFailure(error: e.body));
      return;
    }
    emit(BlogOverviewFailure(error: e.toString()));
  }
}
The detail page data fetch handler is almost the same, but with different state names (e.g., BlogDetailLoading instead of BlogOverviewLoading) and a call to getBlogDetail instead of getBlogPreviews.
With our packages and our blocs set up, we can now code out our page views. Each page sends a request to the bloc on page load, then takes advantage of Dart 3 switch patterns on sealed classes to return content based on blog state. We will use go_router to navigate between overview and detail. The blog overview page returns a list of BlogCard widgets:
ListView.builder(
  itemCount: previews.length,
  itemBuilder: (context, index) {
    final preview = previews[index];
    return BlogCard(
      title: preview.title,
      subtitle: preview.description,
      published: preview.published,
      imageUrl: preview.image,
      onTap: () {
        context.go(
          '/${preview.slug}',
        );
      },
    );
  },
);
The detail page, meanwhile, returns our custom BlogContentWidget:
BlogDetailContent(
  authorName: '${detail.author.firstName} ${detail.author.lastName}',
  body: detail.body,
  published: detail.published,
  slug: detail.slug,
  title: detail.title,
  authorImage: detail.author.profileImage,
  featuredImage: detail.featuredImage,
);
Now start your API and set your BASE_URL to http://localhost:8080. Run your Flutter app locally, and you should see the blog overview page when starting up (your content will be different):
When you click on one of the cards, you should see a blog detail:

If you’ve made it this far, congratulations! You now have a full-stack Dart app that displays content fetched in the backend from a headless CMS. Feel free to check out my sample code for more details, or reach out on LinkedIn with questions/comments!
Continue reading Deploying Fullstack Dart to AWS Part III: Deploying to AWS.