On this page
AWS Amplify is a great solution to easily build and host full-stack applications for both web and mobile. It has SDKs for iOS, Android, web, React Native, and Flutter.
AWS Amplify allows you to do a lot of helpful tasks when it comes to app development. For example, you can use AWS Amplify to:
- Create and connect to an app backend: Create a backend hosted on AWS and connect it using the cross-platform Amplify Flutter library, which gives you the ability to enable real-time data interactions with offline support.
- Host a web app: Easily deploy web app or website to the fast, secure and reliable AWS content delivery network with AWS Amplify Hosting.
- Use pre-built authentication UI: The AWS Authenticator gives you a ready-made UI component for your app.
In this tutorial we’re going to be focusing on the backend functionality by adding AWS authentication to our Flutter project using email and password.
Let’s get started! 🙌
💡Overview
The main goal of this tutorial is to create a new project with AWS Amplify that uses Very Good Ventures tools and best practices. We will create an app, enable the authentication service, and implement it in the app. This example will have a layered architecture (check out this article by my teammate Marcos Sevilla) with 100% test coverage, and our starter app will be generated by Very Good CLI ✨
You’re going to see how easily the Very Good Ventures tools and best practices can be implemented with AWS Amplify.
Installation
Install the AWS Amplify CLI to be able to configure the project.
npm install -g @aws-amplify/cliAWS Amplify configuration
The next step is to configure AWS Amplify and create an IAM User. This user enables you to manage users and user permissions in AWS. For more detail on creating an IAM User, refer to these docs.
1. Run the amplify configure command.
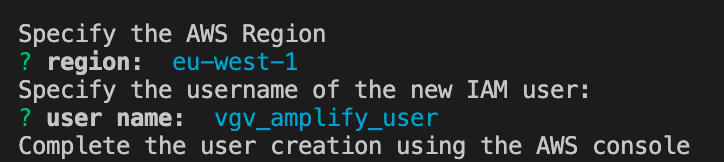
amplify configureThis command will ask you to sign into the AWS Console (you need to copy the URL that appears in the terminal). After signing in, the CLI will ask you to create an IAM user.
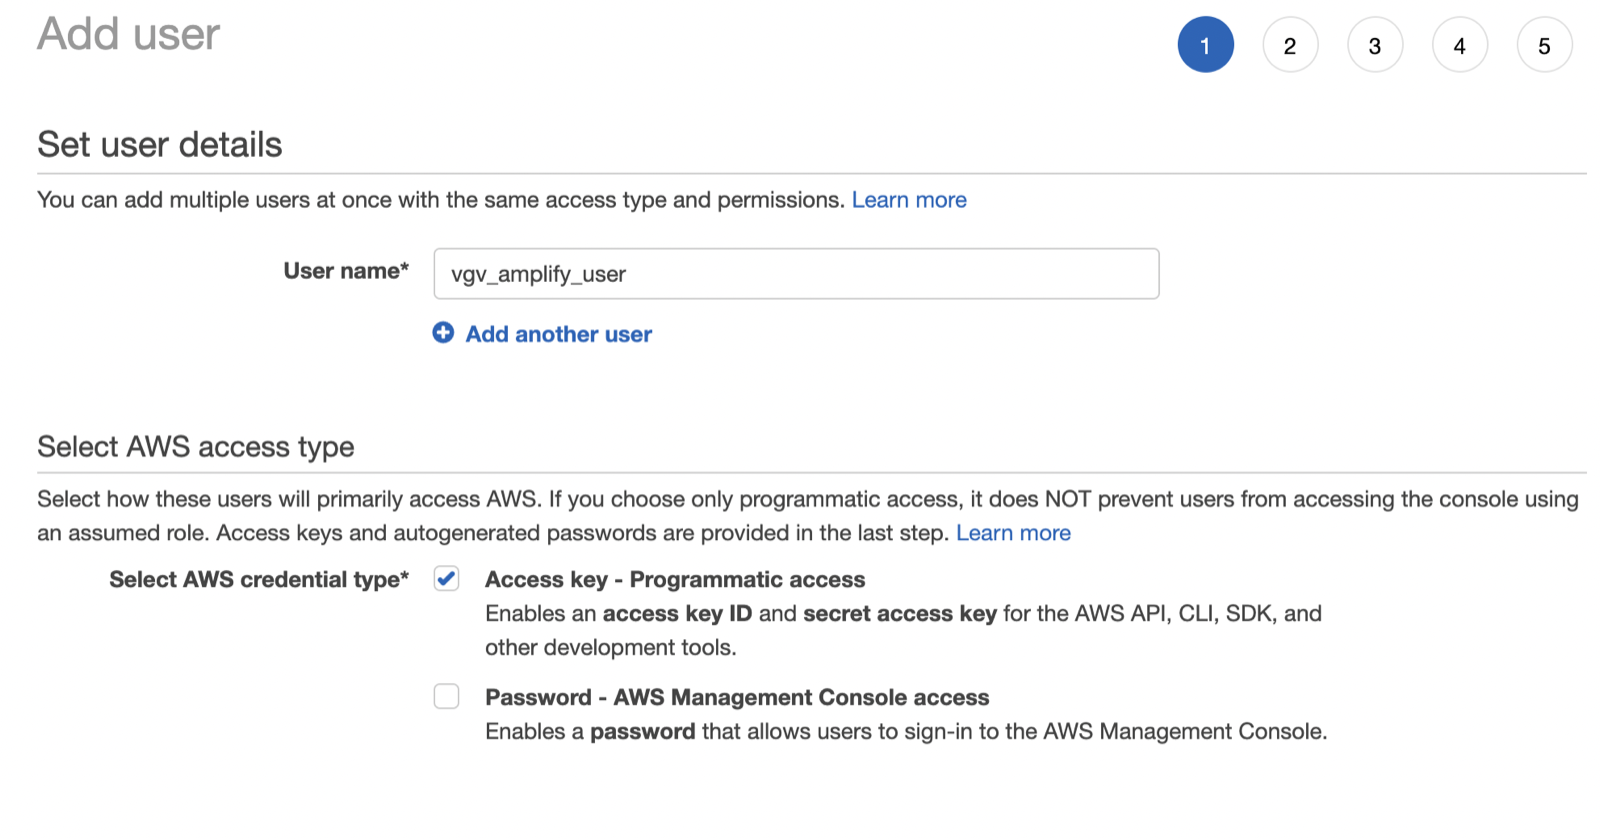
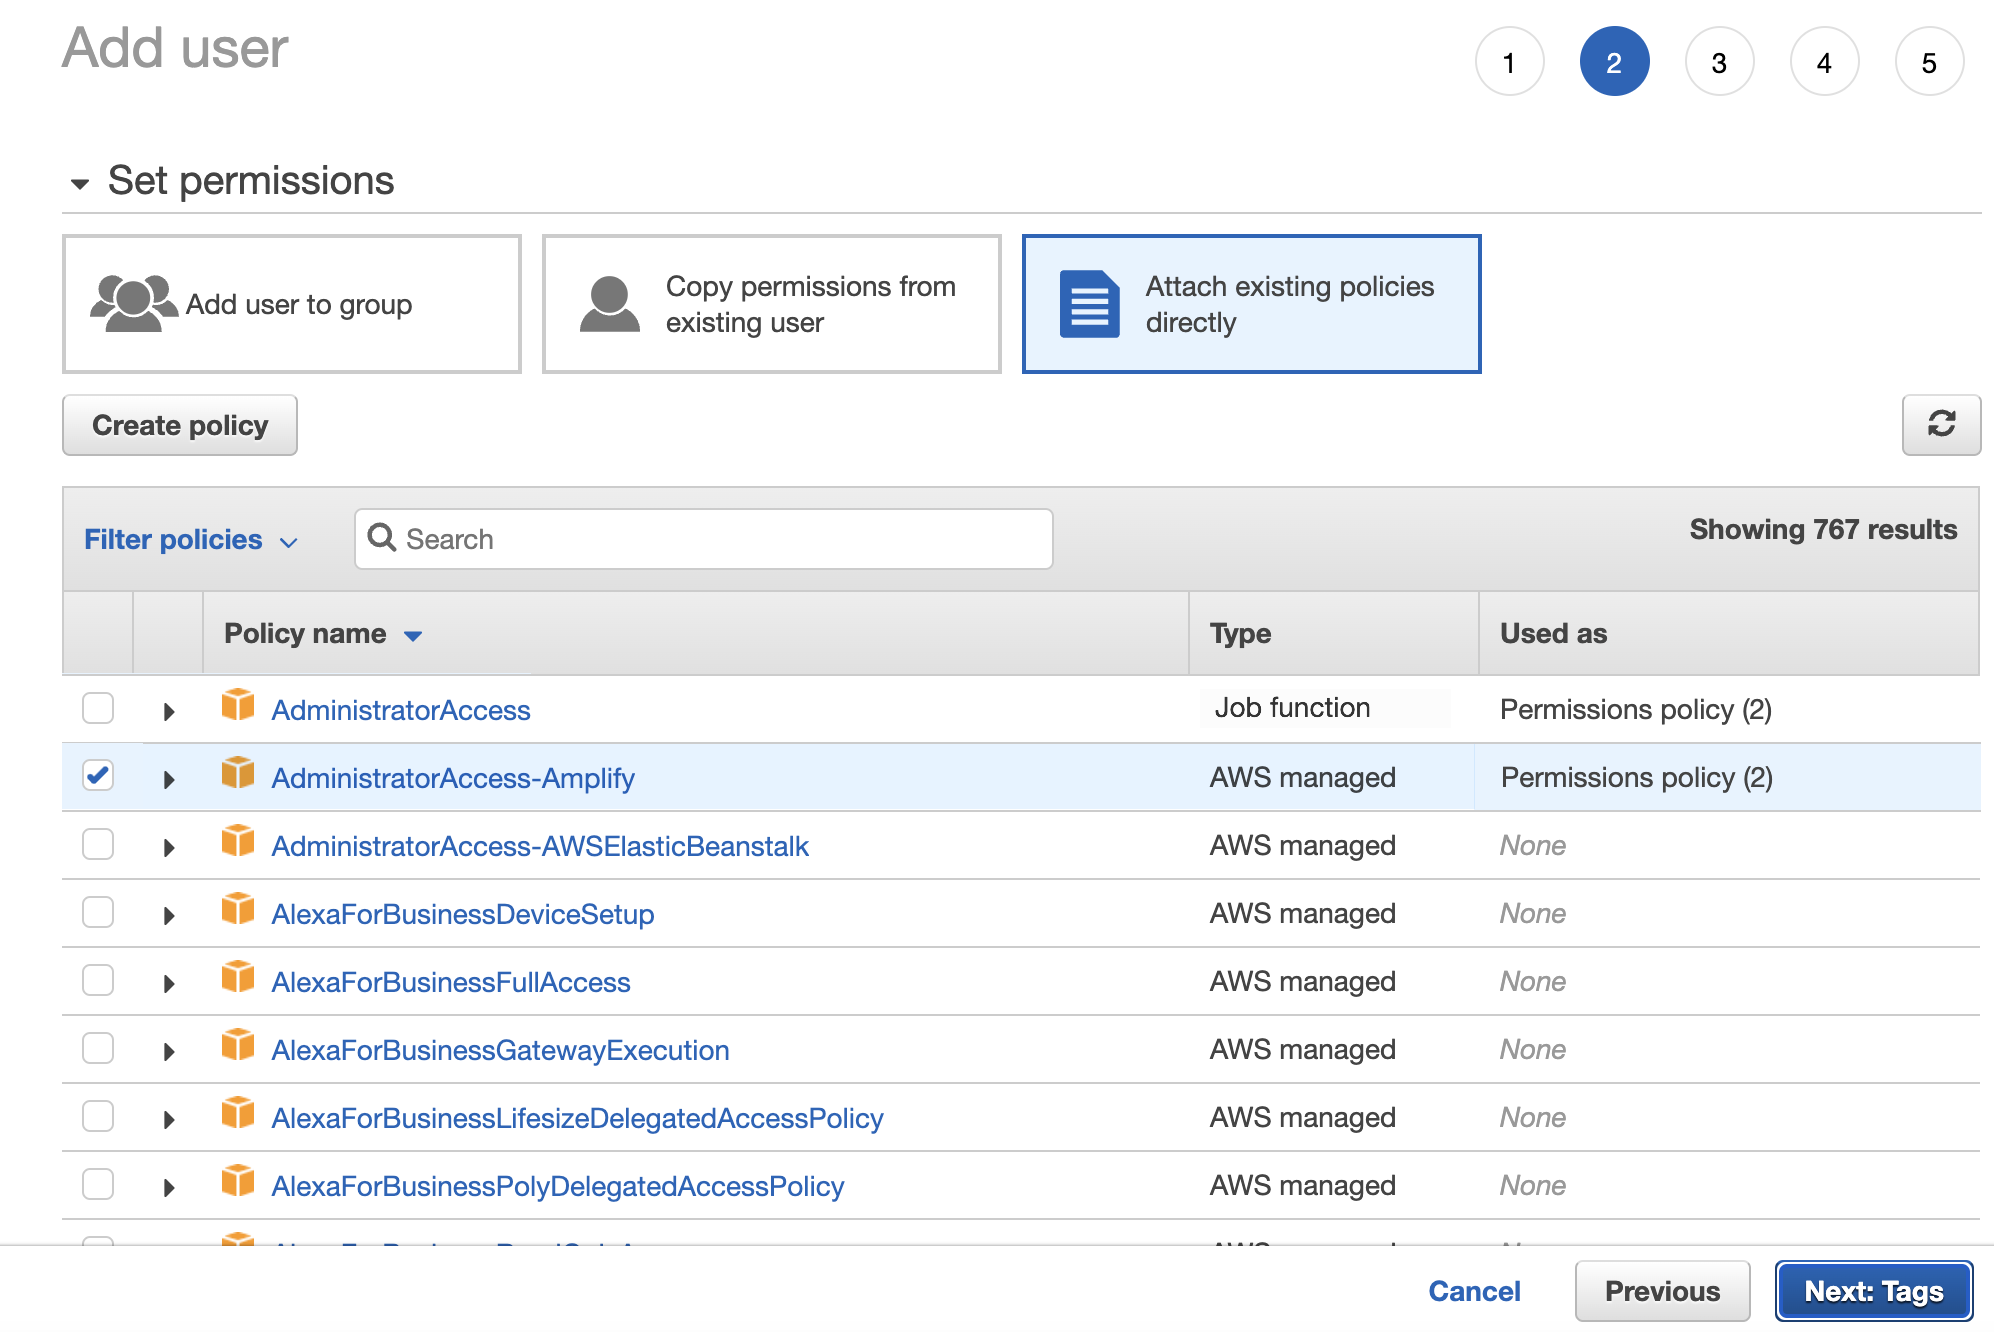
2. After filling out the IAM user information you need to continue in the web browser to manage the policy AdministratorAccess-Amplify in your account. Note that we’re providing administrative access to the account in this example for the sake of simplicity, but you should follow best practices when it comes to admin access.
- Set the username (in this case I added vgv_amplify_user but you can use your own username).
- Select AdministratorAccess-Amplify for this user.
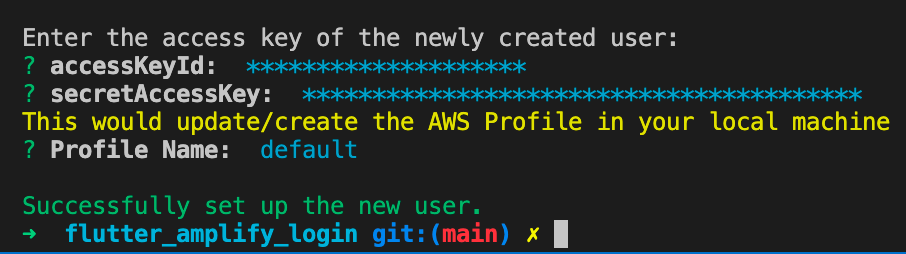
- Check the review page and create the user. As you can see, you have important information here, like the console URL, the access key ID, and the secret access key. Don’t close this page, because we need to use these keys to complete the configuration
3. Go back to the terminal and set the keys that we saw in the last section. Set the Profile name as default.
AWS Amplify initialization
1. Run the command amplify init locally to create your Amplify project. Then, run amplify push. Here we’re going to fill out a few questions to set up the project.

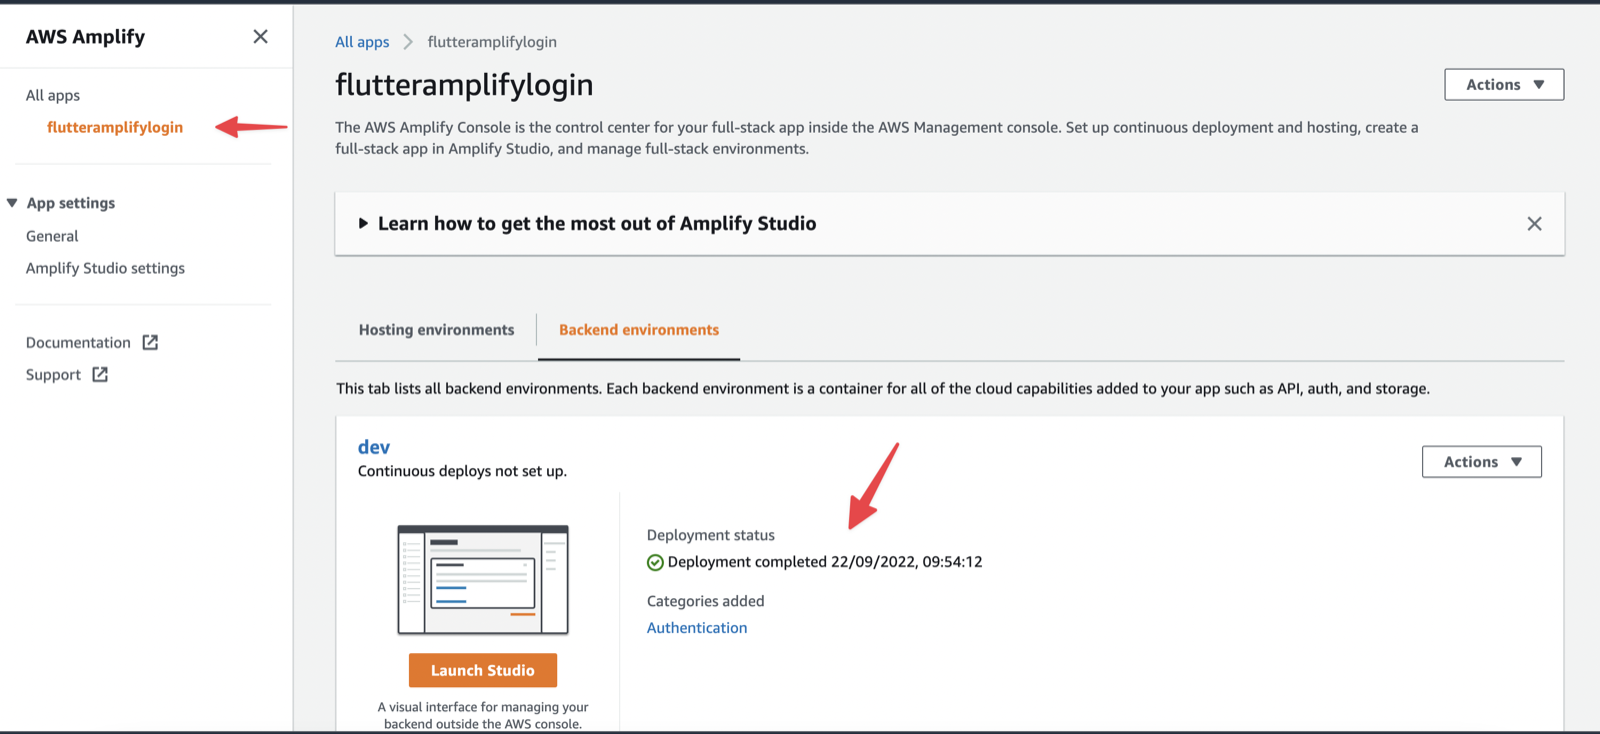
After finish the form, you should receive this success message. This means that your project is successfully initialized in the cloud.

You can check that everything is setup correctly if you sign into your AWS account and search for AWS Amplify. There you are going to see your project and the creation date.
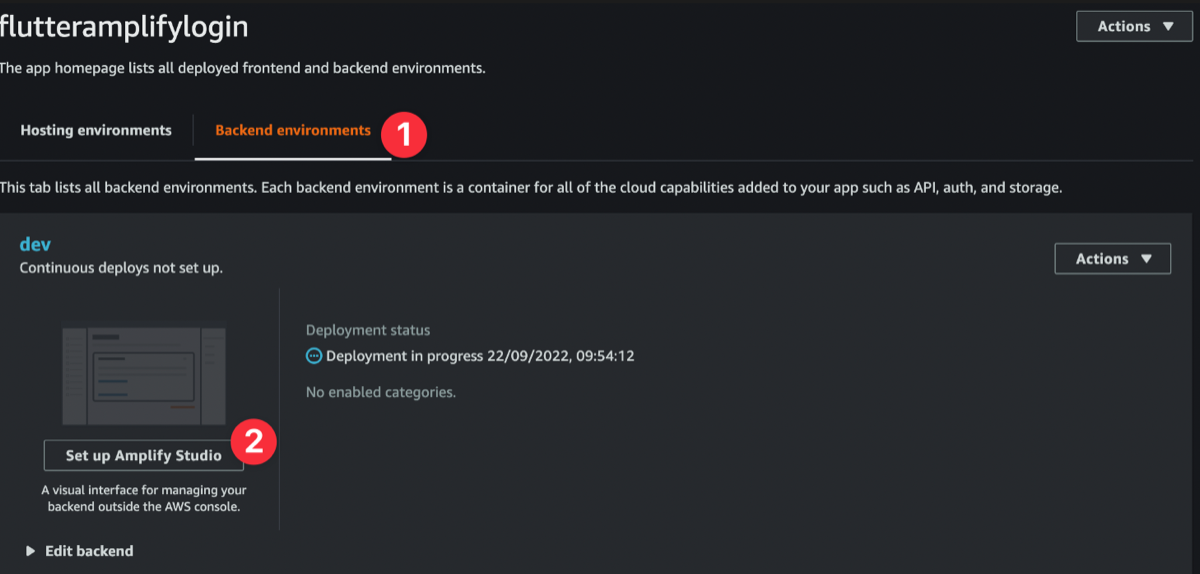
2. The next step is to enable the Amplify Studio. With this, we’re going to have an Admin UI that allows us to control the project in the cloud very easily.

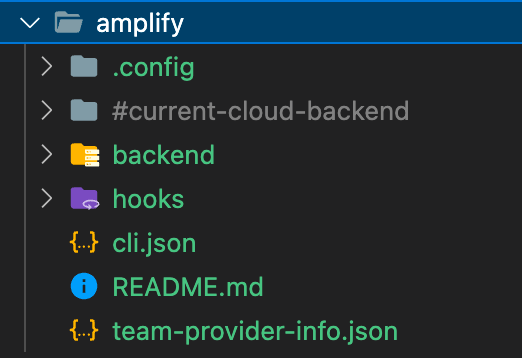
3. We now have a new folder in the current directory which contains all the Amplify configurations.
Also, we will have a new file in the lib folder called amplify_configuration.json (note that we renamed the file from the generated name: amplifyconfiguration.json). This file will contain the configurations of the services that we want to use (in this example, authentication). But for now, it shouldn’t contain many lines, since we haven’t configured authentication yet.

Add authentication to AWS Amplify
We are going to use the AWS Amplify CLI to add the authentication configuration. We need to run amplify add auth command to start. Then we need to answer a few questions:
? Do you want to use the default authentication and security configuration?
    `Default configuration`
? How do you want users to be able to sign in?
    `Username`
? Do you want to configure advanced settings?
    `No, I am done.`
After completing these questions, it is important to run the amplify push command because this is going to push all the changes that we made to the cloud.
After a few minutes, you should see this message in the terminal: All resources are updated in the cloud. You can check that the authentication service is deployed in Amplify Studio.
If you check your amplify_configuration.dart file (note that we renamed the file from the generated name: amplifyconfiguration.dart). You can now see that there are new lines within regarding authentication.
Now, we have the authentication service deployed in the cloud, but we need to implement it in our Flutter application.
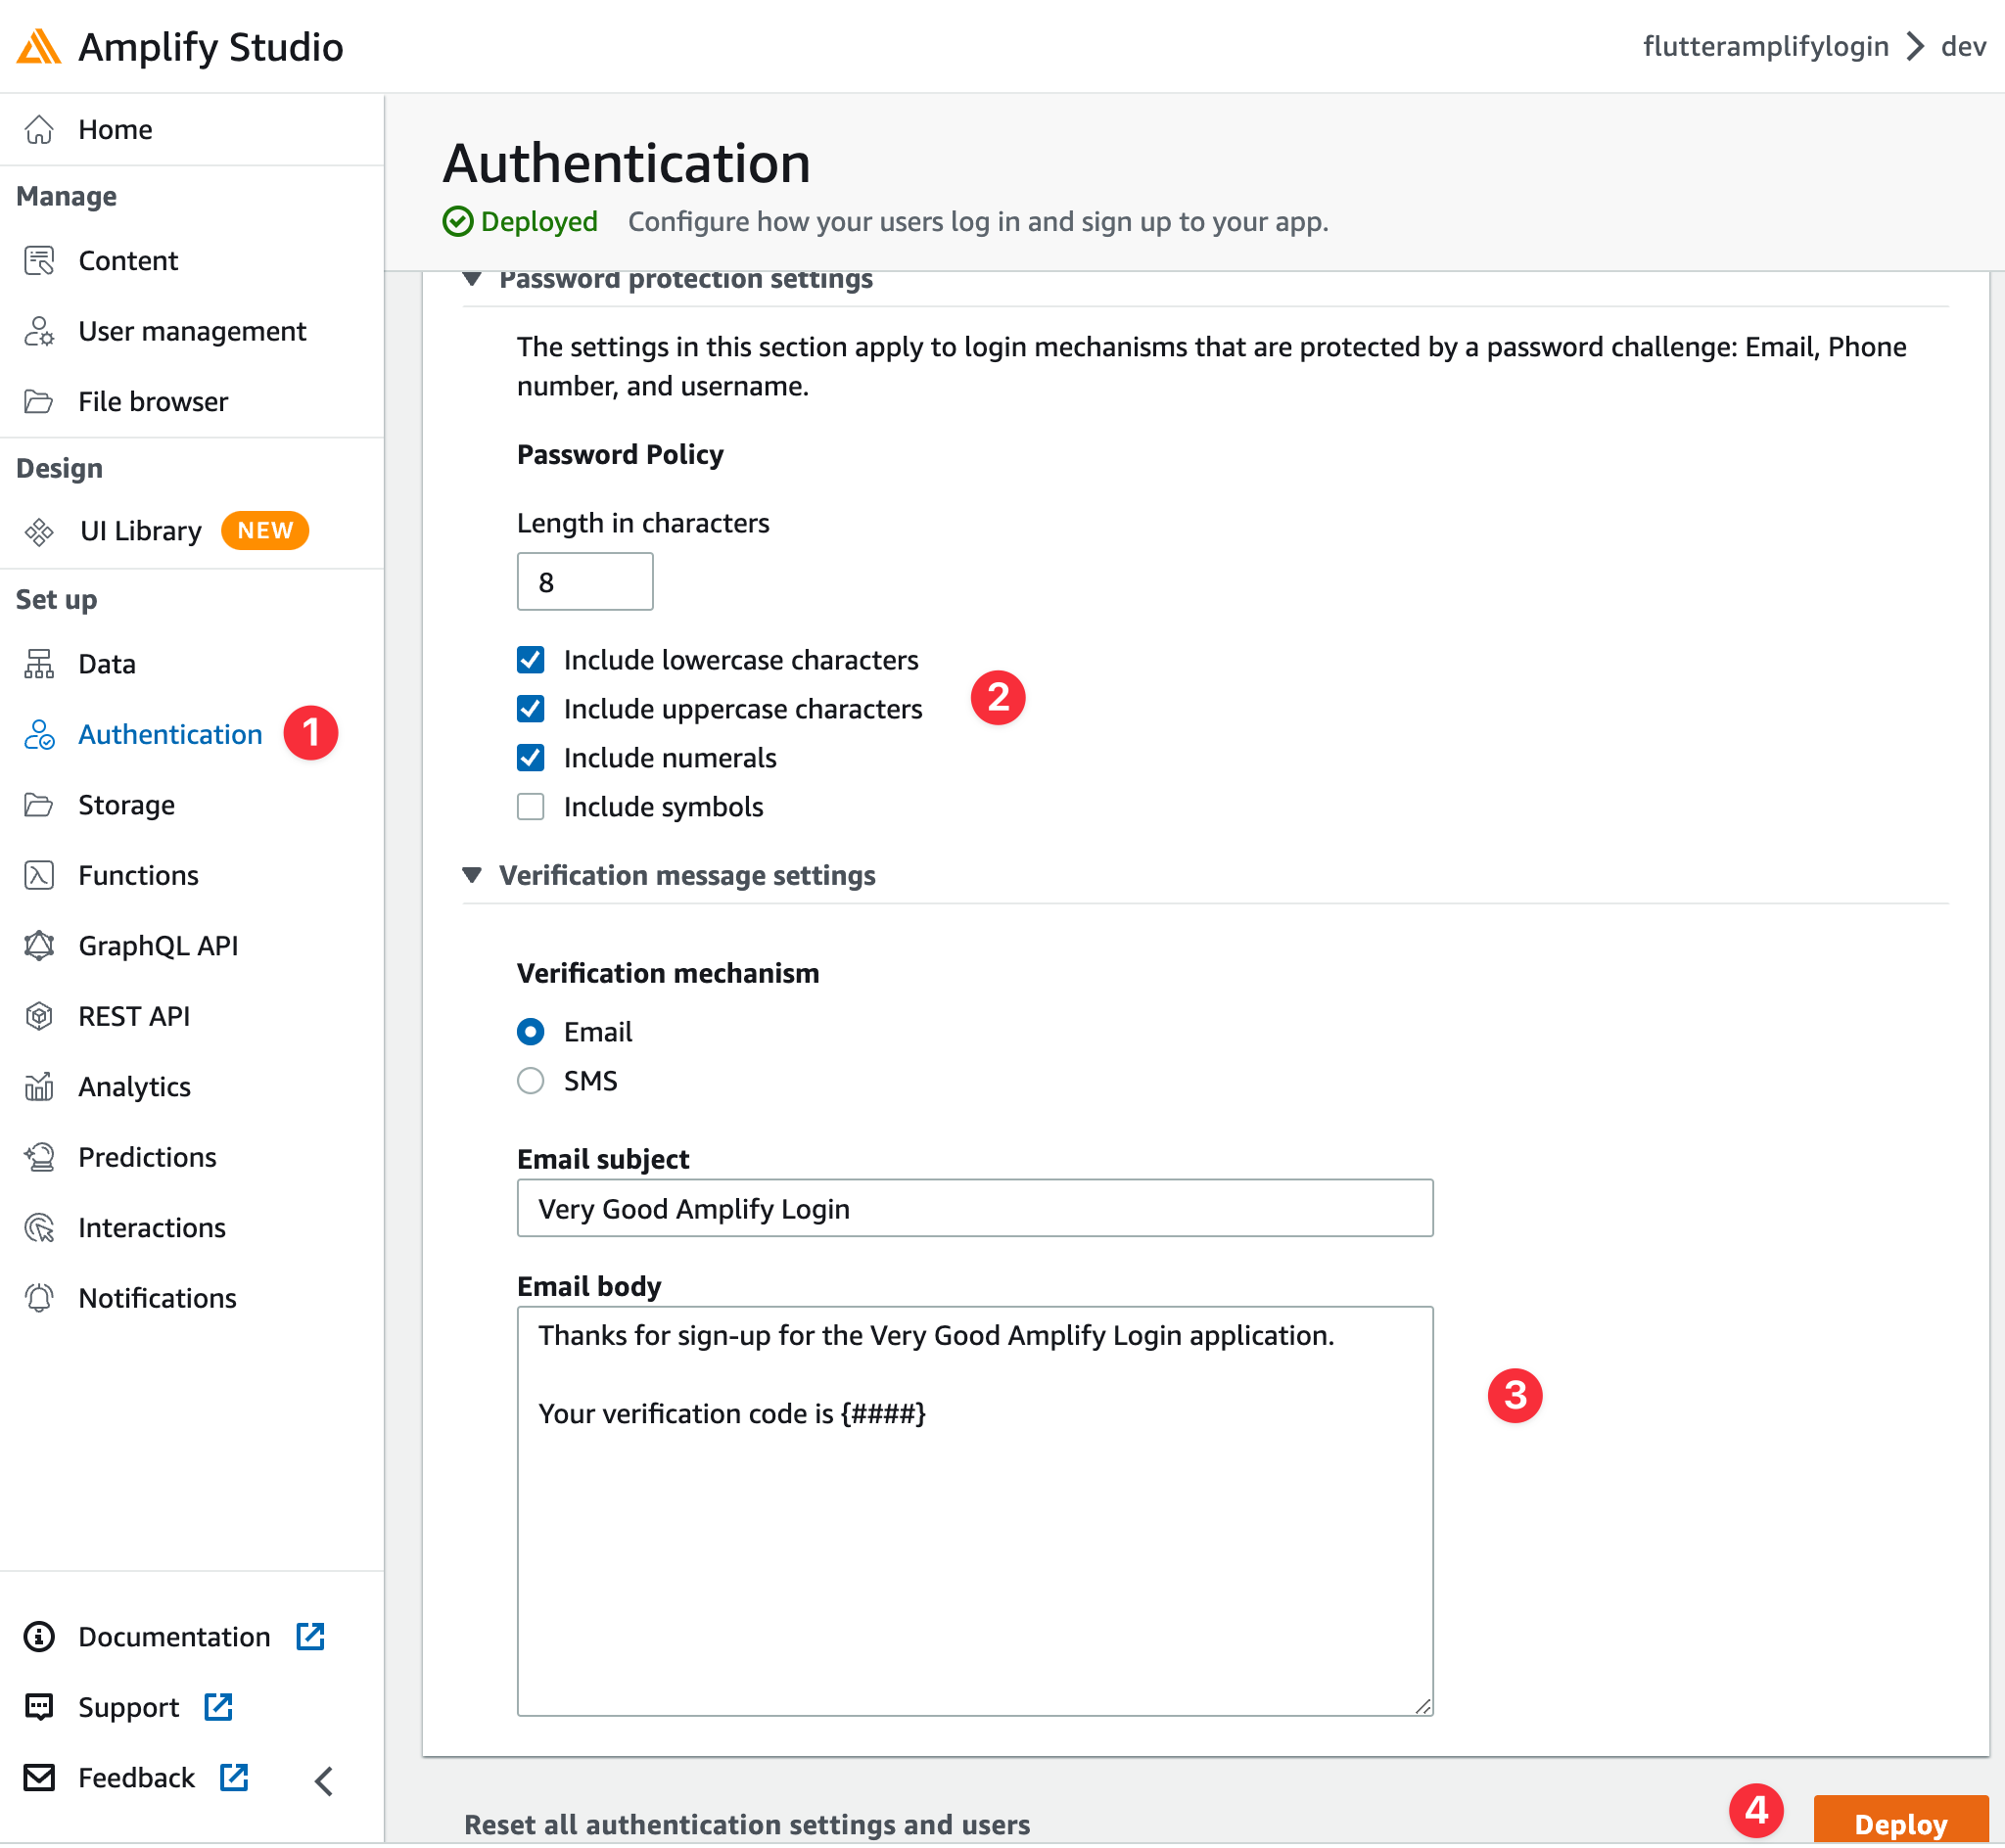
Authentication settings in Amplify Studio
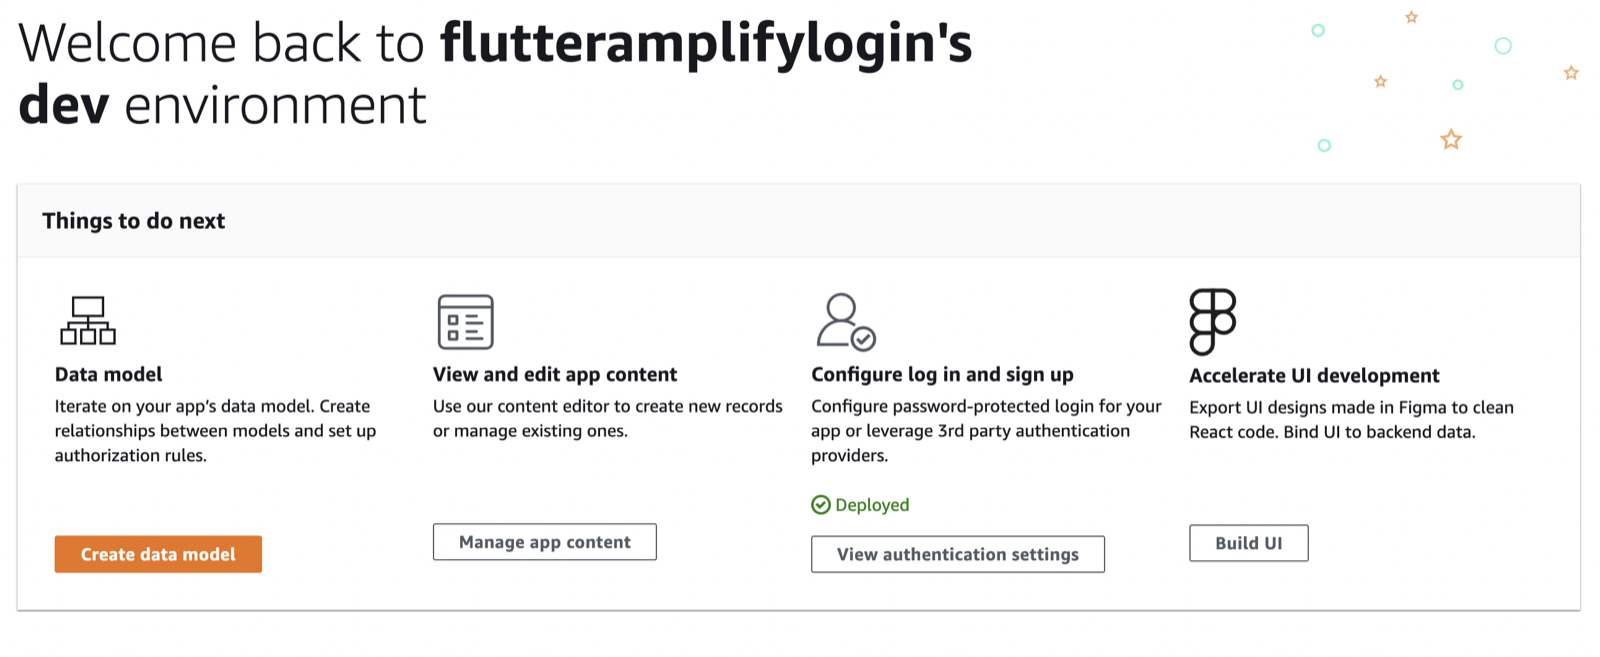
Now we’re going to configure the authentication settings in Amplify Studio. Here we’ll be able to see password protection settings and change the body of the email that is sent to the user when the user signs up.
- Go to Amplify Studio and select the project that you created.
- Go to password protection settings and change the password policy.
- Go to verification message settings and change the body of the email that is sent to the user when the user is signing up.
- Deploy the changes.
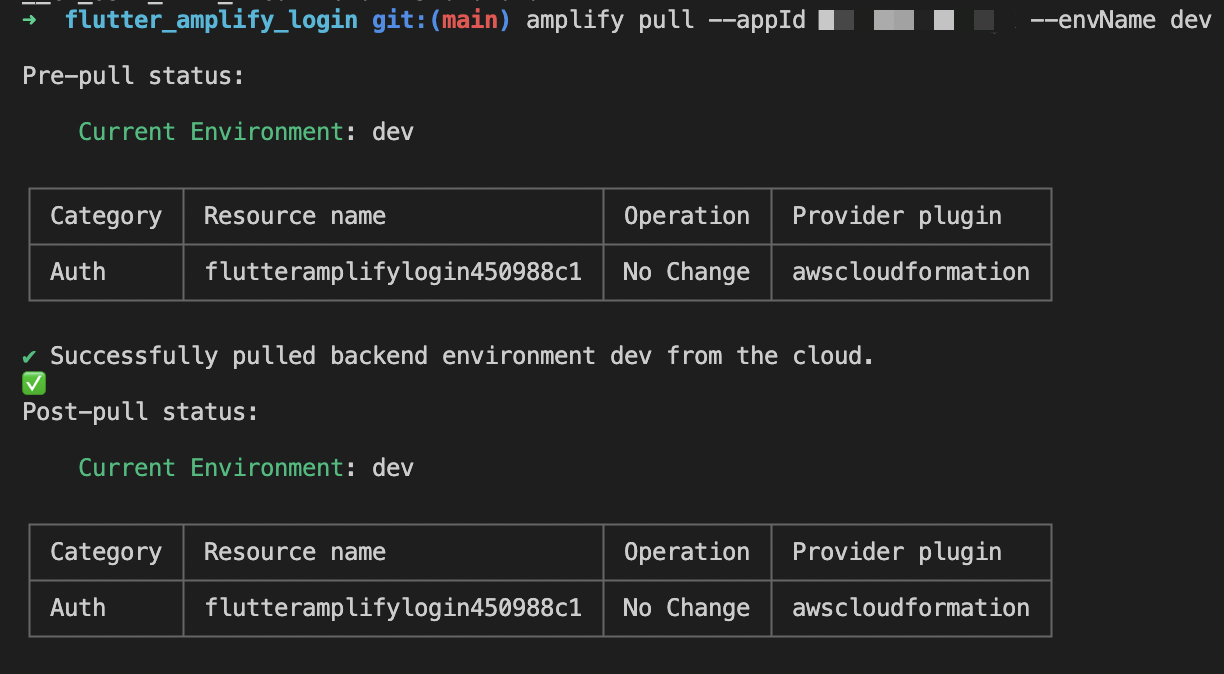
After deploying the changes, we need to pull them. To do that, go to the terminal and run the following command at the root of your Flutter application.
amplify pull --appId [YOUR_APP_ID] --envName dev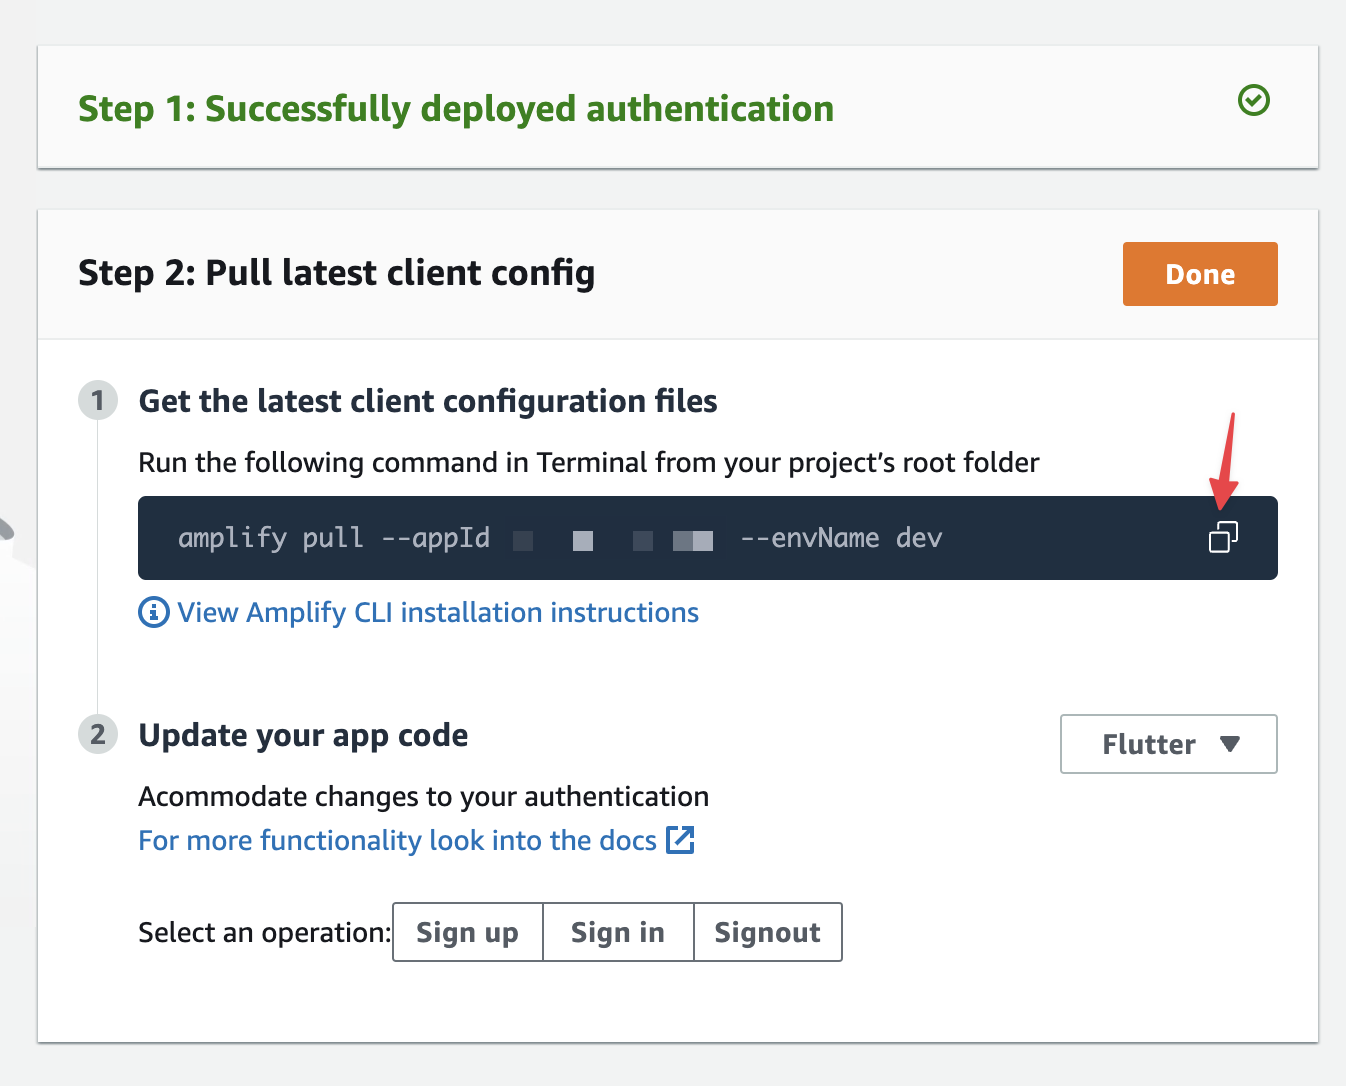
Then you should see the following message in the terminal.
Create a new Flutter app (using the default Very Good Core template).
With your AWS Amplify project now setup, we can now create the Flutter application using Very Good CLI.
1. Activate Very Good CLI.
dart pub global activate very_good_cli2. Create a new Flutter project.
very_good create flutter_amplify_login —desc "An example Flutter app using Very Good CLI and AWS Amplify Authentication"Create the auth client package
Now is time to create a new package called auth_client in the packages folder (you should create the packages folder in the root). This package is going to contain all the code related to the authentication service.
very_good create auth_client -t flutter_pkg --desc "AWS Amplify auth client"We’re going to use the amplify_auth_cognito package to implement the authentication service in our Flutter application. Also, we’re going to use the amplify_flutter package to connect our Flutter application with the AWS Amplify project.
We need to add these packages to our pubspec.yaml file into the auth_client package. Note that we’re using the latest stable versions of these packages, but you can check out the developer preview versions, which include cross-platform support for web and desktop.
1. Add the amplify_auth_cognito package to the pubspec.yaml file.
amplify_auth_cognito: ^0.6.92. Add the amplify_flutter package to the pubspec.yaml file.
amplify_flutter: ^0.6.9Once we have all the dependencies added, we can start with the implementation. This is the structure of the auth_client package.
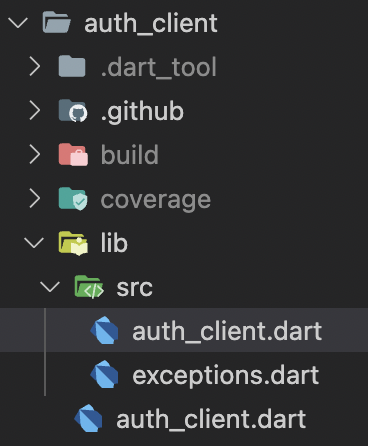
In the auth_client file, we’re going to create a class called AuthClient that will be the entrypoint to the authentication service. This class will have all the methods that we need to implement the authentication service:
- signUp will sign up a new user
- confirmSignUp will confirm the sign up of a new user
- signIn will sign in a user
- signOut will sign out a user
- onHubEvent will listen to the events that are happening in the authentication service.
/// Enum indicating the Authentication status
enum AuthStatus {
  /// Authenticated session
  authenticated,

  /// Unauthenticated session
  unauthenticated,
}

/// {@template auth_client}
/// AWS Amplify auth client.
/// {@endtemplate}
class AuthClient {
  /// {@macro auth_client}
  AuthClient({
    required AuthCategory auth,
    required AmplifyHub hub,
  })  : _auth = auth,
        _hub = hub {
    _hub.listen([HubChannel.Auth], _onHubEvent);
  }

  final AuthCategory _auth;
  final AmplifyHub _hub;

  final _controller = StreamController();

  /// Stream current [AuthStatus]
  Stream get authStatus => _controller.stream;

  void _onHubEvent(dynamic hubEvent) {
    if (hubEvent is HubEvent) {
      switch (hubEvent.eventName) {
        case 'SIGNED_IN':
          _controller.add(AuthStatus.authenticated);
          break;
        case 'SIGNED_OUT':
        case 'SESSION_EXPIRED':
          _controller.add(AuthStatus.unauthenticated);
          break;
      }
    }
  }

  /// Returns whether the user is authenticated or not
  ///
  /// Throws a [FetchAuthenticatedUserFailure] if an exception occurs.
  Future isUserAuthenticated() async {
    try {
      final currentSession = await _auth.fetchAuthSession();
      return currentSession.isSignedIn;
    } catch (error, stackTrace) {
      Error.throwWithStackTrace(
        FetchAuthenticatedUserFailure(error),
        stackTrace,
      );
    }
  }

  /// Creates a new user with the [email] and [password] variables.
  ///
  /// Throws a [SignUpFailure] if an exception occurs.
  /// Throws a [UserAlreadyExistException] if email already exists.
  Future signUp(
    String email,
    String password,
  ) async {
    try {
      final userAttributes = {
        CognitoUserAttributeKey.email: email,
      };
      final options = CognitoSignUpOptions(userAttributes: userAttributes);
      await _auth.signUp(
        username: email,
        password: password,
        options: options,
      );
    } on UsernameExistsException catch (error, stackTrace) {
      Error.throwWithStackTrace(UserAlreadyExistException(error), stackTrace);
    } catch (error, stackTrace) {
      Error.throwWithStackTrace(SignUpFailure(error), stackTrace);
    }
  }

  /// Confirm the sign up with a confirmation code.
  Future confirmSignUp(
    String email,
    String confirmationCode,
  ) async {
    try {
      await _auth.confirmSignUp(
        username: email,
        confirmationCode: confirmationCode,
      );
    } catch (error, stackTrace) {
      Error.throwWithStackTrace(
        ConfirmationCodeSignUpFailure(error),
        stackTrace,
      );
    }
  }

  /// Sign in with the provided [email] and [password].
  ///
  /// Throws a [UserDoesNotExistException] if [UserNotFoundException] occurs
  /// (provided email is not correct).
  /// Throws a [UserDoesNotExistException] if [NotAuthorizedException] occurs.
  /// (provided email is correct, but the password isn't, or vice versa).
  /// Throws a [SignInFailure] if an exception occurs.
  Future signIn(String email, String password) async {
    try {
      await _auth.signIn(
        username: email,
        password: password,
      );
    } on UserNotFoundException catch (error, stackTrace) {
      Error.throwWithStackTrace(UserDoesNotExistException(error), stackTrace);
    } on NotAuthorizedException catch (error, stackTrace) {
      Error.throwWithStackTrace(UserNotAuthorizedException(error), stackTrace);
    } catch (error, stackTrace) {
      Error.throwWithStackTrace(SignInFailure(error), stackTrace);
    }
  }

  /// Sign out the current user.
  ///
  /// Throws a [SignOutFailure] if an exception occurs.
  Future signOut() async {
    try {
      await _auth.signOut();
    } catch (error, stackTrace) {
      Error.throwWithStackTrace(SignOutFailure(error), stackTrace);
    }
  }
}
As you can see there are custom exceptions that you can find here.
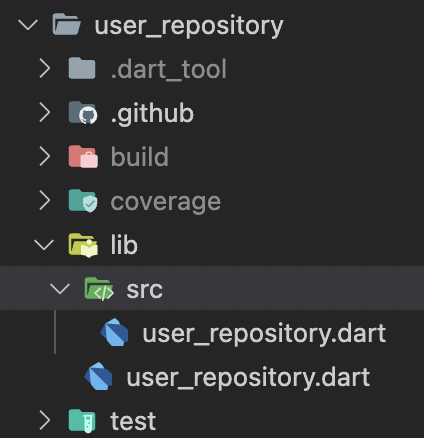
Create the user repository package
The user repository will interact with the auth_client package. We’re creating this package to abstract the implementations details of the Amplify auth_client from the rest of our application, according to our layered architecture. The structure is the following:
1. Create a new package called user_repository and add the auth_client package as a dependency to the pubspec.yaml file:
very_good create user_repository -t flutter_pkg --desc "A package which manages the user domain"dependencies:
auth_client:
path: ../auth_clientOnce we have the package created, we can start working on the user_repository.dart file.
2. Create a new file called user_repository.dart and add the following code:
/// {@template user_repository}
/// A package which manages the user domain
/// {@endtemplate}
class UserRepository {
  /// {@macro user_repository}
  const UserRepository({
    required AuthClient authClient,
  }) : _authClient = authClient;

  final AuthClient _authClient;

  /// Stream of [AuthStatus] which will emit the current user status when
  /// the authentication state changes.
  ///
  /// Emits [AuthStatus.unauthenticated] if the user is not authenticated.
  Stream get authStatus => _authClient.authStatus;

  /// Starts the Sign Up flow.
  ///
  /// Throws a [SignUpFailure] if [AuthenticationException] occurs.
  /// Throws a [UserAlreadyExistException] if [UserAlreadyExistException]
  /// occurs.
  Future signUp({
    required String email,
    required String password,
  }) async {
    try {
      await _authClient.signUp(email, password);
    } on UserAlreadyExistException catch (error, stackTrace) {
      Error.throwWithStackTrace(UserAlreadyExistException(error), stackTrace);
    } on AuthenticationException catch (error, stackTrace) {
      Error.throwWithStackTrace(SignUpFailure(error), stackTrace);
    }
  }

  /// Starts the Sign In flow.
  ///
  /// Throws a [SignInFailure] if [AuthenticationException] occurs.
  /// Throws a [UserDoesNotExistException]
  /// if [UserDoesNotExistException] occurs.
  Future signIn({
    required String email,
    required String password,
  }) async {
    try {
      await _authClient.signIn(email, password);
    } on UserDoesNotExistException catch (error, stackTrace) {
      Error.throwWithStackTrace(UserDoesNotExistException(error), stackTrace);
    } on AuthenticationException catch (error, stackTrace) {
      Error.throwWithStackTrace(SignInFailure(error), stackTrace);
    }
  }

  /// Starts the Sign Out flow.
  ///
  /// Throws a [SignOutFailure] if an [AuthenticationException] occurs.
  Future signOut() async {
    try {
      await _authClient.signOut();
    } on AuthenticationException catch (error, stackTrace) {
      Error.throwWithStackTrace(
        SignOutFailure(error),
        stackTrace,
      );
    }
  }

  /// Starts the Confirmation Sign Up flow.
  ///
  /// Throws a [ConfirmationCodeSignUpFailure] if an [AuthenticationException]
  /// occurs.
  Future confirmSignUp({
    required String email,
    required String confirmationCode,
  }) async {
    try {
      await _authClient.confirmSignUp(email, confirmationCode);
    } on AuthenticationException catch (error, stackTrace) {
      Error.throwWithStackTrace(
        ConfirmationCodeSignUpFailure(error),
        stackTrace,
      );
    }
  }

  /// Returns whether the user is authenticated or not.
  ///
  /// Returns `false` if an exception occurs.
  Future isUserAuthenticated() async {
    try {
      return _authClient.isUserAuthenticated();
    } catch (_) {
      return false;
    }
  }
}
Now we have the user_repository package ready to be used in the blocs.
Update pubspec.yaml in the root folder
We need to add the user_repository package and auth_client as a dependencies to the pubspec.yaml file in the root folder:
dependencies:
  auth_client:
    path: packages/auth_client
  user_repository:
    path: packages/user_repository
Create the needed features
We’re going to create the following features in the lib folder:
- App
- Sign in
- Sign up
- Sign out
- Confirmation code
- Home
Create the needed blocs
We’re going to create different blocs for each feature. You can create a feature quickly using flutter_bloc_feature brick. This brick is very useful to create all the structures for our feature. To use it you need to activate mason, if you don’t know what mason is, you can find more information about it.
Let’s get started! 🙌
- app_bloc.dart: This bloc will be responsible for the authentication flow. It will listen to the authStatus stream and emit the correct state. Additionally, it will handle the sign-out method.
class AppBloc extends Bloc {
  AppBloc({
    required UserRepository userRepository,
    required bool isAuthenticated,
  })  : _userRepository = userRepository,
        super(
          isAuthenticated
              ? const AppState.authenticated()
              : const AppState.unauthenticated(),
        ) {
    on(_onAuthStatusChanged);
    on(_onSignOutRequested);
    _authStatusSubscription = _userRepository.authStatus.listen(
      _authStatusChanged,
    );
  }

  final UserRepository _userRepository;
  late StreamSubscription _authStatusSubscription;

  void _authStatusChanged(AuthStatus authStatus) =>
      add(AppAuthStatusChanged(authStatus));

  void _onAuthStatusChanged(
    AppAuthStatusChanged event,
    Emitter emit,
  ) {
    switch (event.authStatus) {
      case AuthStatus.authenticated:
        emit(const AppState.authenticated());
        break;
      case AuthStatus.unauthenticated:
        emit(const AppState.unauthenticated());
        break;
      case AuthStatus.sessionExpired:
        emit(const AppState.sessionExpired());
        break;
    }
  }

  void _onSignOutRequested(AppSignOutRequested event, Emitter emit) {
    unawaited(_userRepository.signOut());
  }

  @override
  Future close() {
    _authStatusSubscription.cancel();
    return super.close();
  }
}
You can check the app_event and the app_state files here.
- sign_in_bloc.dart: This bloc will be responsible for the sign-in flow. It will listen to the SignInEvent event and emit the correct state. Additionally, it will have events to update the state of the form.
As you can see in here, we are using Formz to handle the form state. Formz is a package that provides a set of classes that can be used to handle the state of a form.
There is a package called form_inputs into packages folder. This package is a wrapper of Formz that provides some custom inputs that can be used in the forms. You can find it here.
class SignInBloc extends Bloc {
  SignInBloc({
    required UserRepository userRepository,
  })  : _userRepository = userRepository,
        super(const SignInState()) {
    on(_onEmailChanged);
    on(_onPasswordChanged);
    on(_onSignInSubmitted);
    on(_onSignInPasswordVisibilityToggled);
  }

  final UserRepository _userRepository;

  void _onEmailChanged(
    SignInEmailChanged event,
    Emitter emit,
  ) {
    final email = Email.dirty(event.email);
    emit(
      state.copyWith(
        status: SignInStatus.edit,
        email: email,
        isValid: Formz.validate([email, state.password]),
      ),
    );
  }

  void _onPasswordChanged(
    SignInPasswordChanged event,
    Emitter emit,
  ) {
    final password = Password.dirty(event.password);
    emit(
      state.copyWith(
        status: SignInStatus.edit,
        password: password,
        isValid: Formz.validate([password, state.email]),
      ),
    );
  }

  Future _onSignInSubmitted(
    SignInSubmitted event,
    Emitter emit,
  ) async {
    if (!state.isValid) return;
    emit(state.copyWith(status: SignInStatus.loading));
    try {
      await _userRepository.signIn(
        email: event.email,
        password: event.password,
      );
      emit(state.copyWith(status: SignInStatus.success));
    } catch (error, stackTrace) {
      emit(state.copyWith(status: SignInStatus.failure));
      addError(error, stackTrace);
    }
  }

  Future _onSignInPasswordVisibilityToggled(
    SignInPasswordVisibilityToggled event,
    Emitter emit,
  ) async {
    emit(state.copyWith(isObscure: !state.isObscure));
  }
}
You can check the sign_in_event and the sign_in_state files here.
- sign_up_bloc.dart: This bloc will be responsible for the sign-up flow. It will listen to the SignUpEvent event and emit the correct state. Additionally, it will have events to update the state of the form.
class SignUpBloc extends Bloc {
  SignUpBloc({
    required UserRepository userRepository,
  })  : _userRepository = userRepository,
        super(const SignUpState()) {
    on(_onEmailChanged);
    on(_onPasswordChanged);
    on(_onSignUpSubmitted);
    on(_onSignUpPasswordVisibilityToggled);
  }

  final UserRepository _userRepository;

  void _onEmailChanged(
    SignUpEmailChanged event,
    Emitter emit,
  ) {
    final email = Email.dirty(event.email);
    emit(
      state.copyWith(
        email: email,
        isValid: Formz.validate([email, state.password]),
      ),
    );
  }

  void _onPasswordChanged(
    SignUpPasswordChanged event,
    Emitter emit,
  ) {
    final password = Password.dirty(event.password);
    emit(
      state.copyWith(
        password: password,
        isValid: Formz.validate([password, state.email]),
      ),
    );
  }

  Future _onSignUpSubmitted(
    SignUpSubmitted event,
    Emitter emit,
  ) async {
    if (!state.isValid) return;
    emit(state.copyWith(status: SignUpStatus.loading));
    try {
      await _userRepository.signUp(
        email: event.email,
        password: event.password,
      );
      emit(state.copyWith(status: SignUpStatus.success));
    } catch (error, stackTrace) {
      emit(state.copyWith(status: SignUpStatus.failure));
      addError(error, stackTrace);
    }
  }

  Future _onSignUpPasswordVisibilityToggled(
    SignUpPasswordVisibilityToggled event,
    Emitter emit,
  ) async {
    emit(state.copyWith(isObscure: !state.isObscure));
  }
}
You can check the sign_up_event and the sign_up_state files here.
- confirm_sign_up_bloc.dart: This bloc will be responsible for the sign-up flow confirmation. It will listen to the ConfirmationCodeEvent event and emit the correct state. Additionally, it will have events to update the state of the form.
class ConfirmationCodeBloc
    extends Bloc {
  ConfirmationCodeBloc({
    required UserRepository userRepository,
  })  : _userRepository = userRepository,
        super(const ConfirmationCodeState()) {
    on(_onConfirmationCodeChanged);
    on(_onConfirmationCodeSubmitted);
  }

  final UserRepository _userRepository;

  void _onConfirmationCodeChanged(
    ConfirmationCodeChanged event,
    Emitter emit,
  ) {
    final confirmationCode = ConfirmationCode.dirty(event.confirmationCode);
    emit(
      state.copyWith(
        confirmationCode: confirmationCode,
        isValid: Formz.validate([confirmationCode]),
      ),
    );
  }

  Future _onConfirmationCodeSubmitted(
    ConfirmationCodeSubmitted event,
    Emitter emit,
  ) async {
    if (!state.isValid) return;
    emit(state.copyWith(status: FormzSubmissionStatus.inProgress));
    try {
      await _userRepository.confirmSignUp(
        email: event.email,
        confirmationCode: event.confirmationCode,
      );
      emit(state.copyWith(status: FormzSubmissionStatus.success));
    } catch (error, stackTrace) {
      emit(state.copyWith(status: FormzSubmissionStatus.failure));
      addError(error, stackTrace);
    }
  }
}
You can check the confirmation_code_event and the confirmation_code_state files here.
Create the UI in each feature
Now that we have the blocs ready, we can start creating the UI for each feature.
Sign-in
- sign_in_page.dart: This is the page for the sign-in feature. It will be responsible for creating the bloc and the SignInView widget, as well as initializing the SignInBloc.
class SignInPage extends StatelessWidget {
  const SignInPage({super.key});

  static Page page() => const MaterialPage(child: SignInPage());

  @override
  Widget build(BuildContext context) {
    return BlocProvider(
      create: (context) => SignInBloc(
        userRepository: context.read(),
      ),
      child: const SignInView(),
    );
  }
}- sign_in_view.dart: This is the view of for the sign-in feature. It will be responsible for creating the UI and interacting with the bloc to sign in and check the status of the form.
class SignInView extends StatelessWidget {
  const SignInView({super.key});

  @override
  Widget build(BuildContext context) {
    return BlocListener(
      listener: (context, state) {
        if (state.status == SignInStatus.failure) {
          ScaffoldMessenger.of(context).showSnackBar(
            const SnackBar(
              content: Text('Something went wrong. Try it later or sign up.'),
            ),
          );
        }
      },
      child: Scaffold(
        appBar: AppBar(
          title: const Text('Sign In'),
        ),
        body: const Padding(
          padding: EdgeInsets.symmetric(
            horizontal: AppSpacing.xlg,
          ),
          child: ScrollableColumn(
            children: [
              SizedBox(height: AppSpacing.xxlg),
              _AWSLogo(),
              SizedBox(height: AppSpacing.xxlg),
              _TitleAndSubtitleSignIn(),
              SizedBox(height: AppSpacing.xxlg),
              _EmailTextFieldSignIn(),
              SizedBox(height: AppSpacing.lg),
              _PasswordFieldSignIn(),
              SizedBox(height: AppSpacing.lg),
              _SignInButton(),
              Spacer(),
              _NotAccountSignIn(),
              SizedBox(height: AppSpacing.xxlg),
            ],
          ),
        ),
      ),
    );
  }
}

class _AWSLogo extends StatelessWidget {
  const _AWSLogo();

  @override
  Widget build(BuildContext context) {
    return Assets.images.awsLogo.image(
      key: const Key('signIn_awsLogo'),
      width: 200,
    );
  }
}

class _TitleAndSubtitleSignIn extends StatelessWidget {
  const _TitleAndSubtitleSignIn();

  @override
  Widget build(BuildContext context) {
    final theme = Theme.of(context).textTheme;
    return Column(
      children: [
        Text(
          key: const Key('signIn_title'),
          'Very Good Amplify Login',
          style: theme.headline5,
          textAlign: TextAlign.center,
        ),
        Text(
          key: const Key('signIn_subtitle'),
          'By Very Good Ventures',
          style: theme.caption,
          textAlign: TextAlign.center,
        ),
      ],
    );
  }
}

class _EmailTextFieldSignIn extends StatelessWidget {
  const _EmailTextFieldSignIn();

  @override
  Widget build(BuildContext context) {
    return AppTextField(
      key: const Key('signIn_emailTextField'),
      hintText: 'Email',
      autoFillHints: const [AutofillHints.email],
      keyboardType: TextInputType.emailAddress,
      prefix: const Icon(Icons.email),
      onChanged: (email) => context.read().add(
            SignInEmailChanged(email),
          ),
    );
  }
}

class _PasswordFieldSignIn extends StatelessWidget {
  const _PasswordFieldSignIn();

  @override
  Widget build(BuildContext context) {
    final isObscure = context.select((SignInBloc bloc) => bloc.state.isObscure);
    return AppTextField(
      key: const Key('signIn_passwordTextField'),
      hintText: 'Password',
      autoFillHints: const [AutofillHints.password],
      obscureText: isObscure,
      prefix: const Icon(Icons.lock),
      suffix: IconButton(
        icon: Icon(isObscure ? Icons.visibility : Icons.visibility_off),
        onPressed: () => context.read().add(
              const SignInPasswordVisibilityToggled(),
            ),
      ),
      onChanged: (password) => context.read().add(
            SignInPasswordChanged(password),
          ),
    );
  }
}

class _NotAccountSignIn extends StatelessWidget {
  const _NotAccountSignIn();

  @override
  Widget build(BuildContext context) {
    final theme = Theme.of(context);
    return Padding(
      padding: const EdgeInsets.only(top: AppSpacing.sm),
      child: RichText(
        key: const Key('signIn_notAccountButton'),
        text: TextSpan(
          children: [
            TextSpan(
              text: "Don't have an account? ",
              style: theme.textTheme.bodyText1,
            ),
            TextSpan(
              text: 'Sign Up!',
              style: theme.textTheme.bodyText1?.apply(
                color: AppColors.primary,
              ),
              recognizer: TapGestureRecognizer()
                ..onTap = () => Navigator.of(context).push(
                      SignUpPage.route(),
                    ),
            ),
          ],
        ),
      ),
    );
  }
}

class _SignInButton extends StatelessWidget {
  const _SignInButton();

  @override
  Widget build(BuildContext context) {
    final state = context.watch().state;
    return AppButton(
      key: const Key('signIn_signInButton'),
      onPressed: state.isValid
          ? () => context.read().add(
                SignInSubmitted(
                  state.email.value,
                  state.password.value,
                ),
              )
          : null,
      child: state.status == SignInStatus.loading
          ? const CircularProgressIndicator()
          : const Text('Sign In'),
    );
  }
}
Sign-up
- sign_up_page.dart: This is the page that will be displayed when the user clicks on the Sign Up button. It will be responsible for displaying the SignUpView widget and providing the SignUpBloc to it.
class SignUpPage extends StatelessWidget {
  const SignUpPage({super.key});

  static Route route() {
    return MaterialPageRoute(
      builder: (_) => const SignUpPage(),
    );
  }

  @override
  Widget build(BuildContext context) {
    return BlocProvider(
      create: (context) =>
          SignUpBloc(userRepository: context.read()),
      child: const SignUpView(),
    );
  }
}- sign_up_view.dart: This view will be responsible for displaying the sign-up form and handling the user interactions with it. Also, it is going to be in charge of the SignUpBloc which handles the sign-up process.
class SignUpView extends StatelessWidget {
  const SignUpView({super.key});

  @override
  Widget build(BuildContext context) {
    return BlocListener(
      listenWhen: (previous, current) => previous.status != current.status,
      listener: (context, state) async {
        if (state.status == SignUpStatus.failure) {
          ScaffoldMessenger.of(context).showSnackBar(
            const SnackBar(
              content: Text('Something went wrong. Try it later.'),
            ),
          );
        } else if (state.status == SignUpStatus.success) {
          final navigator = Navigator.of(context);
          await showMaterialModalBottomSheet(
            context: context,
            builder: (context) => ConfirmationCodePage(
              email: state.email.value,
            ),
          );
          // Navigate back when the confirmation code is successful to return to
          // the sign-in page.
          navigator.pop();
        }
      },
      child: Scaffold(
        appBar: AppBar(
          title: const Text('Sign Up'),
        ),
        body: const Padding(
          padding: EdgeInsets.symmetric(
            horizontal: AppSpacing.xlg,
          ),
          child: ScrollableColumn(
            children: [
              SizedBox(height: AppSpacing.xxxlg),
              _SignUpAWSLogo(),
              SizedBox(height: AppSpacing.xxlg),
              _SignUpTitleAndVGVLogo(),
              SizedBox(height: AppSpacing.xxlg),
              _EmailTextFieldSignUp(),
              _PasswordFieldSignUp(),
              Spacer(),
              _SignUpButton(),
              SizedBox(height: AppSpacing.xxlg),
            ],
          ),
        ),
      ),
    );
  }
}

class _SignUpAWSLogo extends StatelessWidget {
  const _SignUpAWSLogo();

  @override
  Widget build(BuildContext context) {
    return Assets.images.awsLogo.image(
      key: const Key('signUp_awsLogo'),
      width: 200,
    );
  }
}

class _SignUpTitleAndVGVLogo extends StatelessWidget {
  const _SignUpTitleAndVGVLogo();

  @override
  Widget build(BuildContext context) {
    final theme = Theme.of(context).textTheme;
    return Column(
      children: [
        Assets.images.vgvLogo.image(
          key: const Key('signUp_vgvLogo'),
          width: 150,
        ),
        const SizedBox(height: AppSpacing.xxlg),
        Text(
          key: const Key('signUp_title'),
          'Fill out the form to Sign Up',
          style: theme.headline5,
          textAlign: TextAlign.center,
        ),
      ],
    );
  }
}

class _EmailTextFieldSignUp extends StatelessWidget {
  const _EmailTextFieldSignUp();

  @override
  Widget build(BuildContext context) {
    return AppTextField(
      key: const Key('signUp_emailTextField'),
      hintText: 'Email',
      autoFillHints: const [AutofillHints.email],
      keyboardType: TextInputType.emailAddress,
      prefix: const Icon(Icons.email),
      onChanged: (email) => context.read().add(
            SignUpEmailChanged(email),
          ),
    );
  }
}

class _PasswordFieldSignUp extends StatelessWidget {
  const _PasswordFieldSignUp();

  @override
  Widget build(BuildContext context) {
    final isObscure = context.select((SignUpBloc bloc) => bloc.state.isObscure);
    return AppTextField(
      key: const Key('signUp_passwordTextField'),
      hintText: 'Password',
      autoFillHints: const [AutofillHints.password],
      obscureText: isObscure,
      prefix: const Icon(Icons.lock),
      suffix: IconButton(
        icon: Icon(isObscure ? Icons.visibility : Icons.visibility_off),
        onPressed: () => context.read().add(
              const SignUpPasswordVisibilityToggled(),
            ),
      ),
      onChanged: (password) => context.read().add(
            SignUpPasswordChanged(password),
          ),
    );
  }
}

class _SignUpButton extends StatelessWidget {
  const _SignUpButton();

  @override
  Widget build(BuildContext context) {
    final state = context.watch().state;
    return AppButton(
      key: const Key('signUp_signUpButton'),
      onPressed: state.isValid
          ? () => context.read().add(
                SignUpSubmitted(
                  state.email.value,
                  state.password.value,
                ),
              )
          : null,
      child: state.status == SignUpStatus.loading
          ? const CircularProgressIndicator()
          : const Text('Sign Up'),
    );
  }
}
You can see that we’re using a showMaterialModalBottomSheet to show the confirmation code page. This is possible thanks to the modal_bottom_sheet package, created by our teammate Jaime Blasco, you can find more types of modal bottom sheets in the package documentation.
Confirmation Code
- confirmation_code_page.dart: This page will be responsible for displaying the confirmation code form and handling the user interactions with it.
class ConfirmationCodePage extends StatelessWidget {
  const ConfirmationCodePage({super.key, required this.email});

  final String email;

  @override
  Widget build(BuildContext context) {
    return BlocProvider(
      create: (context) => ConfirmationCodeBloc(
        userRepository: context.read(),
      ),
      child: ConfirmationCodeForm(email: email),
    );
  }
}- confirmation_code_form.dart: This widget will be responsible for displaying the confirmation code form modal and handling the user interactions with it. It will also be in charge of the ConfirmationCodeBloc which handles the confirmation code process.
class ConfirmationCodeForm extends StatelessWidget {
  const ConfirmationCodeForm({
    super.key,
    required this.email,
  });

  final String email;

  @override
  Widget build(BuildContext context) {
    return BlocListener(
      listener: (context, state) {
        if (state.status == FormzSubmissionStatus.success) {
          Navigator.of(context).pop();
        }
      },
      child: Padding(
        key: const Key('confirmationCodeForm_confirmationCodeModal'),
        padding: MediaQuery.of(context).viewInsets.copyWith(
              left: AppSpacing.lg,
              right: AppSpacing.lg,
            ),
        child: Column(
          mainAxisSize: MainAxisSize.min,
          crossAxisAlignment: CrossAxisAlignment.start,
          children: [
            const SizedBox(height: AppSpacing.xxlg),
            _ConfirmationCodeTitle(email: email),
            const SizedBox(height: AppSpacing.xxlg),
            const _ConfirmationCodeTextFieldSignUp(),
            const SizedBox(height: AppSpacing.xxlg),
            _ConfirmationCodeButton(email: email),
            const SizedBox(height: AppSpacing.xxlg),
          ],
        ),
      ),
    );
  }
}

class _ConfirmationCodeTitle extends StatelessWidget {
  const _ConfirmationCodeTitle({
    required this.email,
  });

  final String email;

  @override
  Widget build(BuildContext context) {
    final theme = Theme.of(context).textTheme;
    return Text(
      key: const Key('confirmationCodeForm_title'),
      'Add the confirmation code \nreceived on $email',
      style: theme.bodyMedium,
    );
  }
}

class _ConfirmationCodeTextFieldSignUp extends StatelessWidget {
  const _ConfirmationCodeTextFieldSignUp();

  @override
  Widget build(BuildContext context) {
    final state = context.watch().state;
    return AppTextField(
      key: const Key('confirmationCode_codeTextField'),
      hintText: 'Confirmation code',
      keyboardType: TextInputType.number,
      prefix: const Icon(Icons.numbers),
      errorText: state.status.isFailure ? 'Invalid code' : null,
      onChanged: (code) => context.read().add(
            ConfirmationCodeChanged(code),
          ),
    );
  }
}

class _ConfirmationCodeButton extends StatelessWidget {
  const _ConfirmationCodeButton({
    required this.email,
  });

  final String email;

  @override
  Widget build(BuildContext context) {
    final state = context.watch().state;
    return AppButton(
      key: const Key('confirmationCodeForm_confirmationCodeButton'),
      onPressed: state.isValid
          ? () => context.read().add(
                ConfirmationCodeSubmitted(
                  email,
                  state.confirmationCode.value,
                ),
              )
          : null,
      child: const Text('Confirm code'),
    );
  }
}
App
- app.dart: This page will initialize the AppBloc and the UserRepository. We will use a boolean to check if the user is authenticated or not. This widget will also be responsible for displaying the app_view widget.
class App extends StatelessWidget {
  const App({
    super.key,
    required UserRepository userRepository,
    required bool isAuthenticated,
  })  : _userRepository = userRepository,
        _isAuthenticated = isAuthenticated;

  final UserRepository _userRepository;
  final bool _isAuthenticated;

  @override
  Widget build(BuildContext context) {
    return RepositoryProvider.value(
      value: _userRepository,
      child: BlocProvider(
        create: (context) => AppBloc(
          userRepository: _userRepository,
          isAuthenticated: _isAuthenticated,
        ),
        child: const AppView(),
      ),
    );
  }
}- app_view.dart: This widget will be responsible for displaying the correct view depending on the auth_state. To control which view should be displayed, we’re going to use FlowBuilder and the status store in the AppBloc.
class AppView extends StatelessWidget {
  const AppView({super.key});

  @override
  Widget build(BuildContext context) {
    return MaterialApp(
      themeMode: ThemeMode.light,
      theme: const AppTheme().themeData,
      darkTheme: const AppDarkTheme().themeData,
      localizationsDelegates: const [
        AppLocalizations.delegate,
        GlobalMaterialLocalizations.delegate,
      ],
      supportedLocales: AppLocalizations.supportedLocales,
      home: FlowBuilder(
        state: context.select((AppBloc bloc) => bloc.state.status),
        onGeneratePages: onGenerateAppViewPages,
      ),
    );
  }
}
We can have three possible states to display the needed view:
- AppStatus.authenticated: This state will be displayed when the user is authenticated. In this case we’re going to display the HomePage widget.
- AppStatus.unauthenticated: This state will be displayed when the user is not authenticated. In this case we’re going to display the SignInPage widget.
- AppStatus.sessionExpired: This state will be displayed when the user session has expired. In this case we’re going to display the SignInPage widget.
List> onGenerateAppViewPages(
  AppStatus state,
  Listdynamic>> pages,
) {
  switch (state) {
    case AppStatus.unauthenticated:
      return [SignInPage.page()];
    case AppStatus.authenticated:
      return [HomePage.page()];
    case AppStatus.sessionExpired:
      return [SignInPage.page()];
  }
}
HomePage
- home_page.dart: This page will be displayed when the user is authenticated. In this page we’re going to display the home_view widget.
class HomePage extends StatelessWidget {
  const HomePage({super.key});

  static Page page() => const MaterialPage(child: HomePage());

  @override
  Widget build(BuildContext context) {
    return const HomeView();
  }
}- home_view.dart: This view is the last view that we’re going to display. If the user can see this view it means that the user is authenticated. Here, we’re have the possibility to sign out the user.
class HomeView extends StatelessWidget {
  const HomeView({super.key});

  @override
  Widget build(BuildContext context) {
    return Scaffold(
      appBar: AppBar(
        title: const Text('Home'),
      ),
      body: const Padding(
        padding: EdgeInsets.symmetric(
          horizontal: AppSpacing.lg,
        ),
        child: ScrollableColumn(
          children: [
            SizedBox(height: AppSpacing.xxxlg),
            _AppLogos(),
            SizedBox(height: AppSpacing.xxxlg),
            _TitleAndSubtitle(),
            Spacer(),
            _SignOutButton(),
            SizedBox(height: AppSpacing.xxlg),
          ],
        ),
      ),
    );
  }
}

class _AppLogos extends StatelessWidget {
  const _AppLogos();

  @override
  Widget build(BuildContext context) {
    return Row(
      key: const Key('homeView_appLogos'),
      mainAxisAlignment: MainAxisAlignment.spaceEvenly,
      children: [
        Assets.images.vgvLogo.image(width: 200),
        Assets.images.awsLogo.image(width: 100),
      ],
    );
  }
}

class _TitleAndSubtitle extends StatelessWidget {
  const _TitleAndSubtitle();

  @override
  Widget build(BuildContext context) {
    final theme = Theme.of(context);
    return Column(
      key: const Key('homeView_titleAndSubtitle'),
      crossAxisAlignment: CrossAxisAlignment.start,
      children: [
        Text(
          'Welcome to Very Good Amplify Login App',
          style: theme.textTheme.headline4,
        ),
        const SizedBox(height: AppSpacing.lg),
        Text(
          'Made with 💙 by Very Good Ventures 🦄 and AWS Amplify.',
          style: theme.textTheme.headline6,
        ),
        const SizedBox(height: AppSpacing.xxlg),
        Text(
          'Congratulations, you followed the tutorial and '
          'successfully logged in! Now you can try out the sign-out.',
          style: theme.textTheme.bodyText1,
        ),
      ],
    );
  }
}

class _SignOutButton extends StatelessWidget {
  const _SignOutButton();

  @override
  Widget build(BuildContext context) {
    return AppButton(
      key: const Key('homeView_signOutButton'),
      child: const Text('Sign Out'),
      onPressed: () => context.read().add(const AppSignOutRequested()),
    );
  }
}
Add configure Amplify method to the bootstrap file
Now we’re going to add the configureAmplify method to the bootstrap.dart file. This method will be responsible for configuring the Amplify plugins and the AmplifyAuthCognito plugin.
Future configureAmplify() async {
  await Amplify.addPlugins([AmplifyAuthCognito()]);
  await Amplify.configure(amplifyConfiguration);
}
Call it into bootstrap method.
Future bootstrap(FutureOr Function() builder) async {
  WidgetsFlutterBinding.ensureInitialized();
  await configureAmplify(); // <--- Add this line
  FlutterError.onError = (details) {
    log(details.exceptionAsString(), stackTrace: details.stack);
  };
  Bloc.observer = AppBlocObserver();
  await runZonedGuarded(
    () async => runApp(await builder()),
    (error, stackTrace) => log(error.toString(), stackTrace: stackTrace),
  );
}
Conclusion
We’ve seen how easy is to use AWS Amplify and implement a sign-in and sign-up flow in a Flutter application using the AmplifyAuthCognito plugin and the Very Good Ventures tools and best practices. One thing we appreciate about using AWS Amplify is that it’s very well-documented!
In addition to authentication, AWS Amplify provides you with other utilities such as:
- Data
- Storage
- Functions
- GraphQL API
- REST API
- Analytics
- Predictions
- UI Library
If you are thinking to build an application that requires authentication, data modeling, storage and more. AWS Amplify is a great option.
To start working with AWS Amplify I highly recommend you to read the AWS Amplify documentation and the AWS Amplify Flutter documentation. For any issues, see the AWS Amplify GitHub repository.
Hope you enjoyed it! If you are interested in testing this application, check out our GitHub repository with this example.
Happy coding!💻